


While Lohnes and Reynolds were off devouring their 14th platter of free shrimp at SEMA, they forgot they never confiscated my keycard to BangShift HQ, giving me — the most hated man in BangShift history — free license to sabotage the whole works. I figured it would be a good time to wrap up the Blazer story I’ve been working on since approximately January 12, 1946.
As you’ll recall, I left the class at Assabet Tech with a truck that was in pretty good, solid shape body-wise, but with no paint on it. I had a couple of options: one was to find a paint shop that would spray the truck for a reasonable fee, two was to hit MAACO for their $299 Spring Paint special (more on that in a second), and the third was to paint it myself in my own garage, with rollers and Rustoleum, as you’ve seen before in Hot Rod, and at RickWrench’s $50 Paint Job website.
I really wanted to go with Option 2, since I figured I could mask it off myself, do all the prep work and have them spray it. I’d have it back in a few days with new paint, and do all the wet sanding and buffing on my own. I took the truck over to the MAACO closest to me and was all set to sign up for the Spring Paint Special, which should’ve cost $499, according to the ad on TV.
The guy running the place came out to look at the truck and said, “Yeah, we can do that for about $799.”
$799? I want that Spring Paint Special. “Yeah, that’s it. The $499 is for cars the size of a Geo Metro. This is WAAAAAAY more difficult. Gonna cost $799.”
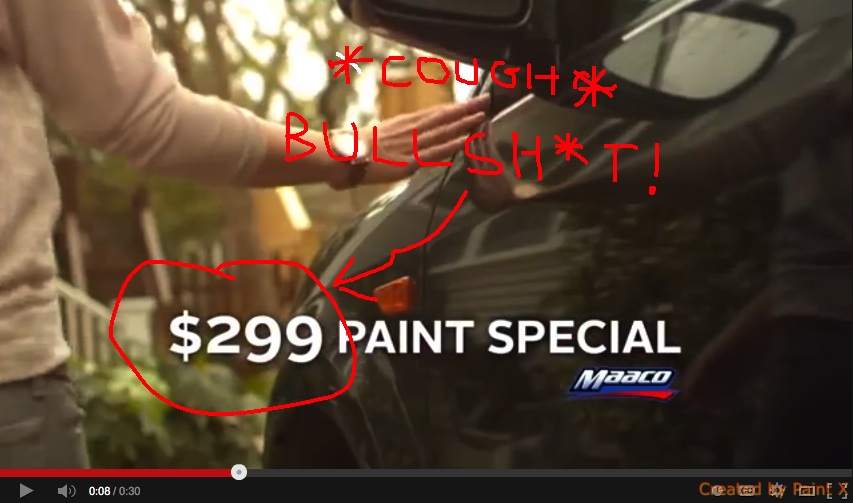
Uh. Hang on. At least 1/4 of this truck is the removable top, which I’m going to do myself, and which you don’t have to spray. All you’ve got to do is the hood, front fenders, doors, quarters and tailgate. Paint-wise, I would imagine you’re going to use MAYBE a pint more than you would spraying a Metro.
“Nope. $799.”
OK, Option 3 it is.
I bought a gallon of Gloss Black Rustoleum paint, a couple of packages of foam rollers, some mineral spirits and a paint bucket and rolled the finish on myself.
I used four coats, which gave me plenty of paint to cover and sand without much worry of sanding through. As I mentioned last time, the paint went on pretty smooth, and I wetsanded it up to 2,000 grit.

That left a pretty uniform, dull finish that I had to buff out to get back to a decent shine. I bought a Porter Cable 7424XP variable speed random orbital buffer to do the job. It comes with a foam pad, but the first thing you want to do is throw that piece of junk right in the trash.
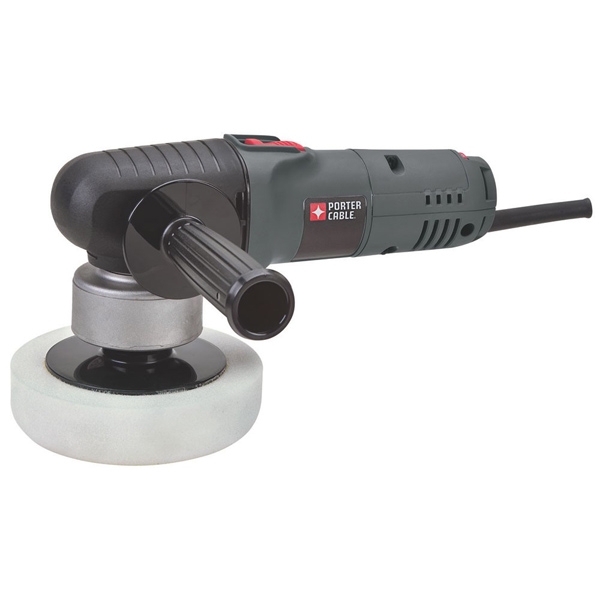
I bought a 7-inch hook and loop backing plate from Autopia.com for $23.

That allows you to use a kit like this one that Autopia sells. The orange pads are for the cut and buff, and the black pads are for the polish.
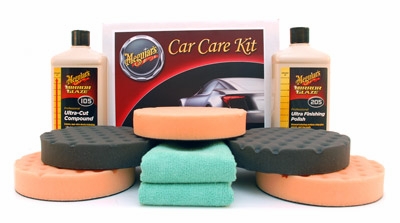
However, I learned pretty quickly that the Meguiar’s stuff in this kit blows. Everybody recommended it, but for some reason, it made everything significantly worse when I used it. I was really worried that the truck would come out looking lousy. It simply wouldn’t come off, no matter how hard I tried.
I was talking with a guy at an auto body supply shop, and he recommended Presta Ultra Cutting Creme, and that stuff worked like a charm. I did two rounds with it and the results were absolutely awesome.
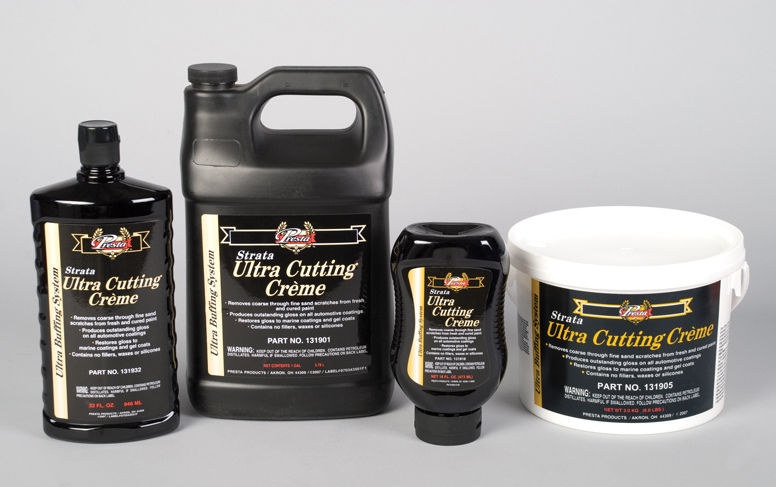
I liked it so much I bought Presta Ultra Polish, and I’m now a full-blown Presta advocate. The stuff is great.
The Blazer started looking pretty good, so I started reassembling all the stuff I took off months before. I bought new bumpers from LMC and rolled white on those. The only thing I sprayed on was the backside of the bumpers, because it was kind of a pain to get a roller in there.
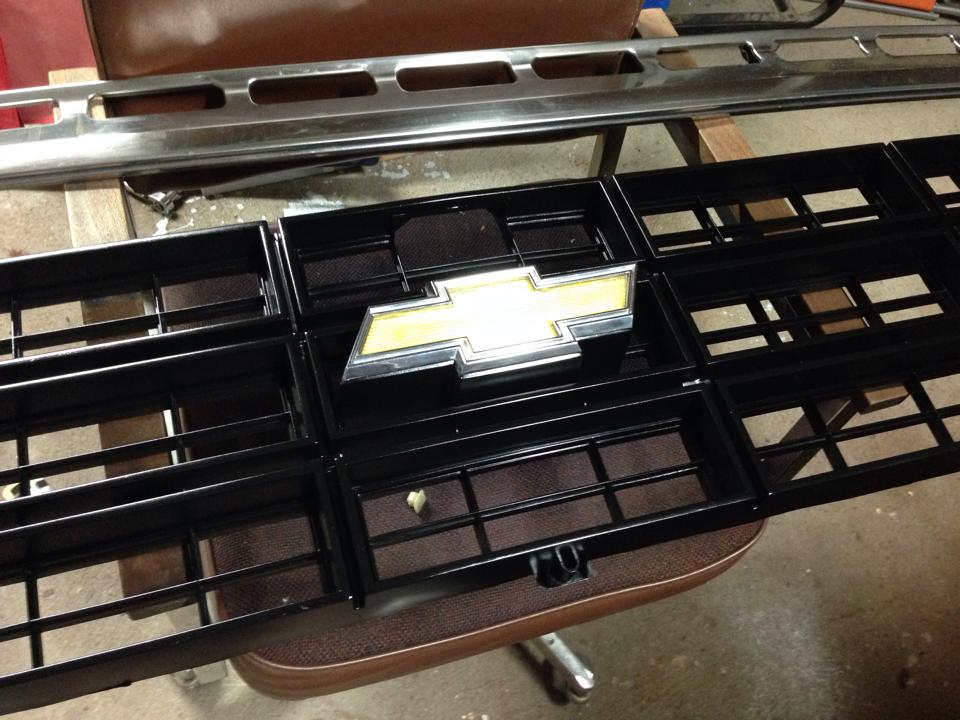
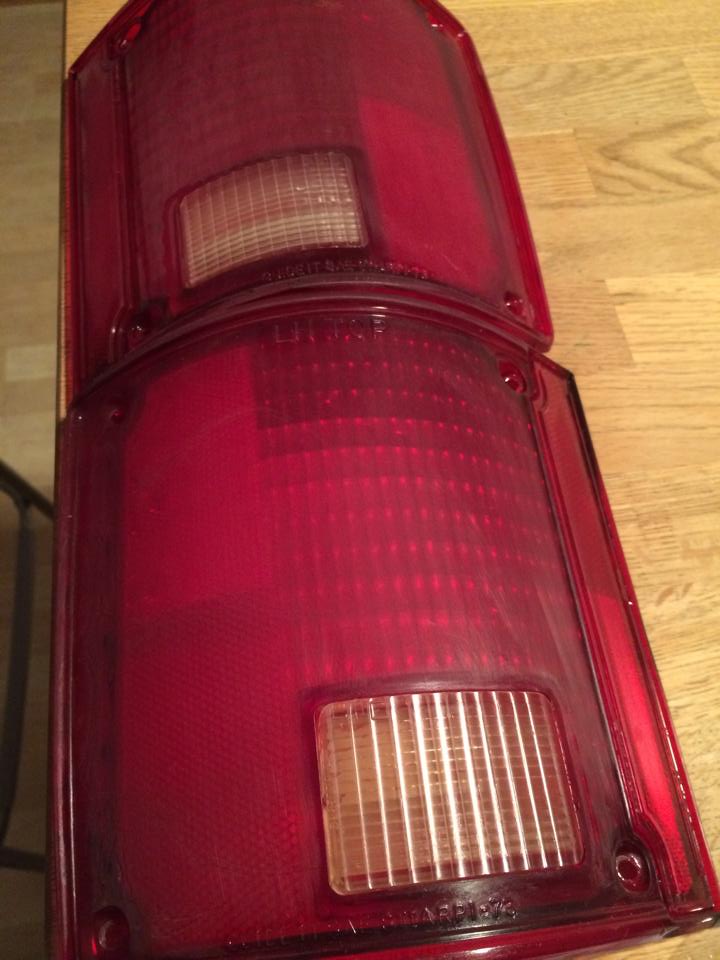
I cleaned up and sprayed the plastic grille black, and I used the cutting creme and polish to clean up the plastic tail lamps.

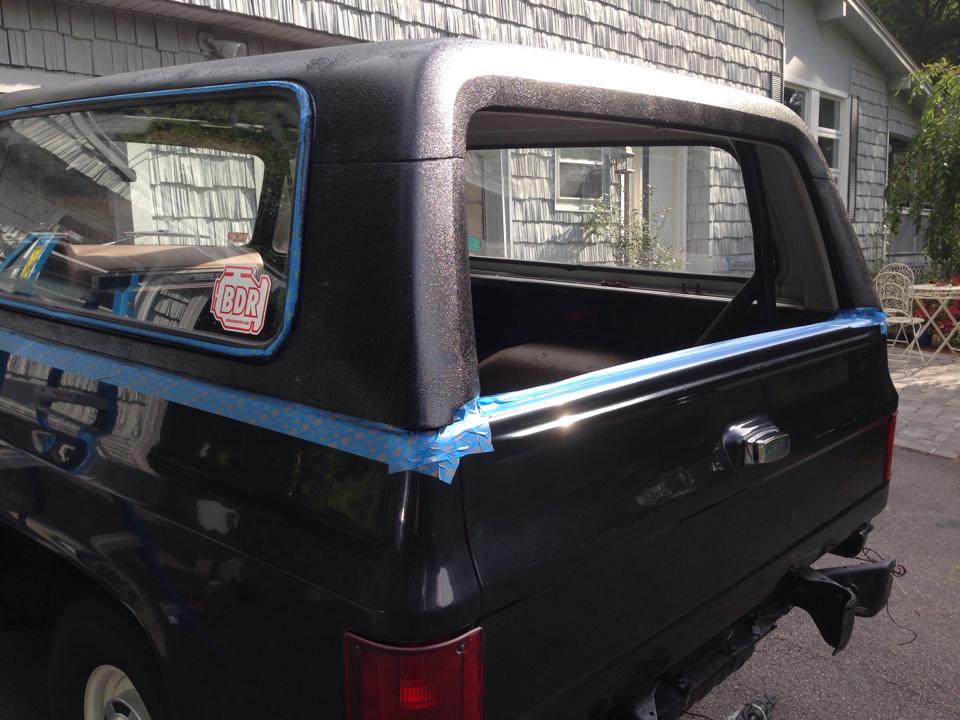
The roof of the Blazer was finished in black, and it was whatever rough finish they were squirting on these trucks in 1979. It was starting to peel off pretty badly on the very top, and the rest of it looked pretty shabby. I bought a gallon of Herculiner, which comes with a roller. The stuff is noxious. Even outside, I had a minor acid trip and thought I was on stage at the Monterey Pop Festival with Otis Redding.
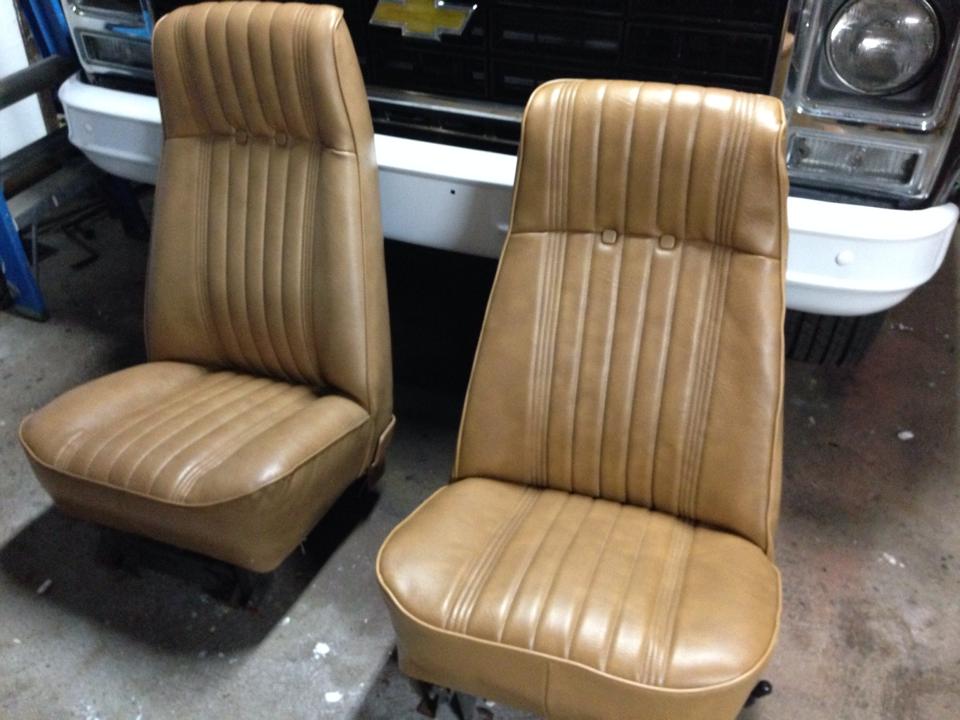
Inside, I had John Kelly at Kelly Upholstery in Natick, Massachusetts recover the driver’s seat, which was in tough shape. I could’ve bought a new kit from LMC, but that would’ve cost $800, and I would’ve had to recover all three seats to get them to match. For $400, John did a great job matching the color and pattern of the vinyl, and sewed me a cover that’s exactly the same design as the passenger seat.
I bought a carpet set from LMC, too. Here’s the thing with carpets: They’re a royal pain in the ass to install. You basically get a carpet that’s pretty much molded to the shape of the interior, but fitting it properly takes hours. It’s a really inexact science to get it to lay down correctly, and the very first thing you have to do is cut holes in it for the shifter, the 4WD selector, the seats, the console and everything else that bolts in place.

The best method I found for doing it was to heat up an old phillips screwdriver or an awl with a Bernzomatic and melt through the carpet from the underside. The mount locations for the seats are all huge, so it’s easy to see where the holes should be. It’s a little trickier to do the shifter, because it stays in place and you have to cut around it. Just err on the side of too small. You can always make a hole bigger, but you can’t make it smaller.
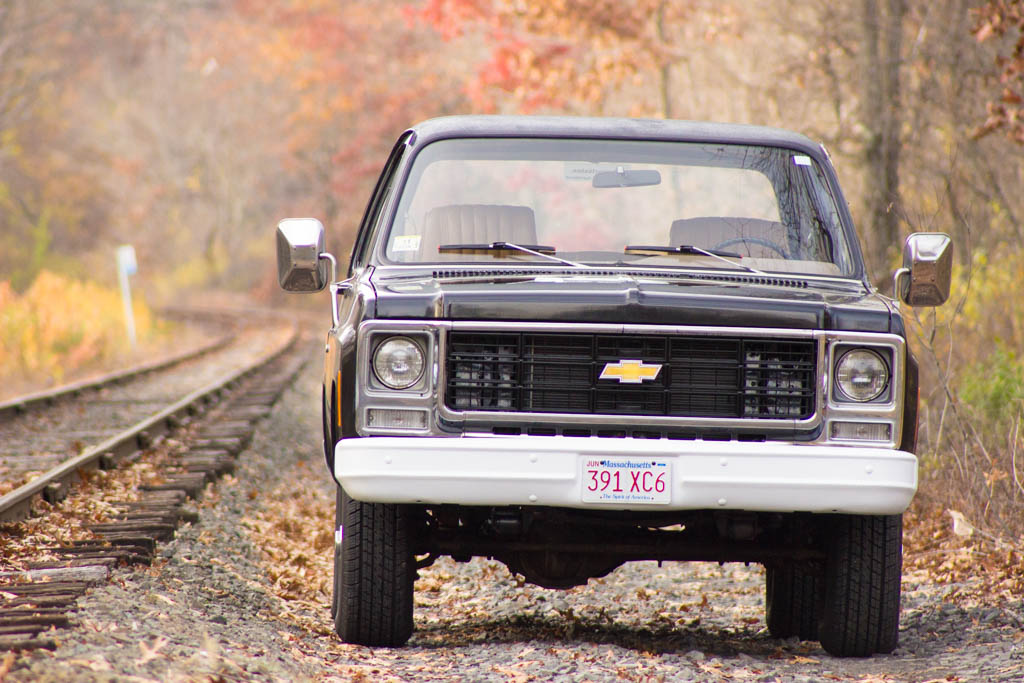
It really took me close to a month of weekend days to button up most of everything. I still have a few loose ends to sort out, but I’m really happy with how it turned out.
Here’s a refresher on what the truck looked like when I got it:

…and here’s what it looks like today.

THERE’S A DOZEN MORE PHOTOS OF CRAIG’S BLAZER ON HIS SITE AT BESTRIDE.COM.
(Thanks again to LMC for providing some of the early sheetmetal and rubber parts for the project.)


Looks good.
Thanks for the tips on the buffer and polishing compound, I’m getting ready to spray my rig, too.
That Porter Cable buffer works great.
Meguiars has one, too, but my understanding is that they’ve blown out their ability to produce them fast enough.
Griot’s Garage sells one in a kit that I’ve used before, and that one works great, too.
I got the Porter Cable one because it was relatively inexpensive and available on the shelf at Lowe’s on a Friday afternoon.
Good luck spraying yours. It’s a learning process, for sure, but it made for a fun summer.
Sweet! Thanks for the tip!
I did a rattle-can job on my old FJ40 years ago, orange-peel aplenty. When I paint my truck I really want it to look more passable than my previous work.
The orange peel is kind of a pain in the ass, but you can fix it. You just need to sand forever.
When I do this again, I’m going to spend a LOT more time sanding the primer before I roll paint on. It’s pretty smooth, but it could be a lot better.
I’m really happy with it, but I’m already think about what my next project is going to be.
Fitzgerald back at bangshift ?
Guess I’ll have to stop my plans
On dropping off that flameing bag of
DOG CRAP on your porch !!!!!
WELCOME BACK **
I’m currently hunkered down in a supply closet at BangShift HQ (i.e., an old metal building where they used to store Dioxin in the 1950s). I’m posting from here until they geolocate me and have me arrested.
Congrats on the paint job! looks good man!
I get all my parts LMC also, great service too!
Yeah, I should mention something about that:
The first thing I did was to buy inner fenders. They showed up at the house a couple of days after I ordered them and everything fit great.
The only thing I didn’t like was that they were festooned with stickers from the warehouse with barcodes and all kinds of stuff, which is totally fine, but they were stuck on with adhesive that took heat, a razor blade and goof off to remove.
I posted a brief, not-too-serious complaint on the Facebook page.
24 hours later, I had a private message, an email, and a phone call from customer service, relaying my complaint to the folks in the warehouse. They also sent me a $30 gift certificate for my trouble.
Fantastic customer service. I can’t say enough about them. Really great people.
L.O.L.
DOES YOUR VESPA FIT IN THE BACK OF YOUR BLAZER !!!!!
IF NOT …I’M SURE ONE OF THE GUYS AROUND THERE WOULD BE HAPPY TO
MAKE IT FIT…BY APPROPRIATELY
SMASHING IT WITH YOUR
RESTORED BLAZER !!!!! L.O. L.
OR YOU COULD JUST SELL IT
AND USE THE MONEY TO BOND
YOURSELF OUT OF JAIL !!!!!!
***JUST KIDDING***
WELCOME BACK TO
” THE BEST CAR- JUNKIES
WEBSITE EVER ” *******
The permanent Caps-lock makes it hard to tell if this is sarcasm or blind fanaticism…
I’ll take it either way!
Just… KIDDING…!!!!!!!
Having a little fun with
*VESPA MAN *
FYI different finishes like different compounds, it can even depend on things like how many hours or weeks or years whatever kind of paint has been on there and it’s often a matter of experience to know the best for the application. The first one tried may “blow” but if you call ’em up they might tell you sorry but they’re really not trying to sell this particular stuff to the fresh Rustoleum guys, actually…it’s for a different (really different) type of paint. Glad you came across something that worked, anyhow.
It’s always good to know a competent upholstery guy, that is one area where DIY effort can be a little less successful. Nice to see it all done.
I like it. I’d take it. It wouldn’t be completely stock, but I’d keep the wheels and the overall look the same. Would sit nice with about 4″ lift and 33s. Cool build as it is though.