


(Words and photos by Scott Liggett) – If you have been following along on our Project Hay Hauler, ’67 GMC C1500 pickup, owned by our contributor Scott Liggett, you would have seen how he has been working to make the truck a daily driver without blowing out the wallet on expensive, new parts. With ingenuity and a bunch of trips to the junkyard, Scott has made his truck far more good looking and comfortable to drive. He was able to get wheels, tires, and even leather bucket seats all at the junkyard. See the links below to the two previous installments on Project Hay Hauler.
It was becoming increasingly clear that the 350 that came with the truck was just thrown together to get it running and driving. While it did run smooth and started every day very reliably, the engine had blow by at highway speeds to the point the breather was completely soaked with oil as well as the firewall behind it after an hour at any speed about 50 mph. The engine lacked any kind of power at all. A full throttle run, and the engine would fall flat around 4000 rpm with a giant puff of smoke when I shifted. Besides, I wanted more horsepower.
While the granny low, SM420 transmission worked perfectly and even the shifter did not have the usual sloppiness after 48 years, it did suffer from not having anything resembling highway gearing. It did have 1:1 fourth gear, but the 7.05 first gear was all but useless for anything that didn’t include hauling a tree stump out of the ground. Anyone who has ever driven a truck with this transmission and the later SM465, starting from a stop in second gear is the normal operation for day to day driving. The 3.54 gears in the Dana 44 rear differential were great for off the line performance, but not so great for tooling down the interstate. Since this truck was my daily driver, this includes regular jaunts down the highway, I needed to make some changes.

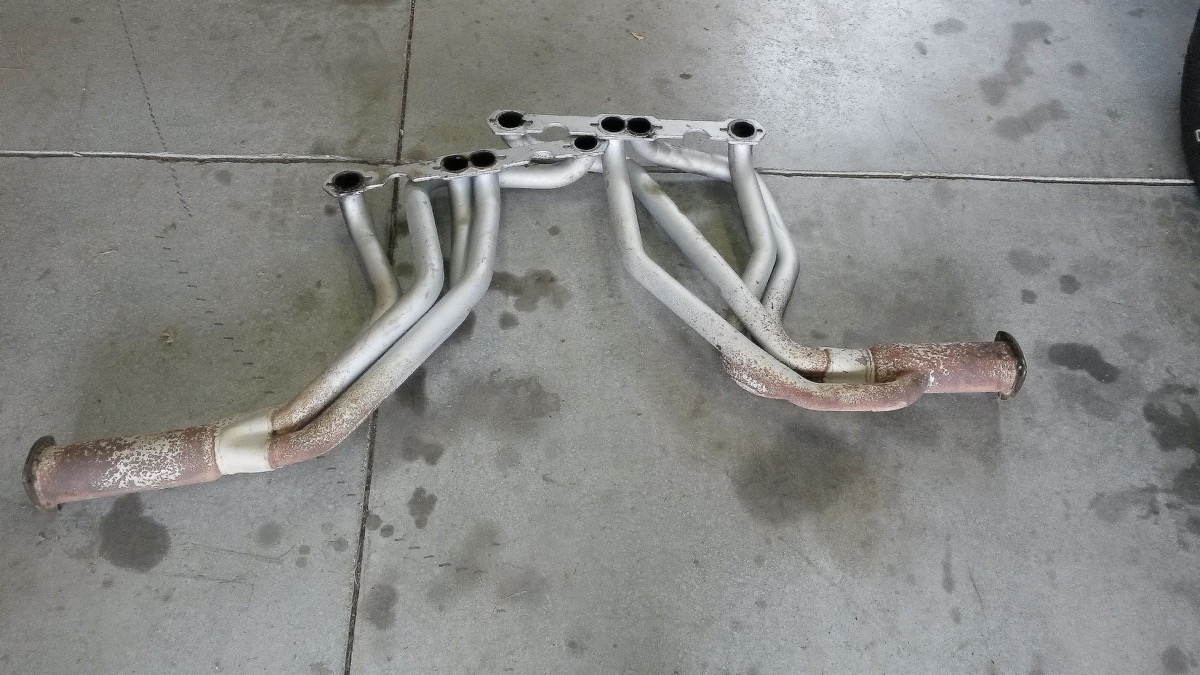
If you remember from my first installment on the truck, the 350 had a Edelbrock Performer intake manifold for the 1987-1995 Swirl Port TBI heads, a Holley 600 vacuum secondary, part # 0-80457SA, and an old Mallory Unilite with matching Mallory coil. The truck also came with Flowtech Afterburner headers for 73-87 GM pickups and a crusty 2 1/2″ dual exhaust with 30 inch long glass packs. The headers looked solid even though the lower half of them was covered in rust.
I thought about building an engine for the truck from scratch by finding a core block, paying for machine work, buying all the parts necessary to rebuild an engine including cam, valve train, and cylinder heads. Then reassemble everything. Even doing all the work myself, with the exception of the machine work, the cost would be getting very close to a crate engine. I have assembled a few engines over the years, most recently rebuilding my 1970 Caprice’s 454 last year, but getting machine work done is getting harder and harder every day. There used to be machine shops in nearly every town in America. If not, many parts stores had machine shops to get engines rebuilt as well. But, the market has changed over the years to where the engine now outlasts most cars. As a result the local trustworthy machine shops are drying up and closing left and right.
It’s no secret that I work for BluePrint Engines, so it seemed natural to go into their catalog of small block Chevy’s to find one that fit my budget and my wants for a replacement engine. I chose BluePrint’s BP35512CT1. It’s a very popular 355 that BluePrint that includes their 195cc Muscle Series Aluminum heads and a hydraulic flat tappet camshaft. This engine is one of their base long block engines that is rated at 375 HP and 405 Torque. I wasn’t sure if this engine would fit my wants for power, but a drive in a friend’s ’63 Impala with this engine and a four speed convinced me that it had plenty of power for how I drive my truck.


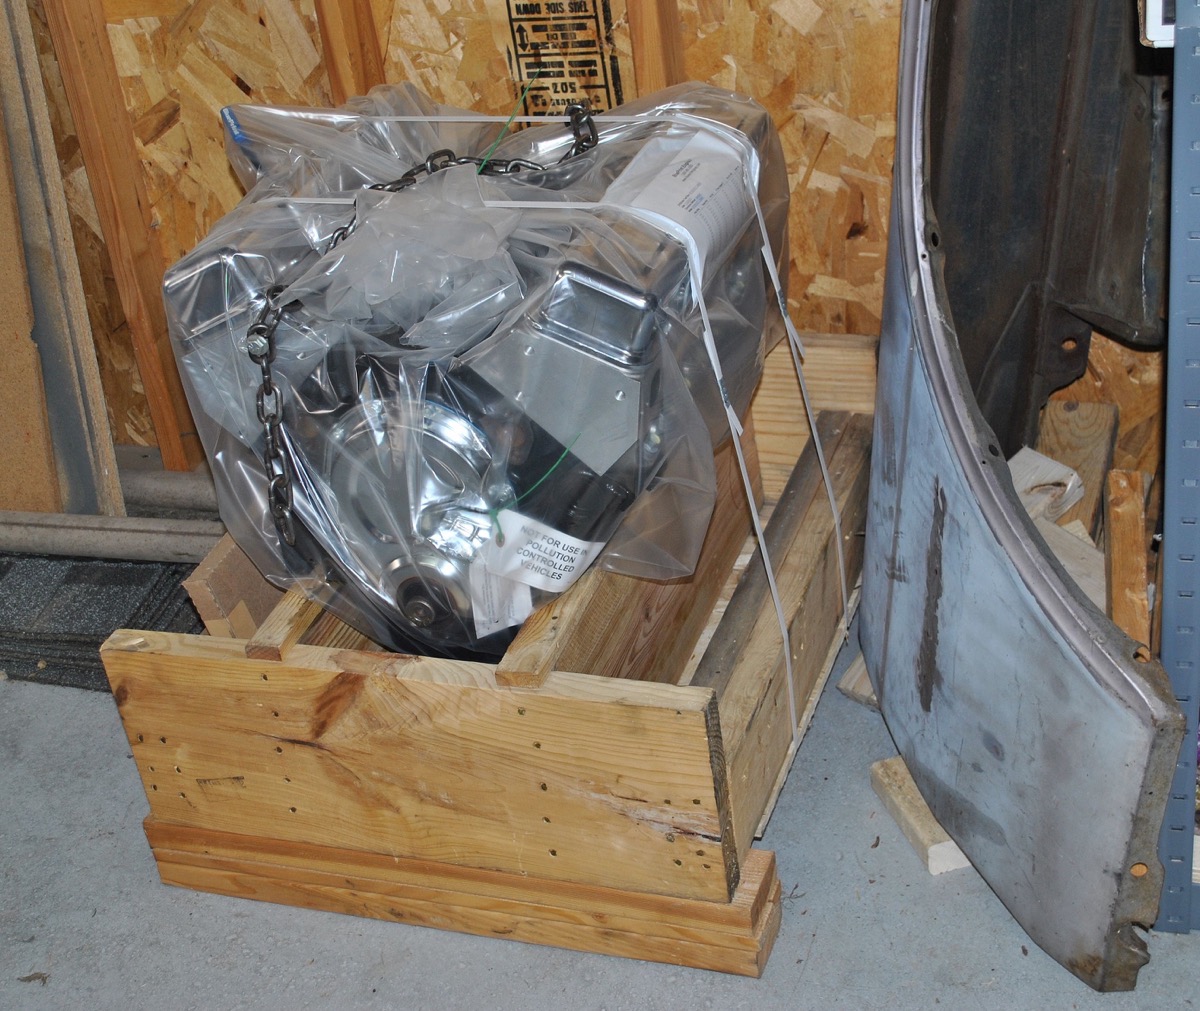
This is how BluePrint Engines ships their engines. In a crate, no really. The engine is bagged and bolted and strapped to the crate’s bottom to keep it from moving around in shipping.


BluePrint dyno tests everyone of these 355’s as part of their quality control process. The dyno results are shipped with the engine as you can see in these pictures.
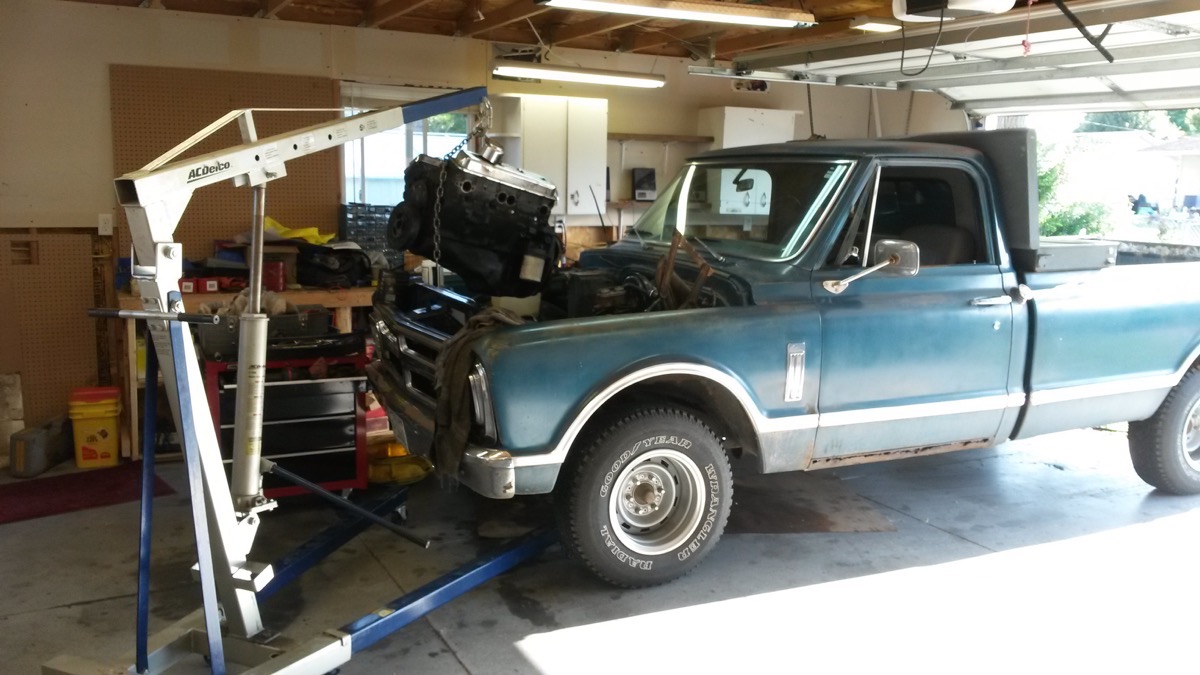
I pulled the top of the crate off in order to pull it out of the truck with a borrowed cherry picker. The engine got set in the corner for a bit as I got to work on pulling the old engine. The first thing I needed to do, before pulling the old engine, was to make room to put it somewhere. So, I figured get the new engine on the stand. I had one of more beefier stands from Harbor Freight and it was working great.

Next, was to start pulling the old engine. I got help removing the hood from a friend, pulled the truck in my two car garage and got busy tearing stuff apart.

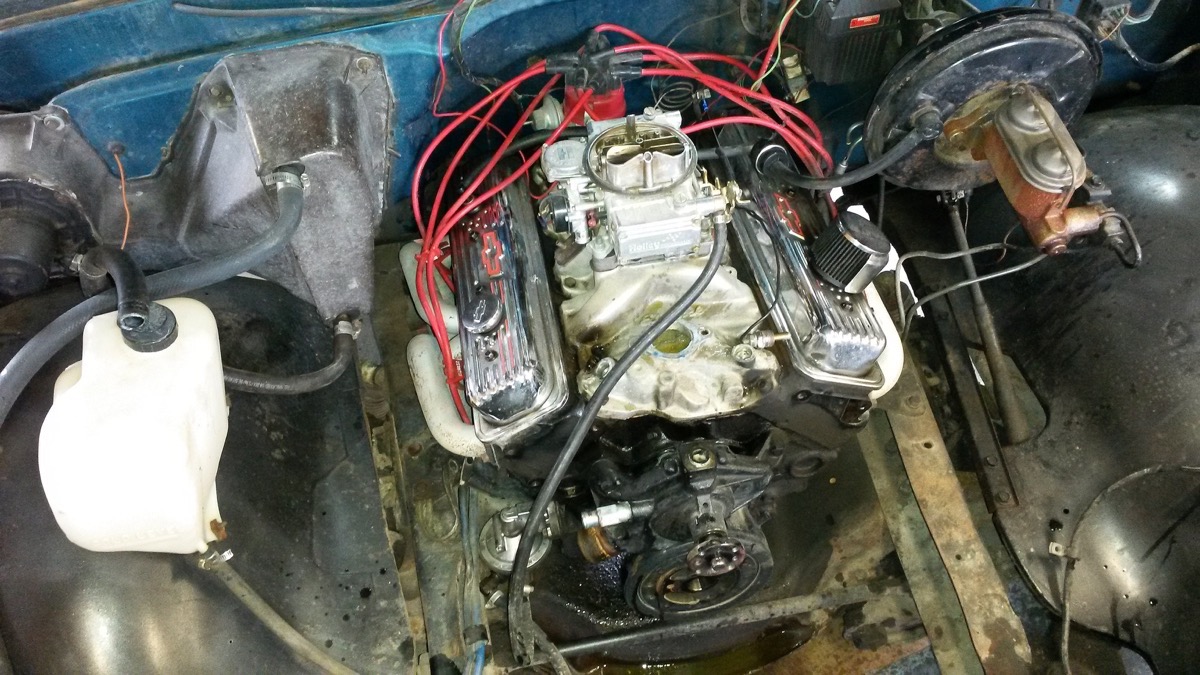
As you can see my old 350 was a giant blob of grease even after I spent some time degreasing it.

I had to push the truck back in the garage until the bed was outside in order to have room for the engine hoist. Still, after 20 years of working outside, this garage is a palace.

There is the lump of iron and grease SM420 four speed. The easy way to get it out was to slide a floor jack under it, unbolt it from the cross member, then remove trans tunnel, and then remove shifter. Then drop the jack and slide it out. It weighs a good 80 lbs.
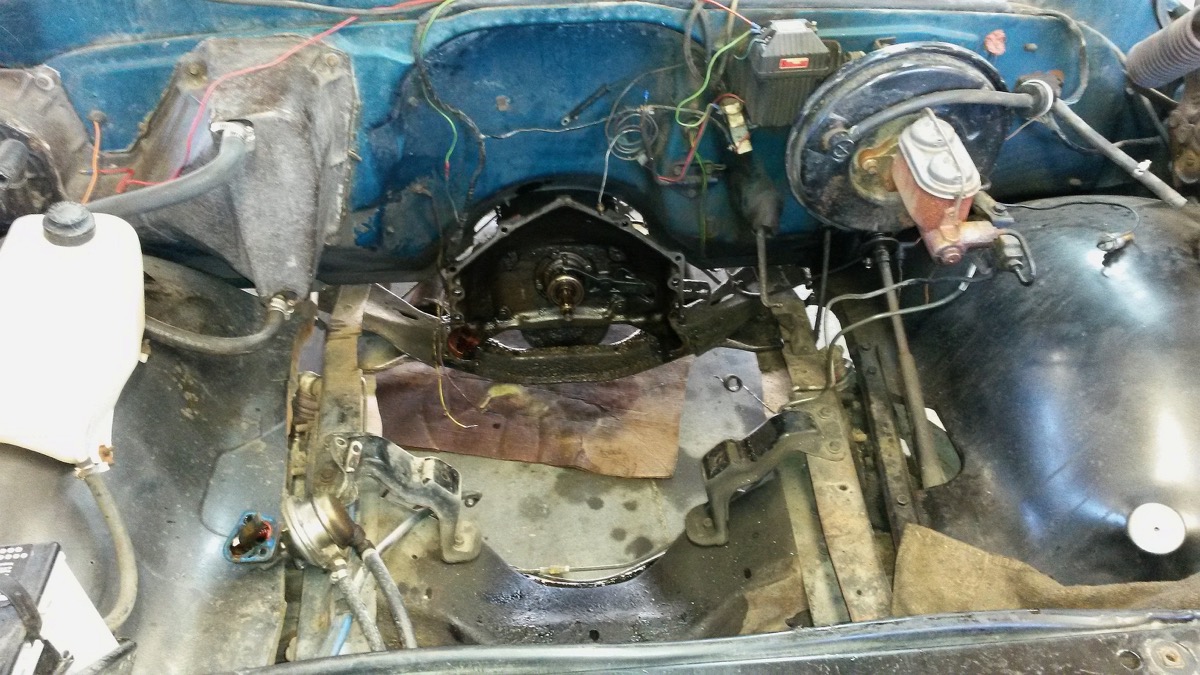
With the engine and trans out of the way, I also removed the engine frame mounts because these were for the giant GMC 305 V6,. My plan needed different ones. I also cleaned up the frame and sprayed it with some black paint.


I probably should’ve waited until after I cut out the old trans crossmember before painting. I got into the engine compartment with my 4 inch grinder and sawzall and got busy cutting it out a bit at a time. This is what was left of the trans crossmember when I was done. Scrap metal pile.

My headers were already rusting again on the bottom so I had the local irrigation company sand blast them for $30.

With my headers back, I got busy painting some things. These frame mounts are for 67-72 GM trucks that came with a small block V8. They bolt right in place of the old frame mounts.I also got a TH350 crossmember from the junkyard for the new transmission I planned to use.

Next, to paint the engine. BluePrint shoots this part number 355 in black with an air gun. It is great a base coat for a new color after some masking and scuffing.

Personally, I prefer my Chevy engines in Chevy Orange. Next, was test fitting headers on the engine for spark plug and plug wire fitting. It is much easier to do this on the stand. BluePrint includes chrome steel valve covers, but I went for something with a little more detail, these Proform Bowtie versions. Don’t worry, this does not void the warranty, but any valve cover leaks are now not covered. I can live with that. The carb is a Holley 600 vacuum secondary, part number 0-80457SA


I planned to reuse my Mallory distributor, but didn’t like the curve it came with. The mechanical timing was set up for 24 degrees of advance. BluePrint recommends 34 degrees total timing on this engine, so that would mean I could only have 10 degrees initial timing at idle. Not very ideal with the camshaft in this engine. So I got the recurve kit from Mallory and basically had to completely take it apart to get to the curve plate. I used the kits 18 degree key and reset the advance curve. This will allow me 16 degrees intial timing at idle for better idle quality and off line performance. I have also seen this pick up horsepower on the dyno.


I suppose, by now you are wondering what transmission are replacing that old iron lump with. It is this transmission. A New Process A833OD. Mopars guys may cry foul here, but GM did use these during the 1980’s. The early ones even had the same bell housing bolt pattern as the Mopar version. Good luck finding one of those bellhousings. If you are thinking of getting one, make sure ou get the bolt pattern is the same as a Muncie, Saginaw, and Borg Warner four speeds. You can then use any of the standard GM bellhousings, but the bearing cover needs to be milled down to fit. I had a GM “621” bellhousing that is for 11 inch clutches that I had previously in my Impala on the shelf, so it got put into service.

I have two of these transmissions. I got them both cheap. The one on the right in this picture has the original Hurst shifter and beefy linkage. The other one with the modified Hurst Indy shifter is currently in my ’65 Impala. The right one that is going into the truck I found at a swap meet a few years ago. I got it for $250 with only the linkage rods, but I had the original shifter and had a second mounting plate made by a friend. These are poor man’s overdrives. They have 3.06 1st, 1.82 2nd, 1.0 3rd and .74 fourth gear ratios. The same as a 700R4 automatic, but I get the fun of rowing gears.

One silly design of these transmissions is the lower driver’s side bellhousing bolt boss.There is no way to get a bolt in from transmission side. I ran a bolt from the inside of the bellhousing, then cut it back in order to get a nut on from the other side.


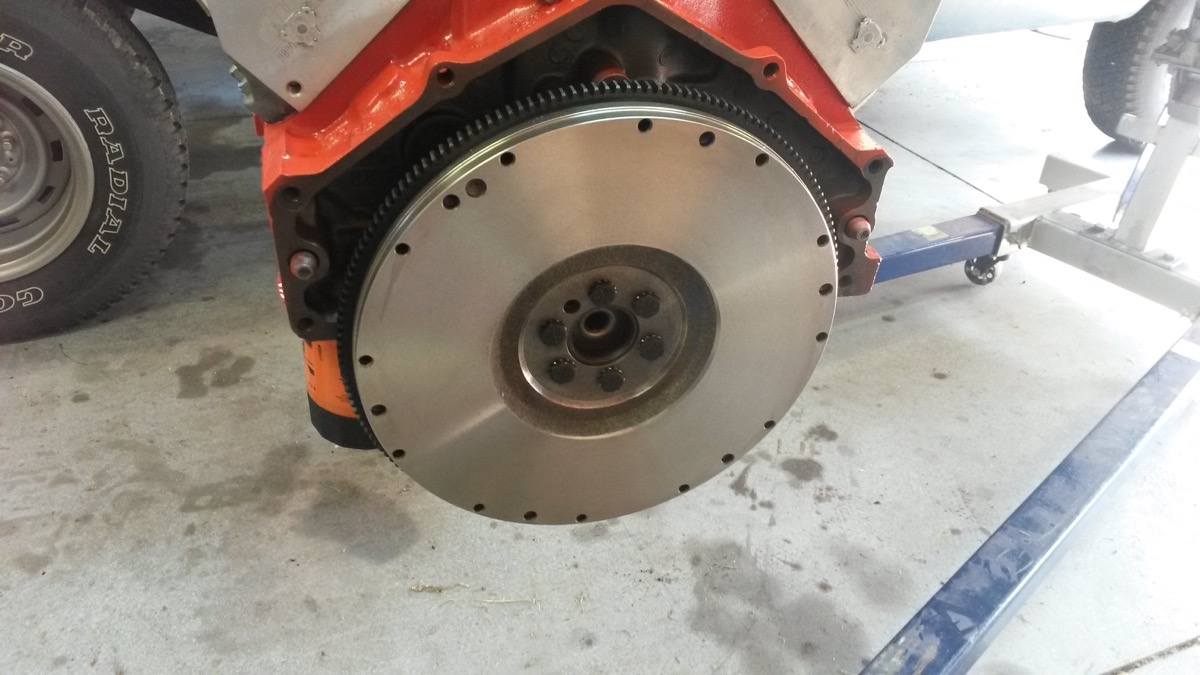
Moving back to the engine. These BluePrint Engine’s 355’s are built on the later ’86 or newer 350’s with one piece rear main seals. These later 350’s need a different flywheel than the old 1977 350 I removed from the truck. So, I got a flywheel from Napa for a 1988 Chevy C1500 350. This application gets me a 168 tooth flywheel for an 11″ clutch.
I had a spare clutch lying around that still had a ton of life left in it, so it got used. I also reused the my old 621 bellhousing I once had on my Impala because the old one wouldn’t work on this set up. I am reusing the truck’s original clutch fork, and all the clutch linkage even though I am moving the engine forward four inches to the V8 position. Amazing none of the clutch linkage or it frame bracket location needed modification or to be moved from the original location after I drilled out the the rivets of the frame bracket. I ended up bolting it back on the frame in the original position.


This was the very next picture I took. Yes, from underneath. The engine is hanging from the chain, holding up the back of the engine at this point while the engine sits on the motor mounts. The headers are barely hanging on the engine at this point. I ran into some issues up top I had to address since moving the engine forward.


Moving the engine forward to the V8 position caused a fitment issue with the headers now hitting the frame rails a bit as they narrow going forward.
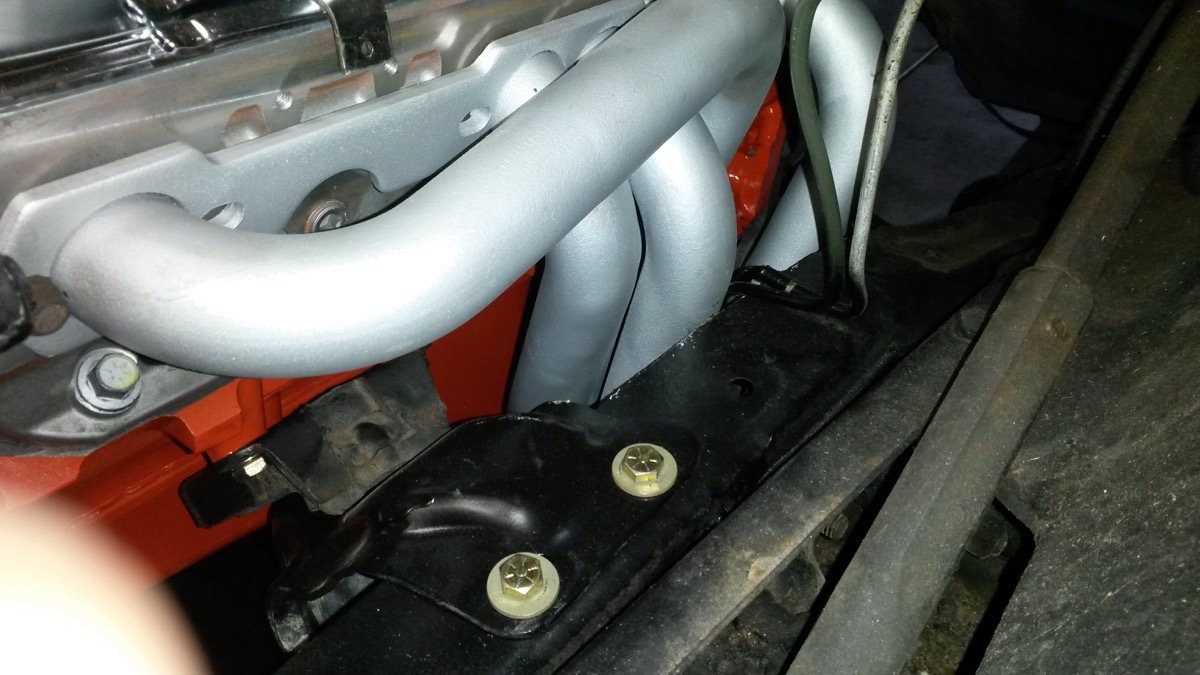


After a bit frame trimming, the headers had plenty of room. The new transmission in. These 833’s sit on a TH350 trans crossmember in their stock location on the frame rails. With the engine now sitting on the V8 frame mounts, trans crossmember fits right into place with the holes in the frame already drilled. These crossmembers are often hard to get out of the frame. Many people knock the rivets out of one side to make it easier. That is how I found this one. I just bolted it back together where the rivets once were at.

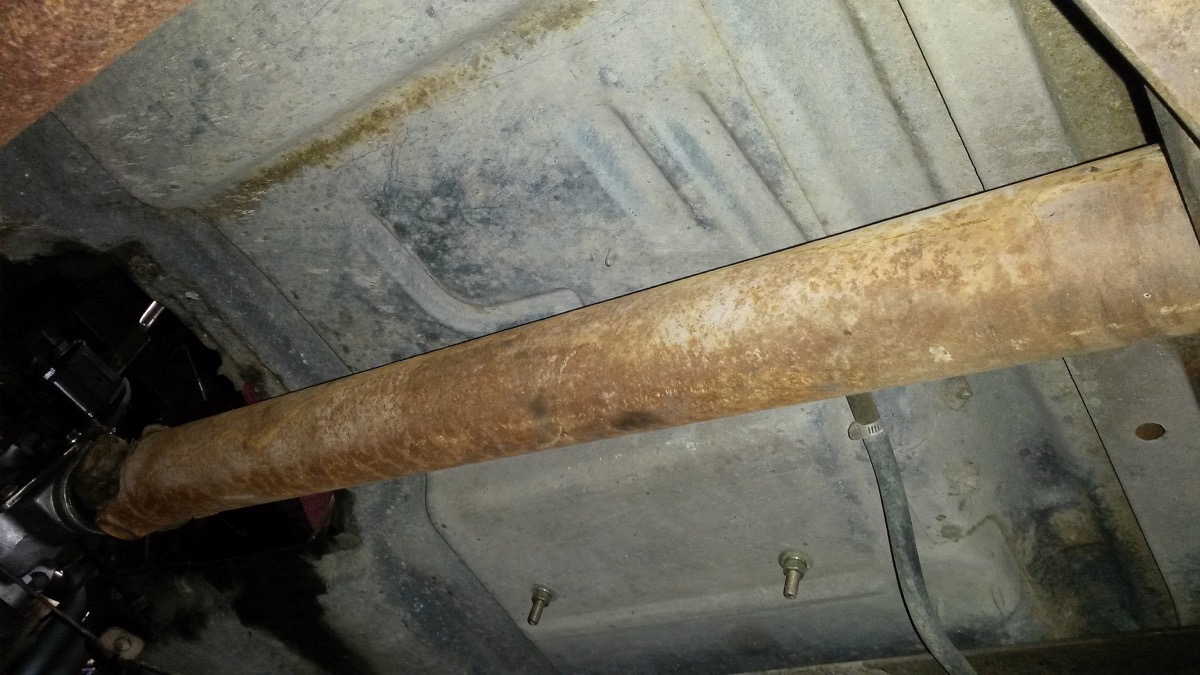
The same truck at the junkyard that gave up the frame mounts and trans crossmember, also gave up the driveshaft. This one had a different frame mount for the center support bearing. I thought this would be an easy coup for a bolt in for my truck. I was wrong. After messing around with it for some time, I tossed it in the scrap pile and went back to the original drive shaft.

I had to shorten the front half of the driveshaft. The local shop doing the work also installed new 1350 u-joints and center support bearing. The whole job cost $240 I didn’t want to spend, but it went together like it was factory. Worth every penny.
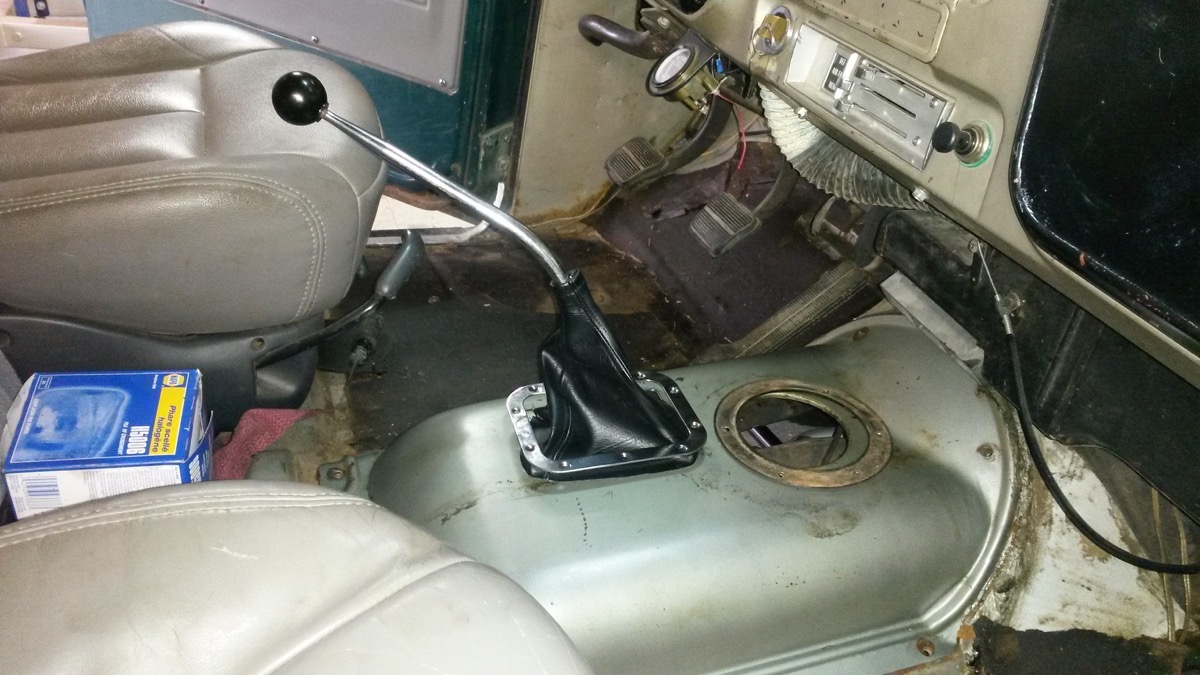
Next up, was the transmission tunnel. The new shifter was in a different spot than the old one. Thankfully, on manual transmission trucks, the trans tunnel is bolt in. It was so much easier to remove it and cut a new hole.


With trans tunnel cut and reinstall, I broke down and bought a new leather boot from Lokar. Then made a patch to cover the original hole. Since I don’t have a welder, I just screwed it into the original trim ring holes.


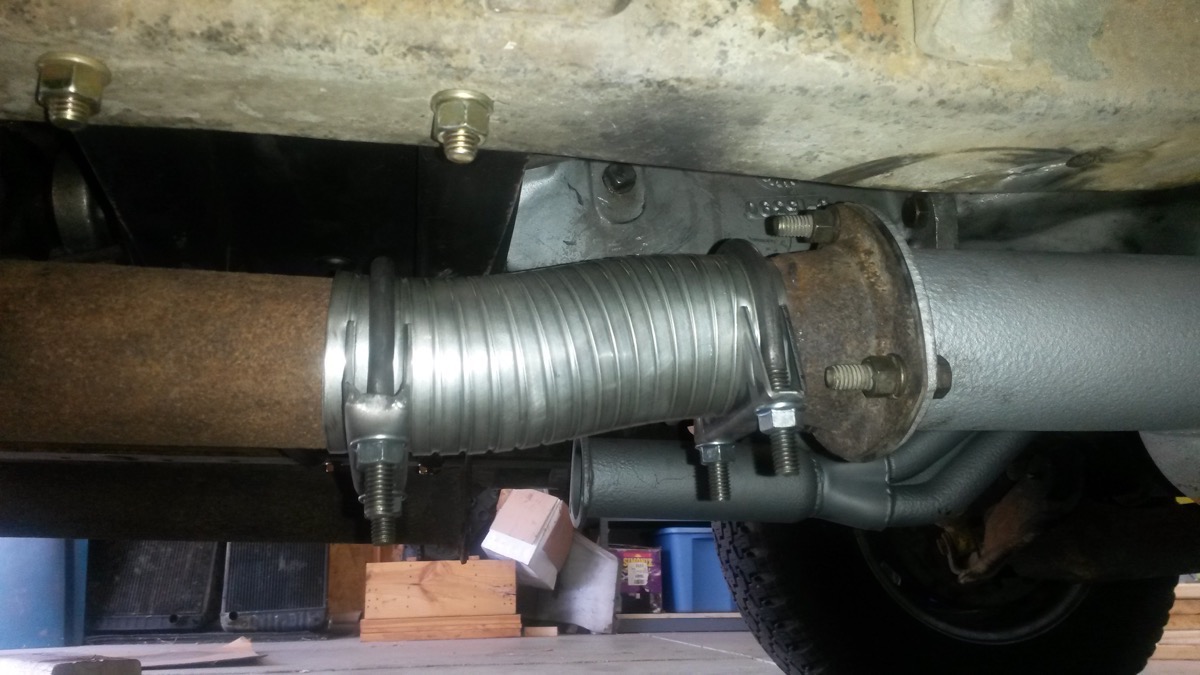
I had one other problem to solve before firing up the new engine. My exhaust was now 4 inches too short to reach the headers. Since I have future plans for a new exhaust system, I got some clamps and a section of flexible exhaust pipe at the local parts store.

Here’s the engine in and after it was running and driving for a week. Pretty cool. Not only does it look a lot better than the old grease ball, but the fun factor has increased a whole bunch with more than double the horsepower. The 833 four speed allows 75 mph blasts down the freeway at a mere 2400 rpm.

Below is a video clip of the truck’s first drive before I even put the hood back on.


Great stuff, Scott!
Great build but for me getting an engine/trans combo 88-98 Chevy p/u with either a 305 or 350/ 5 spd would have been a better option.
Way to go Scott – enjoy !
A thing of beauty that project, brings a tear of joy to the eyes.
Scott, are you messing with us? Your working for Blueprint Engines shouldn’t have given you any second thought on where to source an engine!
I have to admit I’d never heard of a MoPar 4-speed trans with 4th being overdrive. ‘Nice finds.
Having to move the engine 4 inches forward? I’da thunk the bellhousing mounting surface woulda been the bench mark.
Flex pipe? ‘Haven’t seen that stuff since the ’60’s. I would have done the same thing in a pinch.
Good shade-treeing!
I was planning to build my own, but looking at the cost completely machining and buying the new pistons, cam, etc and even assembling it myself, I was getting pretty close to this engine.
As I have been told, this trans was originally the famous A833 that was behind the Mopar big blocks in ’60’s and ’70’s. They made the A833OD for the Dodge trucks later on. Look at the pictures of the trans, you can see the 3/4 shift lever is upside down. This flipped the 3 and 4th gears, because the gear set had 3rd as 1:1 and 4th gear now OD. GM stuck them pickups and even vans in the 1980’s under the option code RPO MY6 .
I’ve got over 80,000 miles on my BP383. Still runs 11.90s all day long.
Love the updates. keep them coming!
So, how much $ invested, so far ?
At this point, I had about $5700 in the truck, including the $2000 purchase price. I have since added to that with exhaust. I will write that up later this month.
Outstanding use of a wide selection of parts. Nice job, Scott. Hot rodding at it’s finest!
Nice work, and well thought out choices for the drive train.Obvious choice of engine, if you’re working for Blueprint.
I watch the repower videos of these old Chevy trucks since I have an 88 that will eventually need a new engine. I like this engine, but I wouldn’t want to give up fuel injection or repower with a flat tappet cam.
With the changes in oil composition, I understand that it’s possible to wipe a flat tappet cam lobe pretty easily.
Funny thing, 3 of our 4 most popular engines have flat tappet cams. Very little complaints. The EPA had the oil companies remove the zinc from standard oils and it really wasn’t announced. It caught a lot of people off guard. Now, it is no big deal. There are a bunch of oils for hot rods and break in oils, plus zinc additives available that make it easy now.