


Finally, our long national nightmare is over and we solved it for a shade more than $60! So I finally caved and fixed the missing bumper filler situation on the nose of the BangShift project Buford T Justice 1987 9C1 Caprice. I had honestly enjoyed the fact that the car looked as though it had been snatched from the jaws of a junkyard crusher, but at the same time, it really did look like hell.
I had heard multiple stories about how much of a nighmare this job as to do and how pulling the front end of an old car like this apart is suck ass city, but overall it went pretty smooth. I didn’t run into any major issues and the results of fixing the bumper filler and then tweaking a couple of other small things made a MASSIVE difference in the appearance of the car. Clearly it isn’t some sort of show queen because it has a bumper filler but it now looks a lot less like someone may or may not be living in it. What did I do and how did I do it? Read on to find out!
AT THE BOTTOM OF THIS STORY ARE LINKS TO EVERY SINGLE BUFORD T JUSTICE UPDATE EVER
SCROLL DOWN TO SEE HOW WE REHABBED THE FRONT END OF BUFORD T JUSTICE ON THE CHEAP!

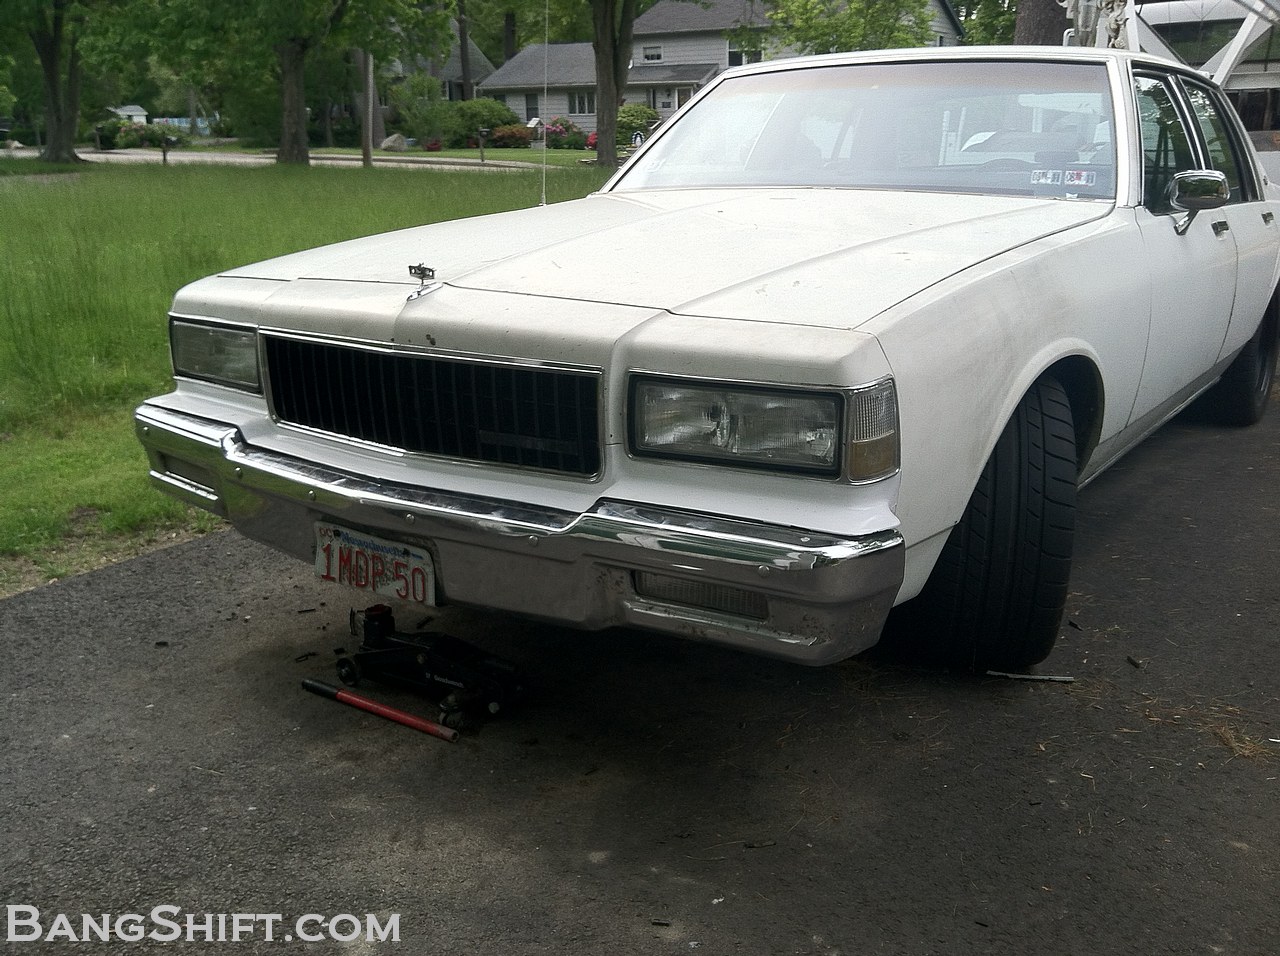
Here’s the face only a mother could love. The old bumper filler disintegrated on the way home from PA after I bought the car. It has been toothless ever since.

The grill was also part of the program. I wasn’t sure if I wanted to repaint the blacked out one on the car or go with a factory chrome one, so I ordered a replacement for the princely sum of $24 from RockAuto.com


Pulling the grill was a simple matter of removing six star headed screws. Clearly that area needs the deft touch of a spray bomb job.

I took a second to jam the new chrome grill into the car and I wasn’t sure that I liked it.

On a stock Caprice the chrome piece would probably be fine, but the idea of having a blacked out grill that matched the wheels closely was attractive to me.

That’s my son using his kid hands to reach in and clean up some of the areas I couldn’t reach. The giant Lohnes noggin prevented him from getting his face inside the grill opening.

Next, I yanked the bumper off as it seemed the only way I’d be able to properly fit the new bumper filler was to get everything out of the way. It came off easily after removing the eight nuts that retain it.

After the bumper went, I pulled the headlight lenses and the chrome headlight surrounds. It was looking like the “man without a face” at this point. This was probably about 45 minutes total work to this point.

It was at this point that I attacked all the stuff inside the grill opening with black spray paint. Not shown in this photo, but I blasted all of the stuff that would normally show itself behind the grill chassis black.

Here’s the grill as it was when I removed it from the car. I liked the look that someone else had already done by blacking out the center and leaving the chrome rim. I didn’t want to alter that, just make it nicer.

Here’s why it needed to be freshened. All that time on the leading edge of the big car had resulted in lots of chips and the black paint was UV faded pretty badly.

After cleaning, sanding, taping, and prepping the grill, I shot the bajasus out of it with black paint. I did a few coats with the hopes that I’d stave off immediate chipping.

I decided to paint the Chevrolet name plate black as well, rather than have it be all glaring in factory faux chrome. I think it came out looking good.

Next up, I test fit the new rubber bumper filler. Apparently there are fiberglass versions of these things that suck out loud, but this rubber piece, which was another Rock Auto purchase (for about $40 bucks) fit great.

I started prepping the rubber by scuffing the surface thoroughly with fine grit sandpaper. The intention here is to get any type of coating off of the part and to give the paint some texture to stick onto.

I made sure to leave no part of this piece unscathed!

A body shop pal of mine told me to wipe the whole thing down with Isopropyl alcohol when I was done sanding. He said that this alcohol does the best job to prepare the surface for paint by stripping any junk off it left by sanding.

Next up was the Dupli-Color adhesion promoter which is basically a clear primer designed to help paint stick to parts like this rubber bumper filler.

This plastic specific paint is the way we went because it has some of the flexing properties needed to deal with parts that expand and contract with heat like rubber does.

After a couple of light coats from the spray can, our bumper filler was looking good enough to install. We left it to dry for several hours before messing with it. Patience is a virtue in some situations.

Here you can see the freshly dried grill and bumper filler ready for installation. Bolting the thing back together was no different than taking it apart. The bumper filler lined up perfectly and we fastened it with some new stainless steel screws. There are 17 screws that hold the piece on. Once they were fastened, we reinstalled the bumpers, headlight buckets, and lenses. The result?

Was this! The car looks 1000% better in the front with the fresh grill and no gaping hole between the fenders and bumper. It is amazing how such a simple operation and such a small investment can make sure a huge difference in the look of the car. What do you think? Did I make the right call with the black grill? I still have the chrome one hanging around here somewhere. Stay tuned for next week’s update as we spruce up the interior with help from our pals at Auto Meter!
- Introducing Project Buford T Justice – Our 1987 9C1 Chevy Caprice – The Adventure Begins!
- Project Buford T Justice: Our Cop Car Cruises Home and Then We Beat on It!
- Driveway Tech: Bodywork on Buford T Justice – We Close Our Roof Hole For Fun and (NO) Profit!
- Project Buford T Justice Hits the Strip with Some Pretty Shocking Results!
- Project Buford T Justice Hits the Dyno and Goes KABLOOEY! CARNAGE VIDEO INSIDE!
- Project Buford T Justice Will Be Saved For About A 100 Bucks With a 15 Year Old Transmission
- Project Buford T Justice Update: The Trans Thrash is ON!
- Buford T Justice Update: It Lives Again Thanks to a Down and Dirty Driveway Thrash and Junkyard Parts
- Buford T Justice, Our 1987 9C1 Chevy Caprice Goes Through Final Testing Before the Upgrades Begin!
- Buford T Justice 9C1 Update: The Parts From Hotchkis, Cragar, AFCO, and Mickey Thompson
- Update: Hotchkis Suspension & AFCO Bushings Transform Our 9C1 Caprice
- Buford Update: Our 9C1 Caprice Gets Real With Mickey Thompson Tires and Cragar Wheels
- Driveway Tech: How To Swap A Jeep Steering Shaft Into Your GM B-Body or G-Body Car With A Trashed Rag Joint
- Buford Update: We Flog The Suspension, Unveil a Mountain of Speed Parts, Spill Our Wild Drag Strip Plan
- Project Buford T Justice Update: Drag Strip Thrash Squashed By Ma Nature – We Learn Stuff – Plan B!
- Project Buford T Justice Quick Update: Where The Hell Has Our 9C1 Caprice Been?!
- Project Buford T Justice: We Go On Hot Pursuit Of Horsepower-Our 9C1 Caprice’s 350 Gets A Slap!
- Buford T Justice 9C1 Caprice Update: Metal Fab,Head Work, A Good Surprise, An Awful One
- Buford T Justice Update: Headers, Cheap LS Technology, New Valvetrain Parts, More Compression, Fun!
- Buford T Justice Update: A TCI 700R4 And Breakaway Torque Converter Get Our 9C1 Caprice Shifty!
- Buford T Justice Update: A Very Frustrating Day On The Dyno And How We’re Planning To Fix It
- Project Buford T Justice Update: Where Has Our 9C1 Caprice Been Hiding?
- Buford T Justice Update: We Install A First Gen Chevelle Flowmaster Kit On Our 9C1 Caprice!
- Project Buford T Justice: Our Caprice 9C1 Gets The Shaft! A Dynotech Drive Shaft That Is!
- Project Buford T Justice Our 1987 9C1 Caprice Hits The SCCA Autocross – Photos And Video!
- Project Buford T Justice Update: We Finally Give Our 1987 9C1 Caprice A Cheapo Nose Job!
- Project Buford T Justice Update: We Hit The Strip Again With More Power! (W/Video)
- Buford T Justice Update: We Bolt On Power From Trick Flow And Snappy Looks From Trans Dapt!
- Project Buford T Justice Update: Where The Heck It’s Been And Where The Hell It is Going –
- Place Your Bets For A BangShift Shirt! Buford T Justice Is Hitting The Dyno With This Engine One Last Time – Guess The Power And Win
- Project Buford T Justice: The Long Arm Of The Law Gets Longer With A Stroker Build – 388ci Of Budget Fun


Without the filler it looks like an old man without his “uppers”. Looks good Brian-see you at Wilmington!
Correct me if I am wrong…. but isn’t the rubber supposed to tuck in behind the bumper rather than sit on top of it?
I believe you are correct Mr. Ward. I have the fiberglass replacements on my Skylark and yes they do fit like hell.
Looks good and good choice sticking with the blacked out grill. Same scheme I went with on my Skylark. It was blacked out when I got the car, then I broke it and stuck a stock grey one on, and last year I blacked it out again.
Black works real nice here..i was afraid you would choose the chrome grille for awhile..
Well done, looks like a hundred bucks!
I think on that car it does sit on top of the bumper. Looks good!
It sure does look a lot better…..but I think the filler does tuck in behind the bumper.
Ever-adhering to the KISS philosophy. Love it. Keep up the good, simple work.
Filler goes on top of the bumper on these cars. Google image search 1987/88/89/90 Caprice….all on the bumper
https://www.google.com/search?site=&tbm=isch&source=hp&biw=1440&bih=775&q=1990+caprice&oq=1990+caprice&gs_l=img.3..0l7j0i24l3.2504.6010.0.6451.12.11.0.1.1.0.427.1305.9j3-1j1.11.0…0.0.0..1ac.1.15.img.VL4qq14fJBA#facrc=_&imgrc=7Vu-8wnKZTA-UM%3A%3BHssmpHkZw1aDIM%3Bhttp%253A%252F%252Ffc05.deviantart.net%252Ffs70%252Fi%252F2010%252F220%252F5%252Ff%252Fchicago_pd_1990_caprice_by_jdawg9806.jpg%3Bhttp%253A%252F%252Fjdawg9806.deviantart.com%252Fart%252Fchicago-pd-1990-caprice-174511842%3B900%3B600
Sure looks a lot better with the blackout treatment. Now you need some lights from the $200 hauler! Add a nice FIAMM horn set and you be bitchin!
Brian I think that’s a vast improvement , but , call me old fashioned , I would love to have seen a final finished job of a picture with both the chromed grille in and then the blacked out one.Chrome is dissapearing off our bumpers at an alarming pace already and heres your chance to save a little bit. Don’t get me wrong I like both , just like chrome better , looks more old school.
Well… I learned something new. It looks good, Brian. The car is really coming along nicely.
Brian, blackening out the grill was the very first thing i did to Buford, followed closley by respraying the rims and putting duals on . I still miss seeing it in my driveway…or yard. I still have a line on a perfect dash pad for you!
Don’t forget to tag this posting with the Buford Project label
All you need now is a famous Freiburger bon-ami car wash, and about 6 cans of Krylon satin finish clear……….
I’ve used isopropyl alcohol as a solvent and cleaner for years. It works well on epoxy, and is relatively non-toxic.
A paint tip; I used the spray epoxy paint that is made for appliances when I painted some steelies for my crown vic. I sanded the wheels, cleaned them thoroughly with solvent (may have been acetone; it’s been many years), then shot the epoxy on next.
DON’T PRIME! It reacts with the primer and won’t dry. Those wheels started out white, and I covered them in black. After three years, there wasn’t a chip on them. Tough paint!
I forgot to add: it only comes in gloss, but you can scuff it lightly with sandpaper or a 3M pad for a flat appearance.