 Tweet
Tweet
I bring to you yet another part from yesteryear. This is an oil/vacuum pump from a 1929 Plymouth. In the era that this was used, they had the idea that they could incorporate a vacuum pump in conjunction with the oil pump. With the use of a 90 degree street elbow and a strategically placed fitting on the bend, the oil being forced to turn the corner would create a vacuum at the other fitting. It wouldn't suck the chrome off a trailer ball, but it was enough to operate any vacuum accessories that needed it.
These pumps utilize two opposing hardened paddles separated by two rather tiny springs to keep the paddles in contact with the outside of the bore. They ride in a slot in the center shaft that is placed off center in the bore. The wear that happens is on the sides of the paddles, and the springs become weak over a period of time. Dirty oil only adds to the entire mess wearing out prematurely. The oiling system on these engines had a valve that would enable the car owner or mechanic, to increase the pressure as the bearing clearances started to increase. It is important for the mechanic to remember to put the pressure back after having one of these pumps rebuilt. They are capable of producing some pretty high pressure, to the point of blowing the oil pressure gage right out of the dashboard if this is forgotten. I think I've mentioned this once before.
This particular one had a few issues going on. One is the obvious wear to the paddles and springs, the other had to do with the pump body wearing so much to one side, it actually turned the part that the shaft is in, to go egg-shaped. Seeing as how spare pumps for this engine are totally non-existent, I had to bore the body out, and also turn the shaft down and press a sleeve onto it to bring it back to the original size.
With that said, here are the pictures of this cute little thing.


Old paddle assembly.


The new paddle assembly.

The top cover was badly worn due to the shaft being out of round. With the paddles being hardened, they just dug their way into the cover. In order to make it perfectly flat again, it had to be done on the surface grinder. With the opposite side of the cover starting out as rough casting, I had to do something about that. Two flats were ground where the bolts would normally go. Now I had an area that I knew was perfectly flat that I could place two shim blocks under to be able to grind the other side.


The body.


This is the shaft after it got it's new sleeve and oil groove.


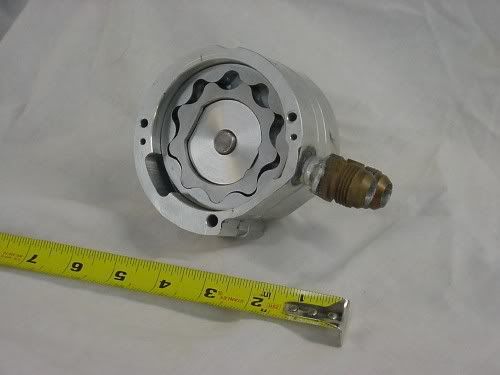
All done!


These pumps utilize two opposing hardened paddles separated by two rather tiny springs to keep the paddles in contact with the outside of the bore. They ride in a slot in the center shaft that is placed off center in the bore. The wear that happens is on the sides of the paddles, and the springs become weak over a period of time. Dirty oil only adds to the entire mess wearing out prematurely. The oiling system on these engines had a valve that would enable the car owner or mechanic, to increase the pressure as the bearing clearances started to increase. It is important for the mechanic to remember to put the pressure back after having one of these pumps rebuilt. They are capable of producing some pretty high pressure, to the point of blowing the oil pressure gage right out of the dashboard if this is forgotten. I think I've mentioned this once before.
This particular one had a few issues going on. One is the obvious wear to the paddles and springs, the other had to do with the pump body wearing so much to one side, it actually turned the part that the shaft is in, to go egg-shaped. Seeing as how spare pumps for this engine are totally non-existent, I had to bore the body out, and also turn the shaft down and press a sleeve onto it to bring it back to the original size.
With that said, here are the pictures of this cute little thing.
Old paddle assembly.
The new paddle assembly.
The top cover was badly worn due to the shaft being out of round. With the paddles being hardened, they just dug their way into the cover. In order to make it perfectly flat again, it had to be done on the surface grinder. With the opposite side of the cover starting out as rough casting, I had to do something about that. Two flats were ground where the bolts would normally go. Now I had an area that I knew was perfectly flat that I could place two shim blocks under to be able to grind the other side.
The body.
This is the shaft after it got it's new sleeve and oil groove.
All done!
Comment