Announcement

Collapse
No announcement yet.

ShopGathering 3

Collapse
X
 
  • Filter
  • Time
  • Show
Clear All
new posts

  • ShopGathering 3

    Today 10:31 AMoj
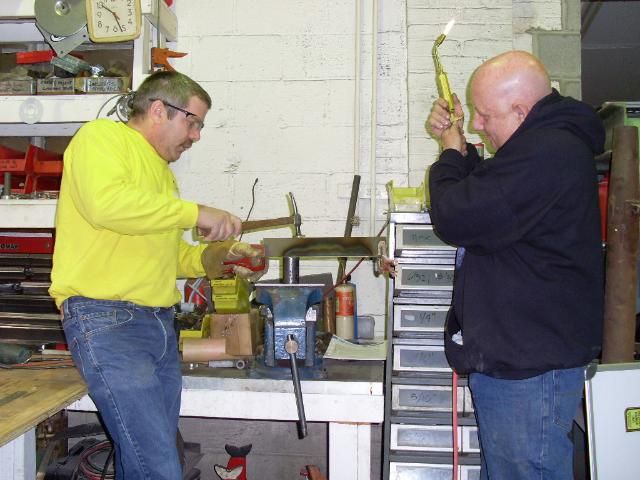
    This is the last one for the year and coming up quickly. This session will have mini seminars going on at the same time. We'll have Bill Anderson (rescheduled from the 1st gathering) delving into the flathead assembly esp the unique valve train geometry and adjustment; Mike Whitt (we hope, although he is starting to get cold feat) setting up a ford 9" gear set; John Wessels on rebuilding strombergs and holley 94's; I'll be doing carb theory, rebuilding other carbs; John Dayton will rebuild and bush the lever action shocks; Dave Krolak will come down to go into brake systems.

    I'll open the shop around 8am woth coffe and donuts etc, we'll get started around 10am, have a deli-style lunch and continue until whenever, last guy out turns the lights off and locks the door ok?

    We can also do specail demos, inclwelding and machine operation etc - just ask.

    shop ph is 540-955-0479; cell 540-539-4293

    Clarke Co. Speed
    607 E. Main St.
    Berryville VA 22611

    thanks, oj
    A Carter Carb Shop, sales and service

  • #2
    Re: ShopGathering 3

    Did I miss the date or is it literally TODAY ?
    Phil / Omaha

    Comment


    • #3
      Re: ShopGathering 3

      Dumbassed me, the date is March 13th. Like the other gatherings, there is no cost. I am still recruiting and looking for an ignition specialist and any other skilled craftsmen to come and share.
      Thanks, oj
      Be nice to have some brownies too!
      A Carter Carb Shop, sales and service

      Comment


      • #4
        Re: ShopGathering 3

        Hey Oj

        No can do on the 13th. Kelly have a weekend planed. Bummed on missing it I need all the help I can get with diff setup.

        Here is the wright up Robert sent me from the last gathering.

        Steve

        I didn't get as many pictures as I normally do for my tech threads, so some of these will be previous photos and some diagrams. Prior to Tom showing the body lead demo, I needed to make some panels for him to work from. We decided that a curved surface, similar to the front end of a 38 Chevy and its hood halves, would be a better fixture for showing the need for flowing lead up a slight incline. I started with two equal sized panels, and bent a flange on the long edge. Then discussed some of the issues faced when shrinking a flange. For demonstration purposes, in the following example we have a 12" long panel with a 1-1/2" wide flange.


        If we were to look at the same panel with a radius, formed by shrinking the flange, we would note dimensions similar to as follows:


        ....where the 90 degree bend at the flange still retains its 12" length, the centerline of the flange in this case is shortened by almost an inch, and the outer edge of the flange shortened by almost another inch.

        In working with the Lancaster/Eastwood style shrinker-stretcher machines, it is important to note that they are a linear device, the movement they introduce into the metal is in a straight line.


        So that once a radius starts to form, and with the shrinking device still moving in a linear fashion, the outer edge of the flange will be put into tension as the centerline shrinks. Anyone who has used these devices will have seen this as the machine starts to lose its effectiveness.


        To counter this effect, we need to shrink the outer edge of the flange more than the inner. By simply alternating the depth of the shrink as shown, you can provide more shrink to the outer edge and the device will become more effective.


        Another method of shrinking is with the use of tucks. Looking at their shape, the tuck has a wider "gather" at the edge of the flange as compared to the inside bend of the flange, so this eliminates some of the tension issues seen in the mechanical shrinker.


        Where the demos this past weekend were supposed to concentrate on using only hand tools so that the participants could readily duplicate the results without the need for a major purchase, we did find the use of the Shrinker a good comparison, and by chance the tuck shrinking did prove to be faster and more effective.

        For the tuck shrinking, one can use tucking forks, rounded jaw pliers (by design or modification) or special designed devices. As an example, here is a set of tucking forks I made out of some scrap metal and 5/8 bolts turned down.


        And a pair made from needle nose pliers..


        Probably the biggest challenge with their use is producing consistent tucks. To produce a flowing, consistent radius, we should start with consistent tucks, both in size and the spacing between them.

        I decided to make a pair of tucking pliers out of Vice Grips, as the jaw adjustment on them would prove to give repeatable sized tucks.

        We'll start off by finding a pair of vise grips suitable for the job, which in this case means the jaw serrations are starting to wear and round off and won't grip much of anything else. Finish what has started by removing the serrations to produce a nice flat jaw on the bottom, and cut the top one off at about 30 degrees from its original position.


        I had some extra long shouldered 3/8 bolts, perfect round stock for the job. Three of them were cut off to 1-1/2" length.


        Here's my economy model lathe made by Dewalt...


        To set the spacing for the "fingers" the first is clamped in the vise grip jaw, centered.


        The outer is placed next to it and then welded down the outside, center finger removed, and then welded down inside. Here we should leave a slight gap of your sheet metal thickness to prevent any binding, which will allow a deeper tuck.


        Repeat for opposite side, then weld center finger.


        Note in the above picture the 30 degree cut of the upper jaw positions the center finger at an angle compared to the bottom fingers. It is this angle that will help to form the tuck's shape.


        Of course I took my favorite anvil along to the meet, here clamped in the vise..


        Again our object in this case is consistency, so equally spaced marks are placed on the flange, identical tucks made at each mark, and you can see the consistent radius along the panel.


        I use a O/A torch to heat the tucks prior to hammering them flat. Others prefer to not use heat, and can capture the tuck and flatten it very effectively without it. I am still working on this proficiency, so in the meantime, I use heat. We're looking for something like this, prior to hammering.


        Here OJ assists with torch duties...


        Another point to mention is that the hammering action tends to also spread the tuck back apart if not captured effectively. Where the picture above doesn't show it well, a good means of overcoming this would be to clamp a strap of metal across the ends of the newly formed radius prior to hammering, similar to this:


        Then the hammering force will be more effective in flattening the tuck back into itself.


        Once each piece was completed separately, the flanges were aligned back to back and the two pieces tacked together. Each had an identical radius, for a good fit. Consistency pays off!


        Well I have stopped buying stuff for cars I don't own. Is that a step in the right or wrong direction?

        Comment


        • #5
          Re: ShopGathering 3

          Wow, you're already planning your 3rd event? Awesome!

          It's very cool to see your shop set something like this up and open it up to everyone, for free. I'm a semi-competent machinist and I'd be volunteering at your place if I was anywhere near VA. lol

          Good luck with the latest event!

          Comment


          • #6
            Re: ShopGathering 3

            I just got off the phone with Dave Krolak, we were discussing the brake seminar. He really is putting together an in-depth session from model 'a' to hydraulic conversion to master cyl sizing and modern disc brakes. He is going to let the discussion go in whatever direction it wants to take and he'll have examples of the diffrerent systems.
            Dave used to teach this stuff at Wyotech and now works in his restoration shop in Maryland, so if you want to learn from a master here is your chance.
            A Carter Carb Shop, sales and service

            Comment


            • #7
              Re: ShopGathering 3

              Tomorrow the 13th is the day! Bill Anderson came by yesterday with the flattie for the demo and we have some neat stuff for you guys to see! Them flatties are different for sure. Dave Krolak is doing the brake systems, he is goin gto focus on the model 'a' hydraulic conversion but we have plenty examples and materials to go into disc brakes as well; John Wessels and i will go into carb theory and rebuilding procedures - John is 'old school' and will show you how to mess with the stromberg 97 and holly 94; A different John is coming from Maryland to show us how to rebuild and bush the lever shock (houdaille shock).
              The shop gatherings are free, i open aroind 8oclock in the morning with coffee and donuts, the demos begin around 10 oclock and we'll have a delistyle lunch.
              the address is 607 E Main St. Berryville VA 22611, my shop ph is 540-955-0479. I am here right now trying to clean this place up, if you have questions or suggestions give me a call, oj hope to see you tomorrow.
              A Carter Carb Shop, sales and service

              Comment

              Working...
              X