Announcement

Collapse
No announcement yet.

Tom's 66 Mustang

Collapse
X
 
  • Filter
  • Time
  • Show
Clear All
new posts

  • Tom's 66 Mustang

    In no particular order I'll show what I have done or doing. Hopefully you'll find something interesting at some point. I guess I'll start of with my disc brake swap. I bought a set of 72 disc brakes years ago Sunday afternoon while leaving Carlisle. I don't remember what the guy was asking for them but I offered him $25. I really didn't care, I was going to keep walking if he didn't take the offer. He was less then happy but I guess it was better then hauling them back to Timbuck Two. I sandblasted and painted them. I had a set of brand new USA made rotors sitting in my garage along with a master cylinder.


    This is the master cylinder I used. It is for a 72 Mustang. I checked with Chock, it does have a residual check valve and 1" piston. I think a better choice would have been for a manual disc Maverick with a 15/16"bore. Oh well. I haven't driven the car yet so I can't say just yet.


    One problem I found was the old pushrod was too short. a $1.49 threaded rod coupling was needed to make an adjustable pushrod. I cut the rod in two, threaded both ends and tacked the coupling on. I cut the coupling down to 1" and cut the pushrod 1/2" from the end of the shaft.


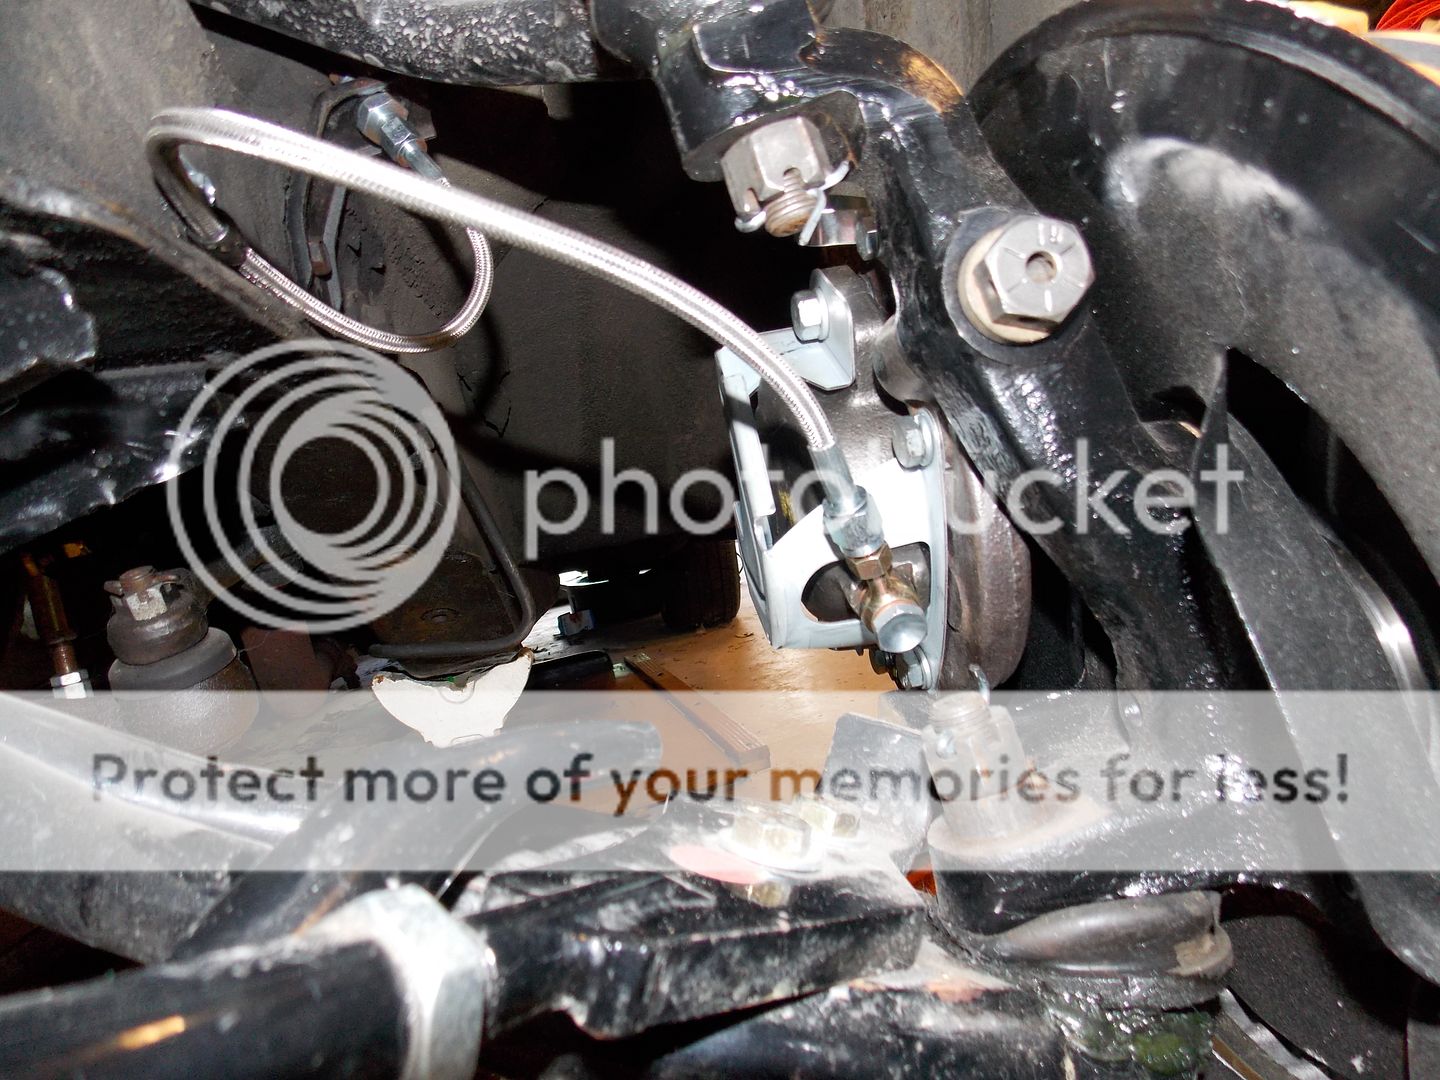
    Since I needed a proportioning valve, I had an old block from a Granada but I didn't know what shape it was in. So I ordered an adjustable one from SorT. I made my own mounting bracket. Amazing what you can do with a hacksaw, 4" angle grinder and MIG welder.


    I rebent the rear line to the valve, cut it down and put a new double flare on it.


    Bent some new lines up.


    Everything installed.


    I used DOT legal flexible SS brake line from Speedway and fittings.


    Tom
    Overdrive is overrated


  • #2
    This is the Mustang you've had awhile, right? Cool to see the details.
    ...

    Comment


    • #3
      Originally posted by Loren View Post
      This is the Mustang you've had awhile, right? Cool to see the details.


      The very same. I just haven't had the time or money to do everything at once. Looking back, I've done enough to it. I figure there might be something that may be helpful to someone. Next big project is putting in the GT40P motor with a few upgrades but I think fixing the foundation to my barn is going to delay that so I'll fill it with stuff I've done in the mean time.

      As you can see the suspension id far from stock. It's a hoot to drive! I'll be covering some issue on that too.
      Last edited by Huskinhano; June 4, 2015, 08:56 PM.
      Tom
      Overdrive is overrated


      Comment


      • #4
        Are you going to add your masterful clutch / 4-speed install in this thread?

        Inquiring minds want to know!
        There's always something new to learn.

        Comment


        • #5
          Originally posted by milner351 View Post
          Are you going to add your masterful clutch / 4-speed install in this thread?

          Inquiring minds want to know!


          I am, Let me get the stuff together. Anything in particular with the swap you need info on? BTW, I dropped my phone and broke it. Lost your number. Text me again.
          Tom
          Overdrive is overrated


          Comment


          • #6
            Here' some of my 4 speed swap. www.mustangsteve.com sells some cool stuff. Since Ford just installed pot metal hats with nylon bushings that wear out and cause a lot of binding I decided to fix that forever as well as make the clutch operation easier. So I used Steve's pedal set up with roller bearings. These bearings I discovered can be found in most hardware stores.


            I was digging the roller bearing set up so I thought I would continue with the clutch linkage. I made my own with 3/8" cold rolled steel rod and rod ends from Graingers.It was cheap and easy to do. Best of all it works very easy and silky smooth. The stock linkage is shown for comparison.


            On Mustangs anyway, there is a knock out just like an electrical box for the clutch rod. I knock mine out. I had to remove the master cylinder to get better access. You can see the hole by the 4 o'clock position. A couple wacks and a pair of pliers and it's out.


            I have to see if I have more pictures some place, if not I'll take some while my car is up on jack stands but in the mean time getting back to the clutch linkage. On 65 cars, clutch adjustment is made on the rod from the pedal. In the Z bar, there is a clevis swedged on the Z bar and the rod has 2 jamb nuts, one on either side. On my 66, there is no adjustment on this rod and no clevis, the rod just slips into the Z bar with a bushing and clip. The clevis is easily remove, which is what I did. On my 66, there is a tension spring to hold everything together on the linkage. It's pretty easy to see where it goes on the clutch fork. On the body, it's a little difficult to see exactly where it goes. If you look closely just under the lower control arm bolt, you'll see an opening that is stamped and looks like an exclamation mark "!" That's where it goes.

            The pedal hanger is the same for automatic and manual. Some guys just cut down an automatic brake pedal.I had a correct manual brake pedal. You will have to remove the round vent ducting under the dash to slip the clutch pedal in. Now, there usually a huge assist spring. a lot of guys leave this out as I did. It's really easy to either remove it or install it actually. To install it, don't push the pedal n all the way. Put one end of the spring end in on the hanger and the other end on the pedal with just enough tension to hold it in place. Next, slide the pedal in just enough to meet the stop. Now, push down on the pedal about 1". You have the leverage from the pedal now helping you to expand the spring so you can slide the pedal in place and release the tension on the stop.Now you can install the retaining clip to hold the pedals in place.

            On flywheels and starters. There are 2 size of flywheels, a 157 tooth and a larger 164 tooth. The 157 tooth uses either a 10" or a 10.5" clutch. Until recently I thought the 164 tooth was a 11" clutch but according to one guy I know who works in a Mustang restoration shop, at least a passenger car 164 tooth also uses a 10.5" clutch. A 164 tooth flywheel weighs in at 40 pounds. a 157 tooth weighs 20 or 22 pounds. On starters, this topic is so screwed up it's difficult many times to get the right one. Starters are listed as either manual or automatic starters.This is so wrong. They should be listed by tooth count only. The "automatic" starter is for 157 tooth starters regardless of transmission. The "manual" starter is for 164 tooth flywheels, again no matter what type of transmission. Both starters have the same amount of teeth on the drive gear. The difference between starters has to do with placement of the ring gear on the flywheel. On the 164 tooth, the ring gear is flush with the engine side of the flywheel. The 157 tooth, the ring gear is set back about 3/8". Here is the back side of a 157 tooth flywheel.


            If you use a 164 tooth starter on a 157 tooth flywheel,it will never engage. Putting a 157 tooth starter on a 164 tooth flywheel, it will grind!. Both size flywheels have dedicated bellhousings. I 164 tooth flywheel will not fit into a 157 tooth bellhousing. You can bolt a 164 tooth bellhousing on a 157 tooth flywheel but you will never get a starter to work with that combo. The last bit of flywheel stuff. 5.0 T5 flywheels are 157 tooth, they look almost exactly the same other than the size of the balance weight. The 5.0 uses a different pressure plate bolt pattern as well as dowels to locate it. A 5.0 with it's flywheel and clutch setup will work just fine in the older 157 tooth bellhousings with no issues at all. You can also use the 5.0 PMGR starter on the older 157 tooth flywheels. The PMGR starter is a lot smaller weighs IIRC about 10 pounds vs 20 pounds for the old series wound starter. When you wire the PMGR starter, connect the power cable to the terminal on the PMGR. Off the "S" terminal on the fender solenoid,run a wire to the little terminal on the PMGR. You may bethinking of just jumping the 2 terminals on the PMGR to simplify wiring but the issue has to do with regeneration when the main field of the motor winding collapses. It energises the solenoid to engage the starter. I guess a diode in reverse bias to act as a voltage clamp would solve this. OK, enough for tonight, LOL.
            Tom
            Overdrive is overrated


            Comment

            Working...
            X