 Tweet
Tweet
Dan, you got lots going on, and your project focus is 'way better than mine. I guess that thing I made would be called a measuring device, a jig would entail more structure. Oddly, one of my immediate supervisors loved it but he was only one of three and we didn't otherwise get along so well. Will send love along to Gail.
-
... -
Air Show days this weekend, Miramar (near San Diego, former home of the Top Gun program but now a Marine base flying F-18's and Ospreys) puts on a good one:

I really went there to check out the new F35, short-takeoff and vertical-landing variant, and wound up not getting to it with all the other distractions a huge lot packed full of bad-ass military hardware might have. Everyone did get to see it fly, though, from dead-still hover to pushing probably mach .9. A slight camera malfunction aka operator error meant not many pics taken. (What, can't handle a ten-year-old point-and-shoot?) Gail got more with her I-phone. Here is a nice gratuitous little 'splosion picture for ya however, note these are cans of gasoline going up and not all those helicopters crashing at once.

The Blue Angels as always were a thrill. There were points in the show where some of those aircraft were not too far away from the crowd...I'm glad they know what they're doing although we know this has not been their best year altogether.
More airplane stuff then I'm done: The old McDonnell-Douglas plant in Long Beach CA is, as far as I know, a huge bunch of ghost-filled space now...accepted, depressing fact, when production of DC-3s-on-up were once such a part of the culture of the area. More fun to think about would be the days when brand-new DC-10s were lined up in a lot next to the freeway, fresh off the line and all painted-up and waiting for people to get in and go fly off somewhere. This video has lots of great factory scenes including seventies haircuts, manual drafting tables and vertical mills, and also very pretty camera angles of machines in the air. I'd say watch it later with a brew and substitute ten minute's worth of favorite Bad Co. songs or something from the era for the un-needed docu-promo film soundtrack. https://www.youtube.com/watch?v=dzXwhnuQwb4
Two-Stroke Engines
I have never in my life had any luck screwing around with two-stokes, but as Dad didn't allow motorcycles and go-karts and lawn mowers were all fours anyhow it wasn't so necessary. Now I'm looking at this 6hp Evinrude long-shaft outboard motor that I picked up for $300...maybe I over-paid but it looked clean under the cover and the seller did get it fired up for a moment. 1992? Pre-smog, anyhow.

I got started Saturday when a neighbor happened along and I traded him coffee and three sheets of old plywood for his wisdom about cleaning fuel systems before one tries anything else on a two-stroke. Later I learned about the neat little diaphragm fuel pump that apparently uses crankcase pressure pulses to convert to fuel pressure, when I took all the screws out and then promptly dropped it into perhaps a dozen separate pieces. Fortunately all gaskets and seals had distinct witness marks enabling correct re-assembly without a manual to look at. Trying to find a manual seems to indicate that Evinrude never sold a six-horse or made the model number on the unit plate, so...who knows. The simplest little bowl-and-siphon carburetor in the world sorta works after a good hosing out, but jeez does this thing smoke. I'd have said it needs rings but...you-know, two-stroke.
At the end of the afternoon it was wheezing along reasonably well, except for the smoke...any raving environmentalists come along, I'll just tell them we're having bong hits and I'm sure they'll calm down. In the meanwhile I'll be looking at improving that situation a little but can't quite say where to begin. I know the 50:1 is about correct.
...Comment
-
My twin Johnson 25 hs did smoke.. But not really that much..
May need to use it a bit to clean it out.. As gas evaporates and oil stays..(learned that from my big saws)Comment
-
Well, I had to get into the Waaaaaay-back machine for this, because apparently the metalshapers.org site is no longer
But managed to find a cached version....

**If you click on the numbered thumnails, they open full size, and have captions under them....
JamesComment
-
Ahh...my introduction to the "Way-back machine"...it's great somebody did that or those pics might-have been lost forever.
Nice work on the fenders. Reminds me of about when it dawned on me that such work would mean more time with a hammer and dolly in your hand than a welding torch...stuff can get so flimsy when it's all cut loose and it's easy to really make of mess of things. If you don't mind, I'm gonna stick one of your photos here, it really shows some careful fit-up:

Note again, this is Tubbed Pacecar/James' work not mine!
For anyone who's never done this note that no matter how careful you are, metal will shrink when you weld it. It gets hotter and hotter, expanding and pushing out against the surrounding area until it turns liquid then that pressure collapses...now as it cools, it will pull back in the other way and there's no stopping it. The fix is careful peening/planishing back out, squishing and expanding the metal at the weld between hammer and dolly until things are back in shape. That's where the nice tig welding helps too, with the metal being softer and the weld more even than mig. All very time-consuming but worth it, you can see the planishing and final product in the other pics, the car looks bad-ass.
I had to do rr fenders "the other way" on the purple Challenger. i.e. cutting the hole bigger then re-forming the lip on the steel that was left. There's a weird little contour along the edge, then the factory had so many spotwelds there at the inner fender attachment that it was impossible to save the original lips for sectioning, they just got too tore up in removal. Somewhere I may have pics, I don't know.
----------------------------------
On another subject:
Tube Forming
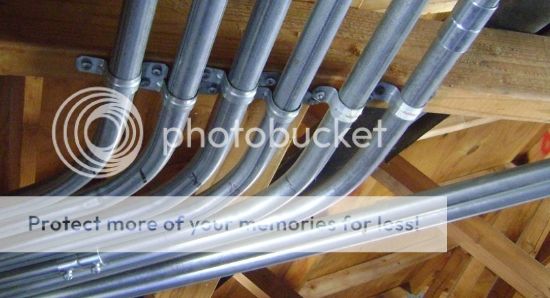
I had to do some electrical conduit this week and it's the same thing as fuel/fluid/nitrous lines or anything like it, just bigger. Maybe that makes it less-scary...or worse? Obviously you're using a conduit bender and standing on it instead of having a little tubing bender in your hand but they really are the same thing to do and a lot like building roll cages on a bender too. Another happy similarity with fuel/EMT line is that material is cheap. 3/16" brake line or 3/4" EMT are around five bucks for ten feet so if you screw up the first one make note of where the changes need to be and scrap it for another try.
Measuring the distance that the run had to go before making a curve, I marked the conduit at the same measurment then positioned the open end of the bender with it using a square.
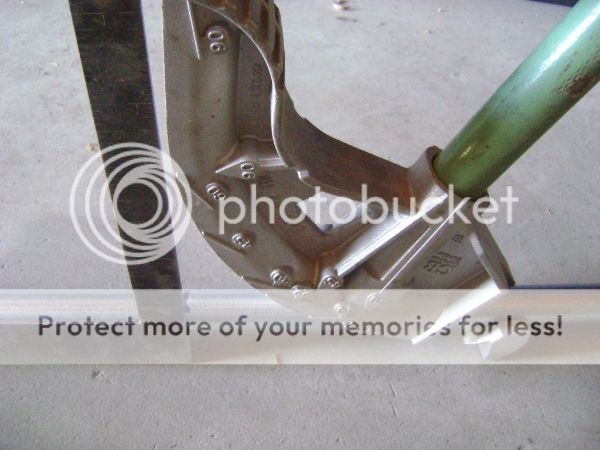
Being careful to not let the tube slip along in the bender, I tugged at it far enough to get a 90. Seen from the other side:
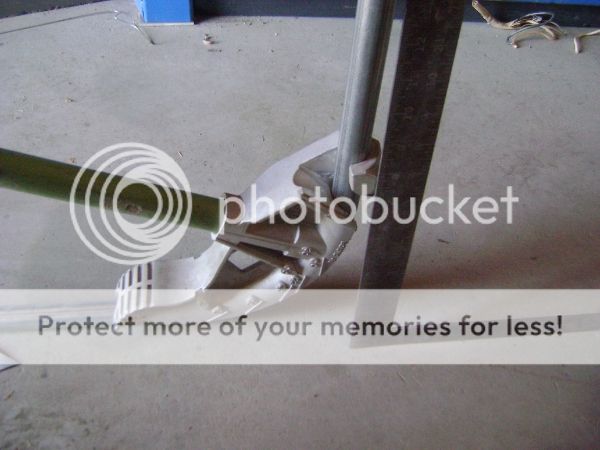
Then on to the next bend, always using the tape measure and a square:
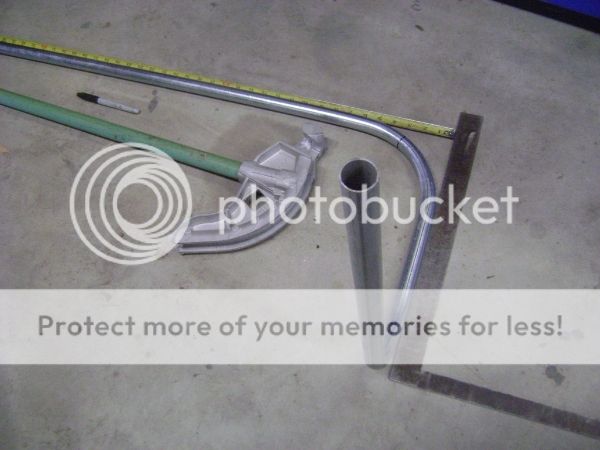
And finally, perfect fit. Seeing this plumb on the wall is 'way better than a bunch of slop or electrical boxes at every corner.
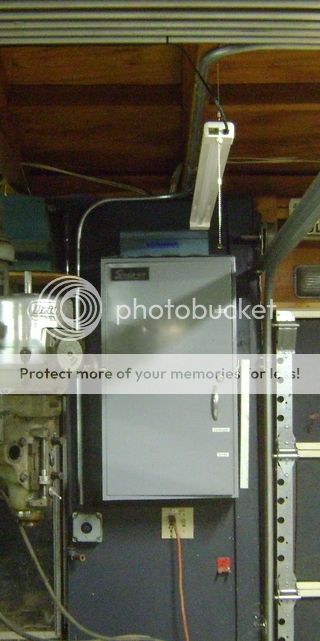
Maybe with one little piece, getting the bends in the right place are not so important but when you have a bunch, it really helps:
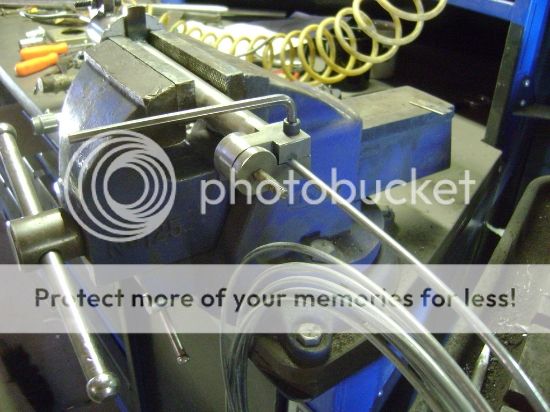
Back to car-specific stuff, here's a neat little bender that fits in the vise, made for when multiple close bends are needed in brake line and/or for when multiple lines with the same specs need to be made. The bending head swivels to different directions, the line doesn't move except to advance forward off it's coil. For multiple parts I just make a "program"; Line advance X amount (and clamp in place), bend head swivel to X degree, bend lever pull to X degree of bend...then back to line advance again. If a particular brake line has 20 bends in it, there are 20 lines of instruction developed and you can do it all day if you have to and each one fits same as the last.
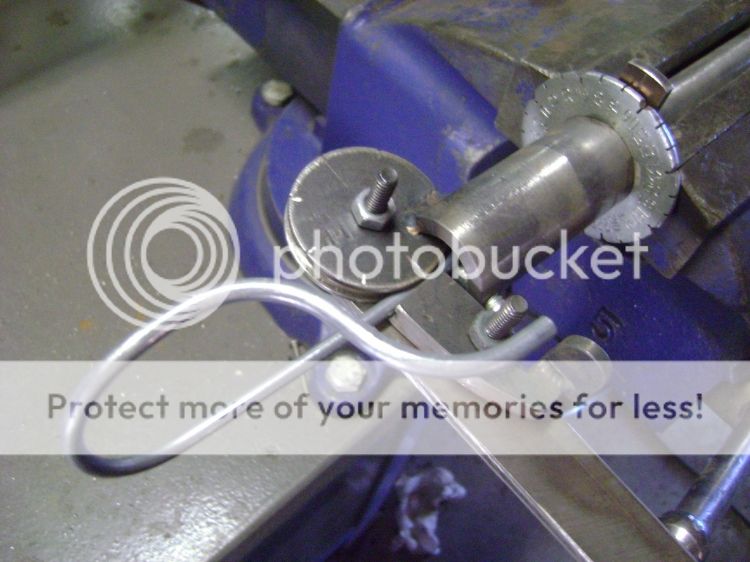
Same tool seen from the rear, w/ coil:
I've got a small box full of little tube-bending do-dads (I used to hate doing brake lines etc. but now kinda enjoy it). I thought of making something like this for a long time and finally got around to it last year, a mfr. of such fluid lines will have a large precise CNC-version of basically the same thing.
-Loren
Last edited by Loren; October 3, 2016, 09:11 AM....Comment
-
Loren: Yup, plenty of "on dolly" hammering, to stretch out the HAZ (Heat Affected Zone), which has shrunk from welding.
One tool that makes life a bunch easier (and a bunch noisier , is a shrinking disc (hard to see the disc in the pic, but it's mounted on the big DeWalt grinder visible under the car)
Using the shrinking disc simplifies things a bit, as you don't have to be quite so precise in your stretching, if you "overstretch" it a wee bit, you just run over the panel with the shrinking disc, and it creates heat, high spots are first to touch, so they get hottest. The you quench it with a wet rag. If you're happy with the results, you move on to a pass with an 80g open coat disc, if not, you can do some more raising with "on dolly" blows, and another round with the shrinking disc.......
I bought my shrinking disc YEARS ago (~2001) from Ken Sakamoto @ Sunchaser Tools, not sure if he's still in business or not, but there are now others selling them as well.
**I also forgot to mention, the car in the pics belongs to my friend & mentor, Steve Rutherford (aka: BuckshySteve) and his son James.
Steve also happens to have a build thread on here for his Mercury Zephyr Bonneville Car, hopefully he catches us up to where the car is at now soon
Cheers!
James
================================================== ================================
Originally posted by Loren View PostLast edited by Tubbed Pacecar; October 1, 2016, 09:52 AM.Comment
-
This last Saturday: Scruffy old guy who needs glasses using a Pfaff 138 HD sewing machine to repair and re-shape the oddball used Craigslist sails that came with our oddball Craigslist somebody-else's-project boat.

I've always felt that sheet metal work and sewing were kinda cross-pertinent to each other and enjoyed watching and discussing the upholstery process with people skilled in that. Gail had bought me a near-antique heavy-duty Sears machine ten years back which I used to perform an amateurish-but-usable re-do of a truck interior (first try, ya know), then later I picked this up when the owner passed away as sort-of an investment toward a buddy's enterprise in reproduction seat-belt making which didn't end up working out. It has sat in storage until now.
This is an industrial machine w/ clutch motor, fast as all get-out (actually too fast), but every dang mechanism having to do with the direct sewing process is adjustable and for the guys that built this, "adjustable" means set-screw-on-a-shaft with no flat areas or nothing solid to hold adjustment under a pounding. My first two days on this were as follows; sew for five minutes, then dick with the machine for an hour...over and over. Quite a test on the patience when what you just want to do is get a task done. Eventually by the time I had gotten to know the machine far better than I ever intended to I figured out that the needles sold for this thing work a lot better if you take about .040" of the end, re-sharpen and then adjust them down that much deeper (they bottom-out on something if you don't shorten first). After that the deal where the hole in the needle pulls the thread down underneath and then backs off to create a loop which the spinning thingie comes along and is supposed to hook and pull it around has a far better chance of success, done a dozen times a second or so (once for each stitch). Don't quite know what I'm talking about? Don't worry, neither do I. Also I know nothing about making or repairing sails, or I should say I didn't until we bought the how-to book for $11 from this place back east. It really is an art, just like a car seat cover made from flat material that has to fill out to shape over the foam underneath, sails have to fill out to an ideal shape in the wind and of-course there are other matters like strong attachment points etc.
So anyhow the old project boat which I bought cheap a year and two months ago now has, by-the-way, a fully rebuilt trailer which can actually go down the road without a continuous eye on the rear-view mirror to see what is going to explode or otherwise fall-off and then of-course these sails and the keel seen earlier and all the other stuff having to do with the actual boat are more, uh, ship-shape. Gail is very happy to finally have her little yacht on the water, we spent all Sunday afternoon on Mission Bay seeing the sights, enjoying the sun and getting a feel for operation.

We'll sail a few more times in the bays and then head out into open ocean when we are better equipped and know what we're doing. For now, there is no real interior in there, just a port-a-pottie and a bunch of space to put crap. Bulkheads, tables, sitting/sleeping area etc. needed for longer trips will be a project (meaning; another project) for this winter I suppose. -Loren...Comment
-
when I was in high school, the shop teacher (likely tired of me correcting him) suggested I take home economics instead of shop class. I did, and I agree, sewing and metal layout are very similar.Last edited by SuperBuickGuy; October 3, 2016, 10:54 AM.Doing it all wrong since 1966Comment
-
As a kid I thought sewing (which Mom required me learn one summer) was for wussies until my latest issue of Street Chopper magazine had a how-to piece on building a custom high-back seat for an H-D hardtail (this was around 1971). I would not have called the bearded, tatted-up hairy-arm'd monster on the sewing machine a wussy. ...
...Comment
-
what did her husband look like?
Doing it all wrong since 1966Comment
-
... ...
...Comment
-
Looks like a MacGregor 22 or something quite like it. You know the old saw about a boat owner's 2 happiest days, right?oddball Craigslist somebody-else's-project boat
Comment
-
Originally posted by hauen View Post
That's exactly what it is. Since there's only two of us these days, 22 is enough, and easy to trailer. I found out about the "old saw" a long time ago w/ powerboats, jeez the repair costs for the stuff that kept failing was a killer, and sometimes the shop did as much damage as good for all the money they asked. No more repair shops! That is part of the deal, now....Comment
-
I had to learn to sew.. Alot like fabricating stuff. My granddaughters bring me their stuffed toys to fix..
Son's girlfriend's girls made faces and said "boys don't sew" I found an upholstery shop in town and we looked in the window.. Guess who was sewing?
I have n old singer I wanna do uph on..Comment
-
Check out "Good Old Boat" magazine. No feature boats newer than 20 years old. No adds from new boat companies, only from companies that sell parts to repair good old boats.Comment
Comment