Long way down the road, but of course I can't help but look at colors. Always been a fan of the color Chevy called "butternut yellow". A very pale yellow that is more creamy than yellow. Tough color to find on old 30's coupes, but this one is pretty darn close to it:
On the color - you might take a look at the '70 Plymouth "Gold" which was a non-metallic yellow (dunno why they called it gold....). My first '70 Road Runner was that color and it looked great, especially with green tinted windows. It's a soft yellow and not at all LOUD like some of the Chrysler colors in that era. It probably was called other names in the different model lines (Dodge, Chrysler, Dodge truck).
On the color - you might take a look at the '70 Plymouth "Gold" which was a non-metallic yellow (dunno why they called it gold....). My first '70 Road Runner was that color and it looked great, especially with green tinted windows. It's a soft yellow and not at all LOUD like some of the Chrysler colors in that era. It probably was called other names in the different model lines (Dodge, Chrysler, Dodge truck).
Dan
Pics I found appear to be more yellow than I'd like. I prefer the creamy yellow of the Chevy color.
Another gorgeous day here in the great NW! I did the final fitting on my hood, and then painted the inside gloss black. I adjusted my front hood pins to match the bracket I mounted inside the hood and locked them in. I added a flat bar to the back side of the top grille plate, just to ensure it was very solid, and strong.
Also added a double plate to the bracket inside, as it's narrow and I wanted it to be thicker.
Did a weld on each end of the double plate, and a few tacks on the edge. That should make it plenty strong.
Once I got the hood and pin setup done I bent up brackets to mount the electric fan. It came with those cheap wire ties that you push through your radiator, and I've had issues with those breaking, or damaging the core. So I prefer mounting it slightly off the radiator and hooked to metal near the radiator. The grille mounting bolts were a good spot to attach brackets, and keep them short.
I also sanded the exhaust pipes between the header collector, and the cutouts, and then shot this part satin black VHT. The pipes are kinda out there, and they detract from the look, so I think the satin black makes them blend in better.
Do not like the wire or plastic ties for fans at all.. They do bust radiators in derbies.. We like to just lay them on the radiator and use trucker's bungee straps.. Radiators do not spring as many leaks.. Street cars get steel tabs as you described.. Beautiful day today!
Do not like the wire or plastic ties for fans at all.. They do bust radiators in derbies.. We like to just lay them on the radiator and use trucker's bungee straps.. Radiators do not spring as many leaks.. Street cars get steel tabs as you described.. Beautiful day today!
Do you have any issues with laying them on the radiators and having vibration eventually bend the fins over from rubbing?
Yes, But they eventually get compromised.. I can make a $80 aluminum radiator last 5 runs, while copper/brass may go 2 runs.. Like I said, street cars get tabs like what you built..
Temp dropped like a rock today! About 15 degrees colder than yesterday, but I spent the day on the car anyway. I reworked the holes slightly for the hood pins, and then installed the stainless scuff plates on the hood.
After that I measured up where to penetrate the floor and routed all my front wiring. Once it was routed I began the tedious chore of wrapping, and securing it. Added grommets and black plastic covering where it could see any harm, and tied it all up in place. Didn't get to actually hooking any of it up as it just took so long to route and dress it down.
I cut down the 12"x 12"x 1.75" 90 degree lower hose and installed it on the radiator. Put the thermostat housing on and discovered the upper hose is the wrong diameter. The bozos gave me another 1.75" instead of the 1.5" I needed. So just stopped there, and quit for the day.
I also discovered my wiring harness uses a 80a. fusible link that's a plug in type, but they didn't supply the link. So need to pick one of those up also. Have to spring for a battery soon also as I need to test everything I've wired before long.
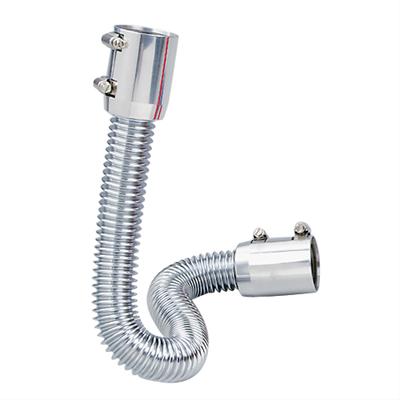
Anyone ever used the flexible ribbed stainless steel hoses with rubber clamp connectors on the ends? I'm looking at buying a kit for the top hose since they're not much more than a universal rubber hose, and look like they're both stronger, and better looking. Seems like a good design with double clamps on each end, but don't know anything about them?
Anyone ever used the flexible ribbed stainless steel hoses with rubber clamp connectors on the ends? I'm looking at buying a kit for the top hose since they're not much more than a universal rubber hose, and look like they're both stronger, and better looking. Seems like a good design with double clamps on each end, but don't know anything about them?
friend used one on his '67 dart gt with 360 swap, if i remember right
he had to use a ratchet/socket on the clamps because when he did
them with a screwdriver they would blow off when the car got hot....
other than that he had no complaints. we even painted the hose with
"metalcast" blue and it was awesome, came out looking like blue anodizing.
Last edited by fatguyzinc; March 1, 2020, 09:07 AM.
If you can get ends with a bead rolled on them, they will be less likely to blow off when the engine gets hot.. Used exhaust pipe to make hoses work in derby cars and tried to weld beads or spots on the ends. Usually double clamped with Indian Head black gasket sealer..That would be just ugly on your masterpiece.
If you can get ends with a bead rolled on them, they will be less likely to blow off when the engine gets hot.. Used exhaust pipe to make hoses work in derby cars and tried to weld beads or spots on the ends. Usually double clamped with Indian Head black gasket sealer..That would be just ugly on your masterpiece.
They already have ribs on them Bob. Made ribbed to allow them to flex, so the SS tubing looks like the ribbed rubber hoses.
See if I can put this picture up here?
I think I'll give one a try. It's pretty much a straight shot from thermostat housing to inlet, with just a little curve to make it line up straight. Shouldn't be too much stress, and will look better up top where it's visible.
I think I'll give one a try. It's pretty much a straight shot from thermostat housing to inlet, with just a little curve to make it line up straight. Shouldn't be too much stress, and will look better up top where it's visible.
I used one on Dad's Falcon....so far so good...(knock on wood!)
 Tweet
Tweet


Comment