Announcement

Collapse
No announcement yet.

Drag Week 2012 - Project GIRTST 71 Mustang (get it right the second time)

Collapse
X
 
  • Filter
  • Time
  • Show
Clear All
new posts

  • CDMBill
    replied
    Originally posted by Dignlif View Post
    Hey Bill,

    Did you put the cooler right up against the radiator or do you have a gap? Mine is centered to the radiator but has about 3-4" of space between it and the rad. Since mine was consistently over 225 last year on the road, I am actually considering adding a second big B&M trans cooler. Since I'll be fabbing up a new mounting either way, I'm wondering if I should move it/them in and lessen the gap.

    Anyone else have an opinion on this???
    Rich, I had a poor experince with the B&M plate style coolers but I've had no trans cooling issues since I went to the Eral's Setrab style cooler. I did have it right in fornt of the radiator last DW which didn't help engine cooling but the trans was fine even with the 6000 stall converter and the trailer. I used the same one in a more foreward location succesfully in 2006 and 2007.

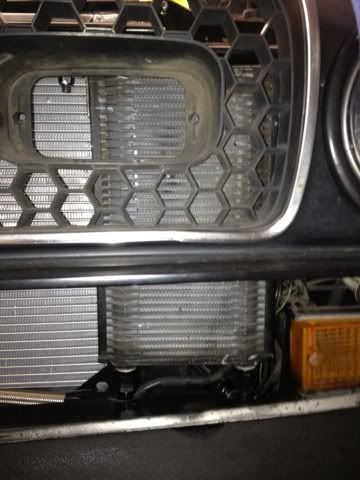
    This is the trans cooler in its new location.


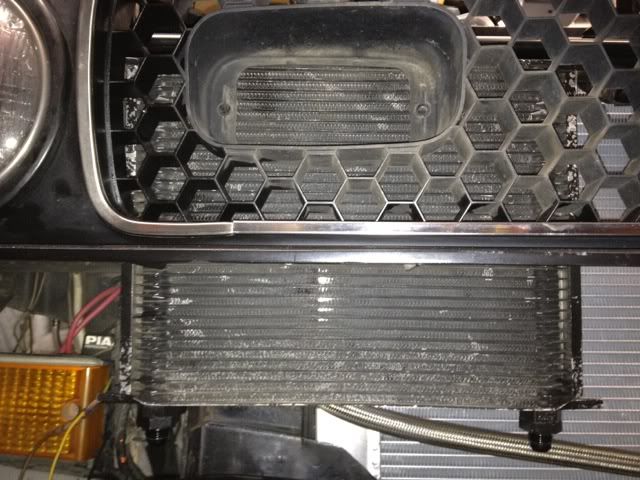
    I have a similar smaller cooler for oil. Also in its new location. Both will be ducted mostly behind the headlamp buckets in to wheel wells. There is a partital overlap of the transcooler with the radiator but it is five inches in front and offset.


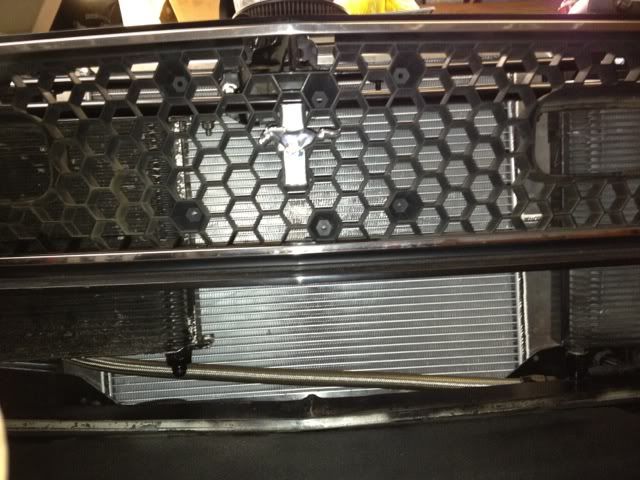
    This is the airflow view form the front.


    Leave a comment:


  • milner351
    replied
    Bill - how much area do you have for cooling air flow below the bumper compared to through the grille?

    Do you have any kind of "chin spoiler" or "air dam"

    It may be another opportunity to get more air in, or locate a cooler down there (rock damage is a concern).

    Comparing area of inlet to area of outlet is a great idea - as usual Bob brings up an excellent insight to the subject.

    With the additional strengthening you've done to the subframe of the car, so you see any structural reason not to open up more exit area for heated air to leave the engine compartment over the sub frame between the "shock tower" and firewall?

    From what I've seen on some newer cars, the firewall behind front suspension is a typical "exit area" for cooling air.

    You might be able to incorporate an exit air duct in the front fender behind the wheel to "pull" air out of the engine compartment using the air rushing under the car to pull heated air out.... it's a "dirty air" area behind behind the wheel but it may be worth some experimenting.

    Leave a comment:


  • Dignlif
    replied
    Hey Bill,

    Did you put the cooler right up against the radiator or do you have a gap? Mine is centered to the radiator but has about 3-4" of space between it and the rad. Since mine was consistently over 225 last year on the road, I am actually considering adding a second big B&M trans cooler. Since I'll be fabbing up a new mounting either way, I'm wondering if I should move it/them in and lessen the gap.

    Anyone else have an opinion on this???

    Leave a comment:


  • CDMBill
    replied
    I have made a little more progress on the cooling project as I've finished building the new cooler(s) mount and revised the lines for the oil supply form the filter to the cooler and on to the engine and I'm shortening the trans cooler lines for the new location.

    Leave a comment:


  • CDMBill
    replied
    Originally posted by Bob Holmes View Post
    Bill, great car and great

    thanks Bob, you are exactly on point with what I'm trying to do and I can use all the help I can get.)

    I'm not bold enough to say that I know how to cool a 1,000hp drag car. However I have spent a lot of research, time and fabrication on how to cool a turbo charged roadracing car. One of the items that I believe you may want to investigate is how to direct and pressurize the air going through your various coolers. You've spent time addressing how the air comes out of the radiator, but there doesn't appear to be the effort (that I firmly believe is necessary) to duct, seal and condition the air in front of the coolers and radiator.

    You're right about the focus on in and out, and ducting, pressurization etc. is something I need to better understand. The drag race element for me is Drag Week and the True Street events, thirty mile drive followed by three hot laps. It's the open track , road course events that are the toughest

    There are a number of NACA research papers that are relevant. And applying the information has been very productive for my application.

    I'd very much appreciate any pointers you have to the NACA research

    Additionally, you need to address how the air that has flowed through your coolers can exit the engine compartment. I work on the basis that I need to have as many inches of evacuation available as there are inches of radiator. Whether that means properly venting the hood (no, that does not mean an opening at the base of the windshield which is a high pressure region), or vents through the fenders or rear of the wheel wells.

    With the new cooler locations I'm trying to direct the airflow through additional openings in the core support plus into the fender wells behind the headlight buckets, it's the design of the ducting and construction that I'm struggling with at the moment. I'm also looking ahead to an eventual intercooler for a boosted application. So bring on the ducting pictures!

    If my thoughts are of interest, I can post some pictures of our ducting, and I can dig up the NACA information. Suffice it to say that our methods caused the dyno operator that certed our hp/tq to comment that our car was unusual for the series that we compete in as it did not overheat. Our problem was trying to keep the car up to operating temp as it overcooled. And this is with a big ass intercooler in front of and sealed to the radiator front surface.

    The drag race issue is mostly lack of oil temp, with heat soak the issue with True Street. Drag Week is the drives between tracks in all kinds of weather and traffic conditions not to mention pulling a little trailer

    I am concerned that some of the thoughts about separating cooling components are in fact detrimental. Think about what you want the air to do, and how to keep it from swirling, escaping and bleeding off pressure.

    Clearly you have to work within the packaging constraints that you have. But you'd be amazed at the impact if your thought process encompasses the air travel from the moment it enters your system to the moment it exits. That is...from in front of the grill (or it could be a bottom feeder) to the moment it re-enters the atmospheric air stream.

    It's the exit from the engine compartment that is troubling. I opened up the shock towers a bit a few years ago and I'm looking at additional venting without cutting holes in the fenders or hood although I'm beginning to consider something like the new Gt500's and the ZL1 Camaro have. The cowl hood worked well as the drop in inlet air temps during a drag strip has exceeded 30* at tracks with moderate temps.

    I look forward to following your progress.
    I'm looking forward to your help.
    Last edited by CDMBill; February 5, 2012, 04:53 PM.

    Leave a comment:


  • TheSilverBuick
    replied
    I like the LED idea because he is already amp limited!

    Leave a comment:


  • Thumpin455
    replied
    I know what I would do with EFI, 1000hp, and a need to keep it cool. Get with Dieselgeek and set it up for E85.

    The turn signals in my 71 feel like ABS plastic, not sure if that is what they are or not. Most RC hobby epoxy should work on it, but I like the LED idea better than incandescent, mainly due to the heat. You dont want to melt the lens, which is a problem with some tail lights. As a turn signal, not a marker light, the heat should be minimal, but the LED setup is usually quite easy to install.

    Leave a comment:


  • Dignlif
    replied
    Hey Bob, I'd be interested in seeing those NACA docs. Sounds like some interesting reading.

    Leave a comment:


  • Bob Holmes
    replied
    Bill, great car and great effort.

    I'm not bold enough to say that I know how to cool a 1,000hp drag car. However I have spent a lot of research, time and fabrication on how to cool a turbo charged roadracing car. One of the items that I believe you may want to investigate is how to direct and pressurize the air going through your various coolers. You've spent time addressing how the air comes out of the radiator, but there doesn't appear to be the effort (that I firmly believe is necessary) to duct, seal and condition the air in front of the coolers and radiator.

    There are a number of NACA research papers that are relevant. And applying the information has been very productive for my application.

    Additionally, you need to address how the air that has flowed through your coolers can exit the engine compartment. I work on the basis that I need to have as many inches of evacuation available as there are inches of radiator. Whether that means properly venting the hood (no, that does not mean an opening at the base of the windshield which is a high pressure region), or vents through the fenders or rear of the wheel wells.

    If my thoughts are of interest, I can post some pictures of our ducting, and I can dig up the NACA information. Suffice it to say that our methods caused the dyno operator that certed our hp/tq to comment that our car was unusual for the series that we compete in as it did not overheat. Our problem was trying to keep the car up to operating temp as it overcooled. And this is with a big ass intercooler in front of and sealed to the radiator front surface.

    I am concerned that some of the thoughts about separating cooling components are in fact detrimental. Think about what you want the air to do, and how to keep it from swirling, escaping and bleeding off pressure.

    Clearly you have to work within the packaging constraints that you have. But you'd be amazed at the impact if your thought process encompasses the air travel from the moment it enters your system to the moment it exits. That is...from in front of the grill (or it could be a bottom feeder) to the moment it re-enters the atmospheric air stream.

    I look forward to following your progress.
    Last edited by Bob Holmes; February 3, 2012, 09:57 PM.

    Leave a comment:


  • Dignlif
    replied
    I would think a two-part epoxy type adhesive would be strong enough, especially if you inlaid another material spanning across the two pieces like thin/ narrow aluminum strips. Setting up the angle with just plastics you could cut tow triangular pieces at the angle you want and support the socket with those, then create the other 2-3 pieces per side and epoxy it all together. With LED's is should be bright enough but you can always go back and install some aluminized tape or aluminum foil? to create an internal reflection.

    I found this cool article at West Systems about bonding plastics. Looks like their product is about $20 for an 8 oz kit, 4 oz of each part. Could be worth a try for experimenting.
    http://www.westsystem.com/ss/gluing-...-g-flex-epoxy/

    For an angle with the grill cloth/ fiberglass method all you'd have to do is use the same two pieces of angled plastic from above and glue the 3 pieces to the base, then stretch the cloth to cover all the openings. I forgot that the reflector base comes apart from the lens housing so you can attach the angles and receiver permanently to the base with this method.

    We did a bulb angle rework on my tail lights once to gain some room for woofer enclosures (yeah I know but it was the 90's and I didn't know any better) and it worked fine.

    Leave a comment:


  • CDMBill
    replied
    Rich, that's a good idea. I've been thinking about ways to mount the bulb somewhat sideways but still use the same mounting flange for the bulb holder. I have some fiberglass repair material for surf boards that cures with sunlight although I'm not sure that is right for this kind pf work. Per Milner's suggestion I have foundsome LED replacement bulbs. I'm going to get a small sheet of plastic to work on the carved up housing. Any idea what kind of plastic these things were made of, and what kind of glue I should use?

    Leave a comment:


  • Dignlif
    replied
    Wow cool stuff Bill! I had never seen that waterpump setup either. I can only dream of that horsepower level right now but I like how you're planning ahead. Steve with the Pro Charged Blazer did a lot of careful planning and it really helped his setup.

    On the blinkers, have you thought of using fiberglass? You can use the old stereo installer trick of grill cloth to create your form and then glass over it and finish with a little filler if you need to. You can make it removable by extending the top/bottom so that the new addition simply screws to the original housing. I've done it before and you can create some really cool shapes with it. I used epoxy resin rather than polyester. To better explain the process, I found a good set of install pix online.

    The first picture is the form and another with the grill cloth stretched over the form, then you apply resin to the grill cloth and let it dry, then lay some glass with more resin, and finally finish with filler before painting.

    Click image for larger version

Name:	1 housing and grill cloth smaller.jpg
Views:	1
Size:	28.6 KB
ID:	860074Click image for larger version

Name:	3 grill cloth with resin smaller.jpg
Views:	1
Size:	25.1 KB
ID:	860072Click image for larger version

Name:	2 grill cloth with fiberglass smaller.jpg
Views:	1
Size:	27.3 KB
ID:	860073Click image for larger version

Name:	4 housing with filler smaller.jpg
Views:	1
Size:	25.9 KB
ID:	860075

    here's the posting I grabbed the pix from

    http://www.fiberglassforums.com/audi...7-drivers.html
    Last edited by Dignlif; February 3, 2012, 12:31 PM.

    Leave a comment:


  • Orange65
    replied
    That manifold is the thing that dreams are made of... pure beauty!

    Leave a comment:


  • TheSilverBuick
    replied
    Ah, so it's a progressive shot you're looking for, and I see how the fuel and N20 lines mix in one nozzle which I could see having a better distribution.

    Leave a comment:


  • CDMBill
    replied
    Darren it's a good question. I have thought about it and that may be the right approach until I'm sure I've fixed the belt issue. I've reworked the accessory mounts so fingers crossed.

    Leave a comment:

Working...
X