 Tweet
Tweet
I'm still thinking about coatings for an intake - only gonna handle air out there, right?
-
Flying south, with a flock of bird dogs. -
Seal her up with JB weld or Splash Zone epoxy and smooth out with a sanding roll. Looking for leaks after firing it is not going to be the best use of your tuning or troubleshooting time.Central TEXAS Sleeper
USAF Physicist
ROA# 9790Comment
-
Originally posted by CTX-SLPR View Post
Coat the whole outside with epoxy! That'll hold the boost and hide the welds/assembly. Win Win! Escaped on a technicality.
Comment
-
I wasn't going to say that but since you did... that's exactly what I did on my oilpan since I didn't have time to leak test it, troubleshoot it or anything else. I just slathered half a tube of JB Weld on the outside of EVERY welded seam and hit it with a file afterwards to knock down the worst of the blobs. One day I'll re do it... one day.Originally posted by TheSilverBuick View Post
Central TEXAS Sleeper
USAF Physicist
ROA# 9790Comment
-
Messed with the Raspberry Pi some over the last couple days. I did an update on the operating system(?) and now it boots a fair amount quicker which is good. Unfortunately I thought it killed my remote desktop app/connection but turned out it just changed the IP address on me during the update. With that I got some suggestions from the Tuner Studio programmer on where to edit the program files to remove a pile of tuning and support files from Tuner Studio so it loads up quicker and the gauge display still functions normally. I made a copy of the whole folder, so if I remote desktop into it I can still run a full version of Tuner Studio, but for day to day display uses, the trimmed down version will do nicely.
Next step is getting it to start up without loading up the GUI and getting a power cable for the screen so I can install/test it in the car.Escaped on a technicality.Comment
-
what OS did you put on it?
will the tuner studio stuff load on just busybox?
https://github.com/raspberrypi/noobs How to boot into "Safe Mode"
To boot into a basic busybox shell rather than launching the NOOBS GUI, you can either:- Append rescueshell to the argument list in the recovery.cmdline file which is found in the root NOOBS directory.
- Insert a physical jumper between pins 5 & 6 of GPIO header P1. If you have external hardware or an addon board connected to the GPIO header, you may find that pin 5 is being pulled low and accidentally triggering "Safe Mode". To prevent this you can append disablesafemode to the argument list in the recovery.cmdline file which is found in the root NOOBS directory.
Last edited by Beagle; March 18, 2015, 05:57 PM.Flying south, with a flock of bird dogs.Comment
-
Its a default Raspbian/Debian variant. I messed with it for a bit over an hour the other night and cannot get Tuner Studio to start without the GUI loaded up, nor even with the GUI booted up automatically I cannot get Tuner Studio to start automatically.....
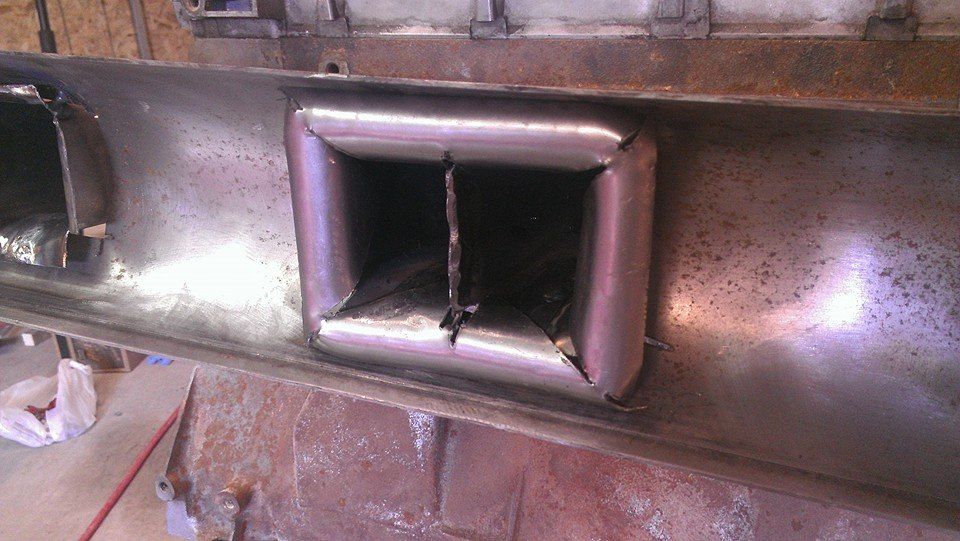
Today I played with my intake some more today, working on a curved entrance to the runners. It was my third attempt, and I think I'll make two more and call it good. I'll add as much welding metal as I can to the gaps and then try and grind/polish/blend it down. Over all, I don't see it getting much better with my skill set. At the end of the day, I'll let the boost do the work =P
 Escaped on a technicality.
Comment
-
interesting thread on automatically logging in and running an app... you probably saw it already but I thought I'd throw it out there. The user context switch idea was a thought.
I started looking at a GT40 lower / custom upper because of this thread and decided if I couldn't draw an eccentric bellmouth I sure as hell couldn't build one! That, and there's very little room on the base for a straight vertical velocity stack, so it complicates everything. Looks good man, stay after it!
Flying south, with a flock of bird dogs.Comment
-
I tried a variation on that one without success, so I'll give that one a try. Part of the hiccup on using the *.sh file is it asks "Execute" or "Execute in Terminal" which requires a click before starting up.Escaped on a technicality.Comment
-
try whatever they call their File Explorer, Preferences, Behavior, Always Execute for Executable Text Files?
I should have said - it'll do that for everything though.. some caution required. I had a boot disk with a skull and crossbones on it since none of my teammates could read. You really didn't want to boot from it unless you were giving a machine back to them or wanted it wiped. I should add, it said "Boot DIsk" which I had to change because people were bad about borrowing and booting from other people's boot disks. I wasn't real good about labeling.
Last edited by Beagle; March 21, 2015, 08:43 AM.Flying south, with a flock of bird dogs.
I had a boot disk with a skull and crossbones on it since none of my teammates could read. You really didn't want to boot from it unless you were giving a machine back to them or wanted it wiped. I should add, it said "Boot DIsk" which I had to change because people were bad about borrowing and booting from other people's boot disks. I wasn't real good about labeling.
Last edited by Beagle; March 21, 2015, 08:43 AM.Flying south, with a flock of bird dogs.Comment
-
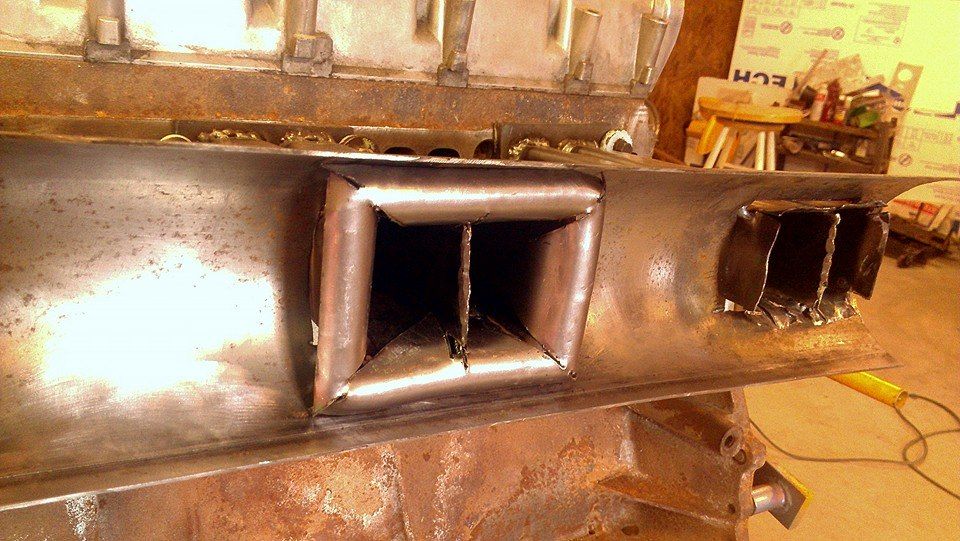
I finished making the other two. They need some finishing body work, and I'll weld in material on the cuts and try and blend them smooth after install.
I made the entrance to the first one a bit longer since its going to be fairly close to the throttle body. They are just hanging there, the middle one squares up when held in place.

To make them was fairly crude. Take a flat piece of metal, cut some lines in the middle and hammer away. I took a piece of pipe I had and cut it in half then welded it to bolt to clamp in the vise. Then found a socket in my spare socket drawer that fit nicely in it and started hammering away. I used my anvil to finish up the corners.
I've welded up almost all the gaps around the runners and the pipe now, so its mostly sealed. I have the most difficult part left, which is between the runners as it passes through the pipe wall left.Escaped on a technicality.Comment
-
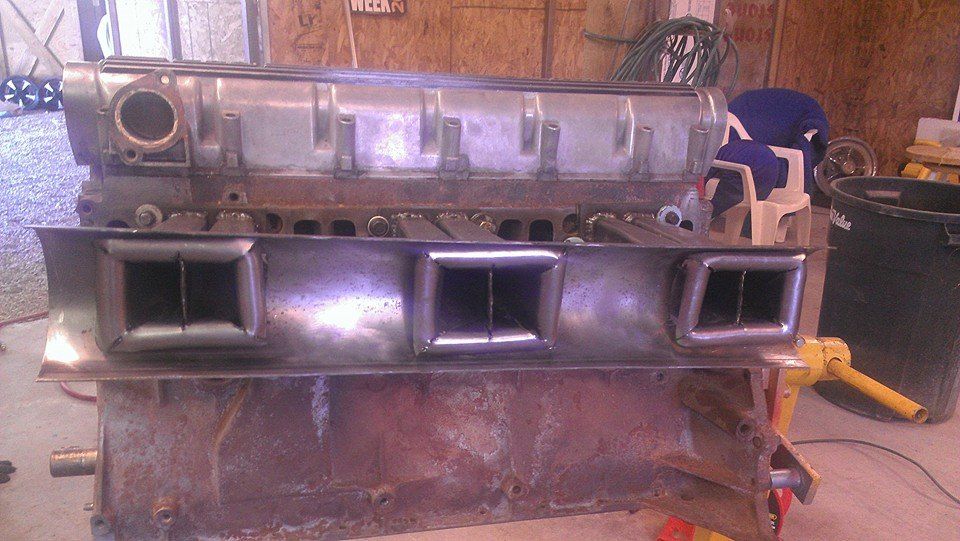
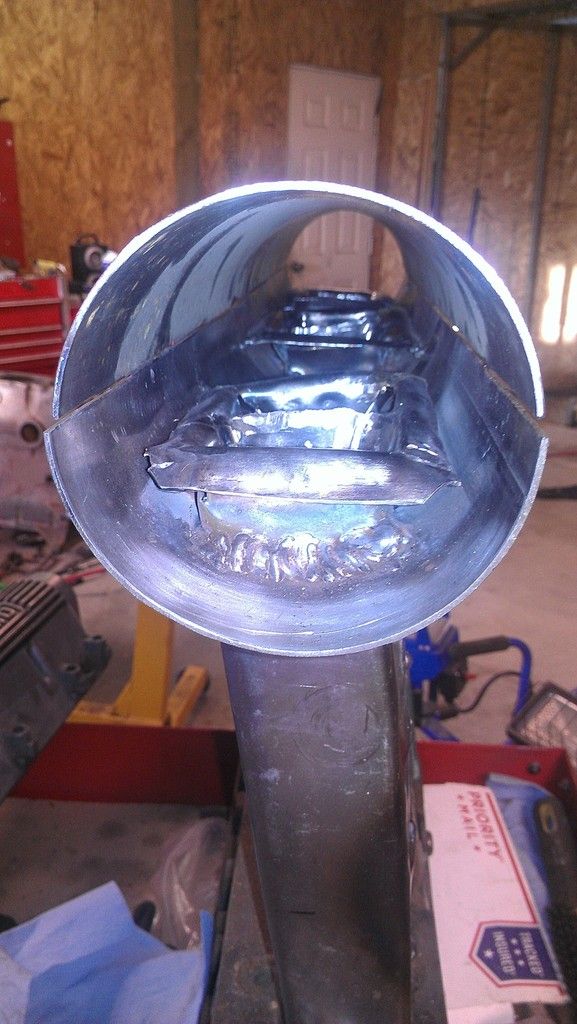
Well I certainly hit a wall in my skills today. Figured I'd do some final checking and sealing up of the runners before attaching the port entrances, and to no surprise essentially each runner has a spot or few where the acetone I was using leaked through. I used a MAP torch and a brazing rod to seal between the runners in the tube, and attempted it once on one of the runners and did not like the way it was warping with the heat. So I've concluded I'm going to use an epoxy sealer over the welds to ensure a seal. I'm not surprised about this at all, I just have to pick one. The second hiccup I ran into was after attaching the runners with a few MIG spot welds, I did some minor hammering to fit each port tighter, and attempted to use the MAP torch and brazing rod again to "fill" in some of the gaps and was not having much success at all. I'm at the point where I'm leaning towards calling it "Good enough" as far as the runners and port entrances are concerned. Next up is the injector bungs. I need to build a jig to set them up.
For the time being I set the other half of the pipe plenum on there as a motivational picture. It will all get a nice coat of paint when done and hide most the sins. I am pleased though how rigid it is now.
Escaped on a technicality.Comment
-
That's a wild intake manifold, dude!
My fabulous web page
"If it don't go, chrome it!" --Stroker McGurkComment
-
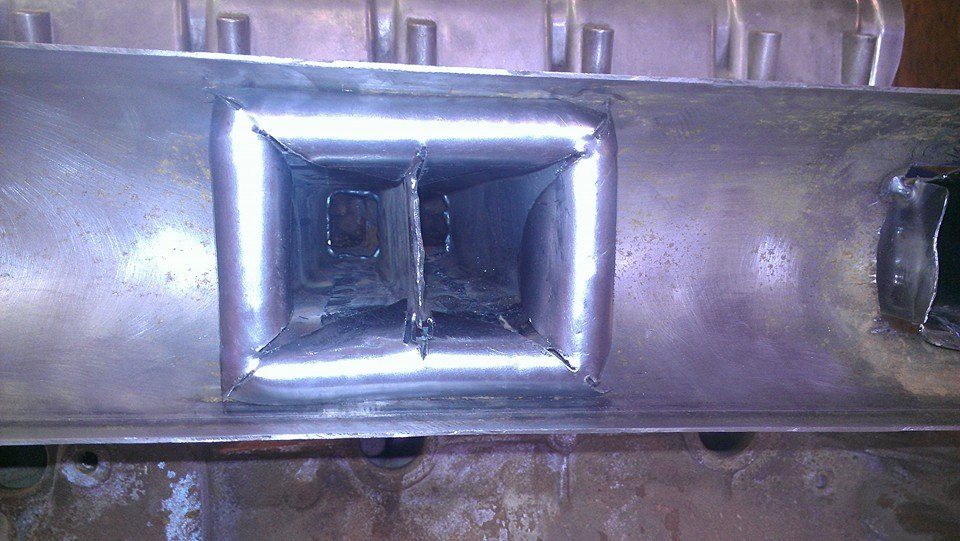
Thanks
I went back out to the garage and MIG'd a bunch of material to all the corners and holes then took a grinder too it and now I am reasonably happy with it.
Next up, injector placements!Escaped on a technicality.Comment
-
On march 18 Brian ran a video of a Oliver inline six tractor engine that had been hot rodded. It has an intake similar to what you are doing. Interesting they did nothing to smooth out the pipes where they go into the plenum. Might be worth a quick look. Nice work love your posts.Comment


Comment