Announcement

Collapse
No announcement yet.

Gail and Loren's Cherokee

Collapse
X
 
  • Filter
  • Time
  • Show
Clear All
new posts

  • Gail and Loren's Cherokee

    Are you ready for a long one? This will have separate postings due to length. The next 60 pix details our experience of coming into a type of car we may have never had much interest in, except that events brought it along…we decided we liked it…eventually I went to modify it up a little and learned something new.

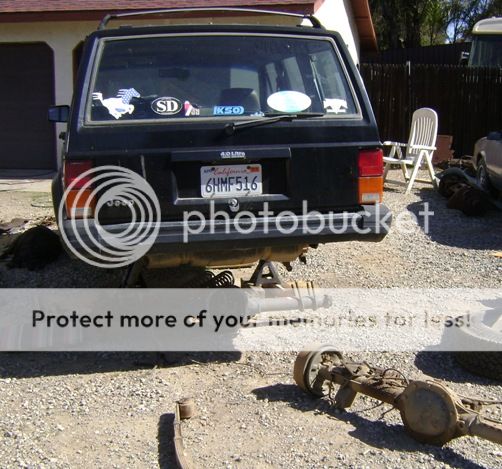
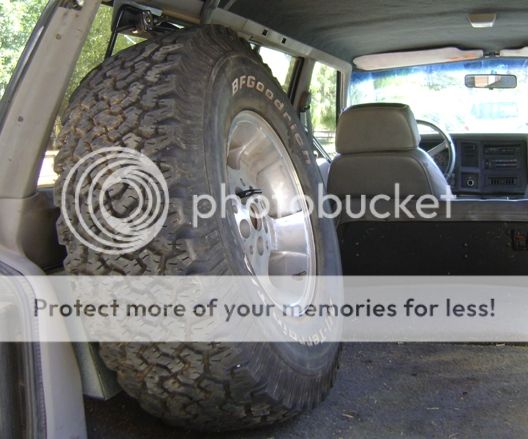
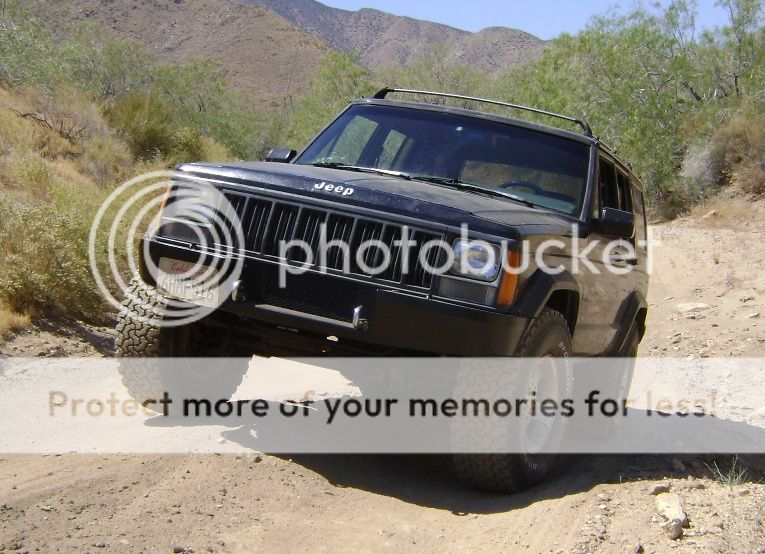
    We were not looking for a Jeep Cherokee in 2005…one sorta came to us. A friend had it as a project to flip, putting a junkyard motor and fresh paint on a 1992, but he couldn’t finish it due to a move. He told me to take it…we’d like it…for a couple thousand bucks, pay him later. To me, it wasn’t the “real” Jeep and Gail just made a face, but with a couple more minor repairs and a new set of tires the old Chero was a great beater. We could take it anywhere, carry most anything, and leave it parked downtown all day without a care. A few trips to the mountains and desert, going places where we never could with the other cars, soon had it becoming regular transportation.

    Deficiencies did show up when we tried something different and started going out with some of the more hard-core off-roaders around town. Places I normally would consider only for hiking were easy roads for these people. We bashed the suspension and sheetmetal on rocks and the tires slipped and slid on hills. We had fun and made going out with them a regular activity, but always had to pass on the more challenging trails.

    While I have a couple of old “full-size” Jeeps stored in back, including both a ’63 first-year Willys-tagged J-10 pickup and Wagoneer, I had never had any experience with a Cherokee. If you think of it, they are a bit like the original Jeep…small, light, inexpensive. They do not use heavy driveline components and are not built for towing. They are reliable to 200k miles and get decent mpg depending on transmission and use. They don’t look like much in stock form and start with little in the way of features, but are simple and versatile and for off-road have the basics such as a two-speed transfer case and a decent set of live axles. If you want to go to rougher places they are easy to modify for the purpose, installing a little lift via aftermarket springs and shocks, bigger tires and cheapo lockers will put you in a different world . Continued modification gets more expensive but like anything else you pay for how you want to play. Most guys keep it low-cost and enjoy what is perhaps one of the biggest advantages of an older vehicle they made millions of…you can thrash away on it and if roll it or wreck it, you just get another body and transfer your parts over. That for our purposes makes a common old Cherokee a good idea.

    For a while I worked on a second more-capable Cherokee project, while keeping the first one stock. I started a custom front axle and made some other parts, but I didn’t really have the time to spend (nor really need two Cherokees) and progress stopped after a short while.

    So things remained, but after seven years of commuting and weekend duty the already-high-mileage first Chero was getting tired. By the beginning of 2013 reliability was starting to suffer and it was time to do something. The second one had the parts I’d built but while sitting the registration had become overdue by probably a thousand bucks…the first one was current and aside from mechanicals was still in good condition, even with over 300,000 miles on the body. Why not gather up the best of each and put together a single car that would serve as good transportation but handle the tougher trails as well?


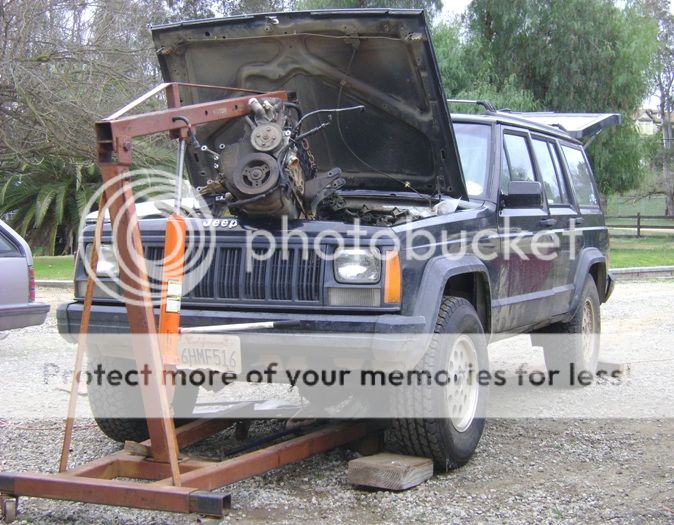
    This was not the original engine for our car and I had no idea how many miles are on it besides, “a lot”. It passed its’ last smog test but didn’t make much power and showed considerable timing chain stretch. It wouldn’t run under 220 degrees in the coolest weather.


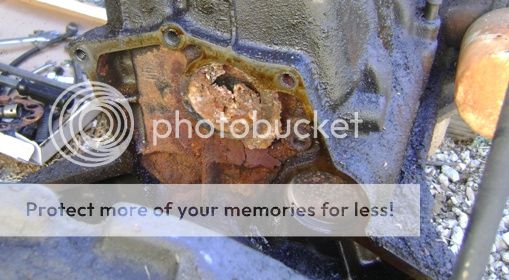
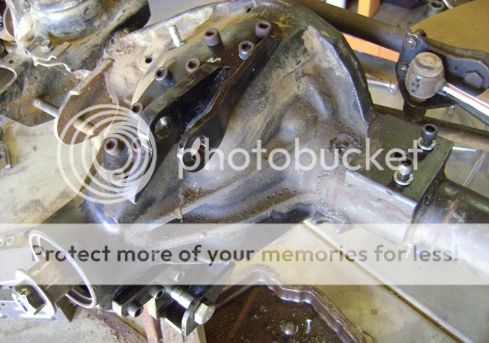
    It leaked a little water from the day we got it so we never bothered with the expense of anti-freeze or rust inhibitor which of-course only encouraged more leaks. I’d changed accessable freeze plus once but could do nothing with a rear one covered by the trans housing. Here it is finally out in the light; it’s almost completely gone, leaving just a bunch of oxidized fluff there. An aluminum plate between the block and trans was the only thing holding water in thanks to the machined block surface around the plug being at the same level, and that was almost rotted through as well.


    The driver-side motor mount lived under a steady bath of leaked power-steering fluid and was shot, the pass side was only a little better. Hoses, connections and gaskets were rotten and leaking everywhere. Really, it’s amazing how well the ol’ Cherokee was doing, we had still been using it every day.


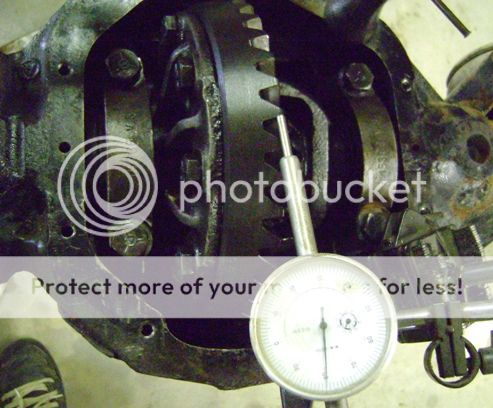
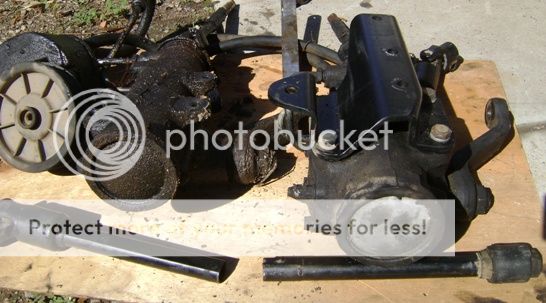
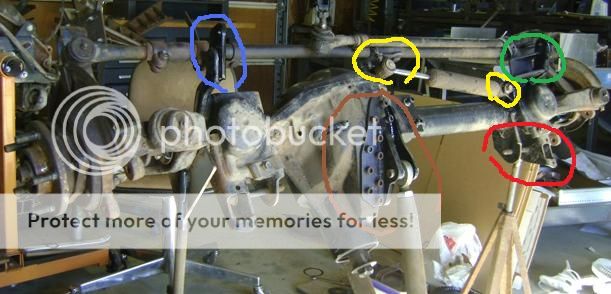
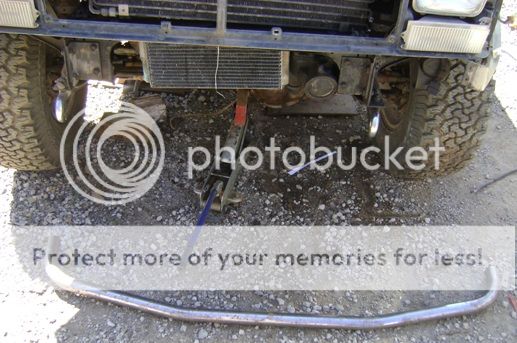
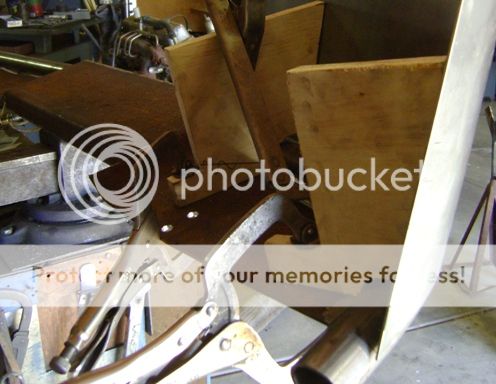
    With the weight off the front of the car it was a good time to pull the original Dana 30 axle out. With crazy miles on it, there was a small leak from the driver side tube seal and the lower left control arm bracket had been damaged in the desert.


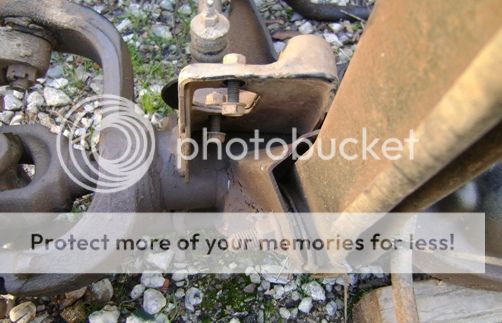
    Another recent mishap had finished the same damaged bracket off making the car no longer drivable.
    Last edited by Loren; July 4, 2013, 09:42 AM.
    ...

  • #2
    Front End

    From the second Jeep Cherokee project that was never finished, I had as-mentioned started a front axle. Photos of that process seem to be lost but to explain, I took a front Dana 44 from a ‘70s Chevy truck, removed the tubes from the cast center and cut/machined new parts to convert to Jeep driver-side-“drop” (the differential on the driver’s side instead of the passengers as with the stock GM), and use Jeep ends. Rather than duplicate the stock control arm brackets exactly, I fabricated parts to re-locate the lower control link front pivots rearward 2” and a bit upward relative to the axle tube, the effect being to move the wheels forward to keep larger-than-stock tires from hitting the firewall and also to reduce the angle created on the links when using taller springs.

    I had decided to build a custom single torque-arm/ladder bar to replace the stock 4-link setup’s upper links, the idea being to reduce wheel-hop on hill climbs and better-manage stress from taller tires. I started by mocking up the axle in place then cutting out a shape in thin plywood that would connect the pieces yet clear things such as the stock exhaust. This was then used as a pattern to bend up some 1 1/2" tubing.
    Click image for larger version

Name:	DSC00311_zps5a783751.jpg
Views:	1
Size:	176.0 KB
ID:	876477

    The pieces were then welded up with machined threaded ends from the local race-car supply store, and fastened to brackets bolted to the housing center. There will now be no upper control arms as stock, instead this link which pivots back on the transmission crossmember will handle any axle rotation forces, hopefully in a more controlled manner.


    The axle itself still needed more work, starting with the gear ratio which was 4.11 when I wanted 3.73s. I had another Chevy front axle in the backyard parts pile w/ good 3.73s and pulled that apart, but close inspection of the center bearing shims showed the one of the races had spun on the carrier casting, ruining it. You can see on the photo the mangled shims.


    The centers are different-series units for 3.73-down and 4.11-up ratios so I couldn’t use my old one, but yet another axle from the “private reserve” provided a usable correct carrier. Previously having built a Blazer and also having scrapped-out various other Chevy, Jeep and International 4WDs over time I had a good pile of old parts to choose from.


    With good parts now in hand, rather than use lash/preload etc. specs for assembly of new components I had instead copied-down what the used ones were at when I removed them and duplicated those. Without a pinion depth measuring tool on hand I had clamped together a couple of bent pieces of steel to make a one-use gauge for distance. Getting the pinion to the right preload took lots of swapping around with shims, then setting the depth took more, and same with the center section preload and gear lash. If ever you go to try setting up axle gears, just have tools to make it easy to pull bearings on and off ‘cause you may be doing it lots.


    The old lash measurement was loose at .016” but I set it to that again. After all was done, the tooth-contact pattern shown by gear marking compound was the same as prior wear so I figured I had it about right.


    I decided to use stock-type axles for this, believing the pickup-truck Dana 44 size increase from original Jeep Dana 30 was substantial enough. One axle (long side) from a 44 and one from a Chevy ten-bolt (also long side) had the meat in the right places and got driven up to Curry Enterprises in Corona to be cut and re-splined to fit. Curry gets the award for “Best Product/Vendor” for this project…they accurately followed the plan and with their expertise and equipment did an excellent job for a lower price than I would have thought. Plus I got free stickers! Thanks, Curry. They were a huge help.


    We knew the stock Dana 30 axle ends, which I’m using instead of Chevy parts to keep original-type wheels and steering, wouldn’t work with the larger 560-X u-joints I wanted. 4130 steel stubs with the bigger holes are available for a price but out of curiosity I thought I’d try something different…


    The original yoke holes could be machined bigger but even if I offset the hole that couldn’t leave any more material than stock around the u-joint cap, and this is the one area which I’ve had experience with breakage (when a buddy with 33” tires dumped the clutch with the wheels steered full-lock…fortunately it only takes a half-hour to change axle sets in a Jeep). Could I weld on more steel and have it help? I tried a little experimenting on an extra part then went after it with a hammer to test. It held up pretty good, finally cracking in the original harder area. I’ll figure then that the welding provides at-least some extra support for the stock piece and just lay it on as thick as possible.

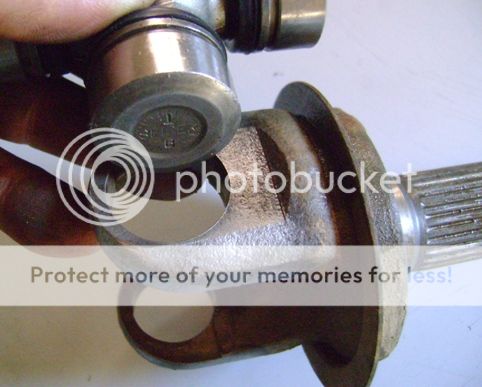
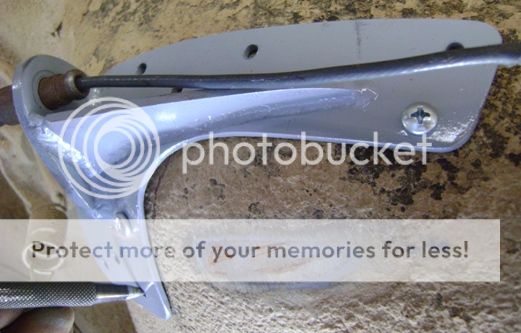
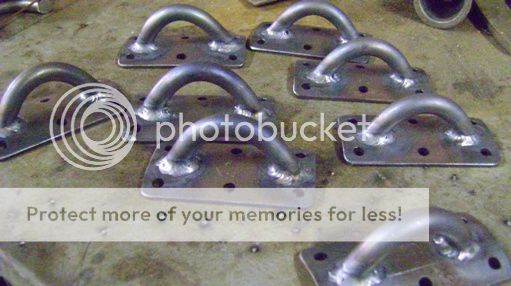
    Stuff like this has got to be annealed down a little, in this case by heating with a gas torch and letting it re-cool, slow. Otherwise you get a mix of brittle and soft spots, and it’s more likely to crack later.


    I had a simple flycutter I made for machining in deep holes once, and pulled it out of the drawer to do these. It took a try with my scrap part first to get the diameter adjusted right.
    Last edited by Loren; February 16, 2014, 08:53 AM.
    ...

    Comment


    • #3

      With that, I was able to put together assembled axles. Later I may still buy that set of 4130 chrome-moly stubs from the aftermarket and do another set of axles, keeping these as spares, but this will do for now.

      (Edit: Some time later, after forgetting to dis-engage 4WD-low on a hard surface I heard a loud "bang", figured it was one of my welded axle stubs letting loose and went ahead and ordered chrome-moly ones. On disassy I found it was a driveshaft u-joint that broke...but went ahead and replaced the stubs anyhow. Interesting news is, the welded-up stubs were not the weak point and yes are being kept as spares.)


      I originally picked a GM truck front housing for this project because it had a big leaf-spring pad cast into one side which I figured would somehow facilitate a ladder-bar mount. That was not to be, however, due to space and the position I needed the bar in (just to the driver side of the car, alongside the transmission pan rearward). So I cut and hammered-up some pieces of steel plate to conform directly to the shape of the diff housing, and screwed those down into multiple drilled-and-tapped holes. Then in turn my actual mounts welded to those formed plates. The sheer amount of high-strength fasteners and spread-out positions should be plenty stout.


      With the front gears, axles and suspension toughed up it was time to turn attention to the steering. Stock parts are not bad, the main issue is that the overall system geometry is designed to run at stock height and with a few inches of suspension lift things start to get out-of-whack. This photo of a stock Cherokee front suspension, set at normal height, might give you an idea of a problem you run into with a lifted car. Note how the steering drag link runs downward from the pitman arm (yellow line), at a slight angle. On a lifted vehicle this can get pretty extreme, among other things creating an obvious issue with the ball joint angle (red circle) . Note also the angle of the second “tie” rod that mount to the drag link to connect back to the driver-side spindle. When much more angle is added to these steering links there will be resultant toe-in changes over every dip. There is a track bar (aka Panhard rod) which parallels the drag link to control steering angle changes over bumps but if positioned at an angle will cause side-to-side movement of the axle relative to the body… while all this will probably work in the sand and rocks, 70mph on a wet poorly-surfaced freeway in traffic is going to get scary. Finally on this stock car, you can see the location of the lower control arm mounts (blue circle). Besides being in a position to catch on rocks, there would be a lot of undesirable angle on the control arms going from there up to the body mounting with much suspension lift…but at-least we’ve already addressed that on the new axle with revised mounting.

      It seems to me the best method to get steering more in line when increasing the space between the frame where the steering linkage starts to the axle where it goes to, would be to split the difference height-wise between the two…i.e., have the pitman-arm end lower on the frame and the steering tie-rod pivots higher on the axle. There are aftermarket solutions for this that basically bolt on (and some are made to be very tough), but with fabricated parts and items found at the junkyard I’ve done it my own way.


      “Dropped” pitman arms are available to get at-least one end of the steering more in line but the stocker is already extended pretty far down and I didn’t want to stress out the box any more with a worse one. Better to lower the whole box somehow, which I could do with a handy bracket I made back when working on the other Cherokee project. This formed ¼” steel bracket moves the box downward to help the drag-link angle, forward a couple inches to work with the new extended-wheelbase axle location, and inward so that the steering shaft from the column will clear the stock stamped frame rail.


      The only trouble with changing the box location and moving the steering shaft down-and-in is, there is the motor mount in the way. I had to cut a groove out of it, then bridge over the top with a removable section to get some strength back.


      Now that the box is moved down, the tie rod needs to come up. That is as simple as mounting it to the top of the steering arms instead of the bottom…except that at that position, the tie rod end contacts the inside of the stock wheel, and of-course the ball-joint taper is upside-down. Both are cured by boring out the tie-rod holes with a little offset…


      …then pressing in a machined steel plug…


      …then welding, annealing, re-drilling and taper-reaming to suit.


      A used tie rod in good shape had been found which can make the straight distance between the steering arms and not have the “scissoring” deal as with stock Jeep. From it there it uses an added drag link up to the pitman arm…old-school, simple and stout. This was laying in a bin at the junkyard and I don’t even know what vehicle it came from, it has metric threads so maybe late-70s Toyota PU? Whatever the case, it was the perfect size. With it installed and adjusted the whole assembly was ready to go.

      Here you can see the the re-positioned control arm mounting (red), the upper “ladder”-bar mounting (brown), revised track bar mount to use the stock bar but have the positioning correct with the new steering (green), new steering stabilizer mounts (yellow) and swaybar mount extension (blue). After doing all this re-“engineering”, I still have the greatest respect for the guys who did the original very-tightly-packaged design, it was excellent setup for a stock vehicle with a straight front axle and all things considered, not that difficult to modify.


      First the axle was installed without springs and manipulated using jacks and steering to all possible positions to make sure no clearance issues arose and no ball joints got to angles where they were in danger of bind. I had done that work when originally building the housing, and did it again to be sure.

      I installed a good set of original Jeep-type 15x8 wheels with 11.50-32-15 All-Terrain T/As to replace the former small stuff (Gail hated the original aluminum wheels anyhow), and bump stops were set so the tires wouldn’t touch anything and the shocks wouldn’t hit their limits either up or down.

      Stock control arms are made of high-strength steel, provide needed twisting action and seem strong enough considering that in the original setup the mounting brackets failed before the arms did (and also that the new ladder-bar scheme takes some loads off them vs. the factory four-link). A set of used longer springs and shocks completed the assembly.


      This could be compared to the previous photo of a stock front end; the rods and suspension links are all nearly level even with an increase in suspension lift. This should not only provide good off-road capability but preserve road manners for normal driving.


      Earlier I had made sway bar re-locator brackets to position that last thing to go in so it would clear the steering and work with the new wheelbase, although I wasn’t sure of the exact best location at the time. I should have waited, I missed by about an inch and had to toss ‘em. Here’s another set which fit better. The sway bar is vital for street but can be disconnected with one bolt for off-road where easier articulation is desired.


      Oh yeah, that deal where the axle is moved forward to give the tires a little clearance at the firewall…now it just causes a problem the other direction. Isn’t that always the way? (ha!) No problem, that’s what tin snips are for. Rather than just hack away, I re-configured the stock plastic fender mounting areas and lips to angle forward enough to clear. It took a few hours and looks OK. There were a couple things inside the fenders to move as well such as the A/C vacuum reservoir. Later I’ll do some sheet aluminum work to keep the mud out of there.
      Last edited by Loren; May 30, 2018, 08:49 AM.
      ...

      Comment


      • #4

        Now with the front end installed I can tend to the engine. This is a low-mileage motor from a wrecked newer Grand Cherokee, it’s in excellent condition and should be good for years. Installation was just a matter of doing the work with no particular invention required, unless you count what was involved in actually shoe-horning the thing in. An inline six, backed by an automatic with an overdrive, backed by a transfer case with an extension housing, is a long unit! It took the hoist on one end, the tractor on the other, a floor jack underneath and some possibly over-the-line swearwords. It was a relief to finally have it in, this engine will stay stock and reliable and with ‘90s Chrysler injection and controls make plenty of power for what we need.


        Rear End

        Cherokees through the years may have 7.5 weak-suck rear axles, or 8.2 better ones as this car did, or even an 8.5 Dana 44. Usually they don’t break until you start using bigger tires and lockers. I had a Dana waiting in the parts pile to swap in, then, an even-better ‘90s Ford Explorer 8.8, 3.73 posi came along in a trade. It’s a strong unit with thick 31-spline axles and should support a locker if we ever decide to use one. It didn’t fit right in though, it’s too narrow and the pinion is too far to the passenger side.


        Since it was already a stout piece made for positive-offset wheels (and the Jeep stockers are negative) I didn’t see the harm in making a substantial spacer to use on just one side and thus getting the width and pinion location improved at the same time. Adding that space behind the disc rotor and thus necessarily to the caliper bracket as well, there is now good clearance between the caliper and the leaf springs which is normally a problem with this conversion.


        Mocked up, it looks about right. The spacer will stay with this axle permanently, and the leaf spring mounts etc. will be welded on a little off-center to compensate.


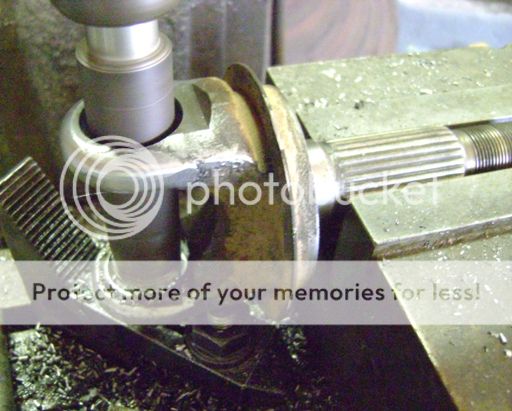
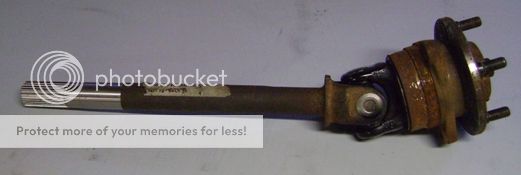
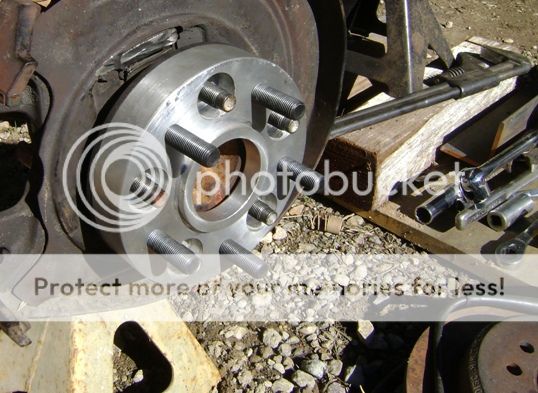
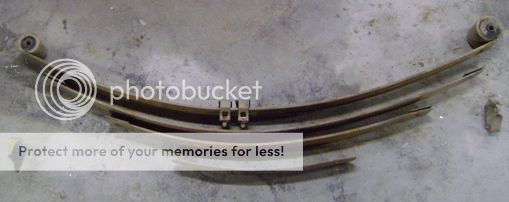
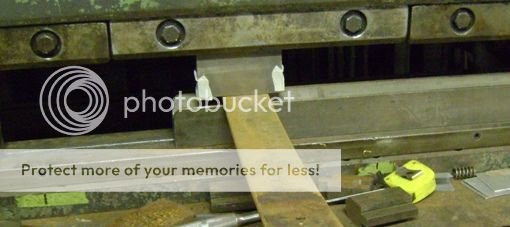
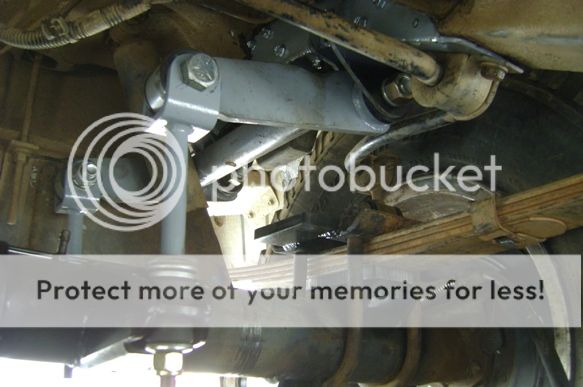
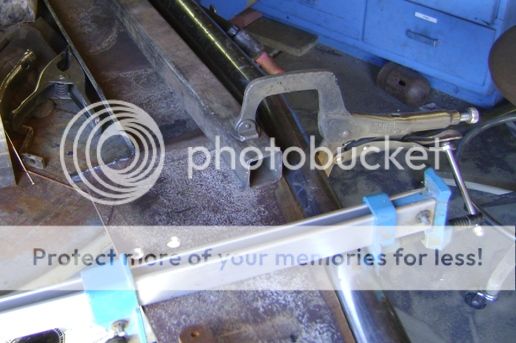
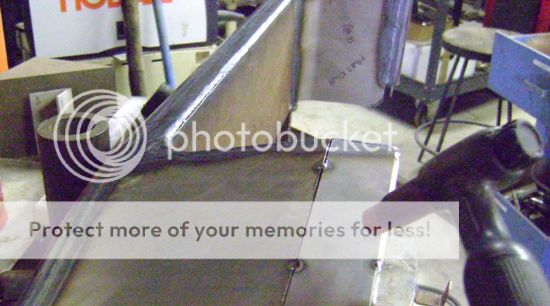
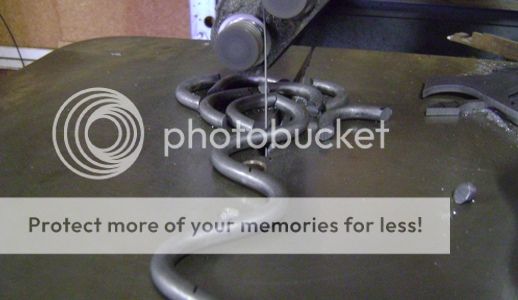
        I found aftermarket weld-on leaf spring pads and used Chevy truck u-bolts and plates, and then chose to fabricate shock mounts. Original mounts hang low and can catch rocks…with the lift we plan to have, re-locating the mounts higher on the axle will keep them out of the way and allow use of stock-length shocks on this lifted vehicle as well. A scrap piece of rect. Tube provided the material…cutting took long enough that I found something to read to pass the time.


        Here’s the set, ready for welding.


        A view of the driver’s side of the axle shows the welded shock brackets, fabricated brake line brackets (to use stock Explorer rubber hoses), Chevy u-bolt plates with welded-on rr sway bar brackets and bump-stop plates, and one final extra: To control wheel-hop on dirt hills with our new taller tires, I’m trying “rocker” brackets, which will connect to a pivoting apparatus on the frame, and not cause conflict with the normal leaf spring movement like ladder bars will. The axle tube was also fully-welded to the center casting to add strength.


        This is a bracket that will hold the lever for the rocker wheel-hop control device onto the frame. It’s meant to spread the load around on the stock sheet metal structure, and attaches via numerous sheet metal screws. When turned into punched-through (rather than drilled) holes, screws can be very strong and will allow easy removal of the bracket in case there is ever a reason to transfer all these parts onto another body.


        Disassembling the leaf springs allows re-bending the individual leafs for more lift. With a larger-diameter axle housing and taller mounting brackets, I think 2” more curve on the springs is about right.


        Press-brake hits at half-inch intervals give the springs the new curve, which is compared in-process to a pattern layout on a piece of plywood.


        All assembled. You can see the wheel-hop device which is tunable via washers and nuts. We’ll see on the trail how well it works… it’s not meant to completely prevent axle rotation, just to limit it down to something reasonable so that “hop” isn’t the factor that stops us before the top of a hill. Will I be happier with this than if I’d just built another “ladder bar” with some kind of pivot where the axle pivots on the leaf spring to prevent bind? Can’t say…only time will tell. It’s still an option if this doesn’t work right.


        The wheel spacer under the rotor on the pass side precludes use of a parking brake there…if I did this rear end over again I might just extend the tube, buy a longer axle, and keep the brake. In the meanwhile we’ve still got a good one on the left which is enough to hold the car on a hill. I built a custom bracket to cable it up.
        ...

        Comment


        • #5
          Cool project - even though I'm not an off-road guy (at least on purpose). Looking forward to more installments in the saga.

          Dan

          Comment


          • #6
            Coming up, Dan. For a change, I actually finished a project before I started posting it here.


            Mocking up a driveshaft revealed the expected condition of too-much u-joint angle. Swapping out the stock single u-joint for a double-cardan scheme, and then using a slip joint on the driveshaft instead of at the tailshaft housing, is common and provides multiple benefits on a lifted vehicle. You can buy an aftermarket kit but I chose to try this: A yoke that would fit the stock tailshaft but support a double-cardan CV joint was sourced through a local driveshaft shop and drilled-tapped for set screws at four places to hold it firmly to the transfer case output shaft to eliminate the normal sliding action.


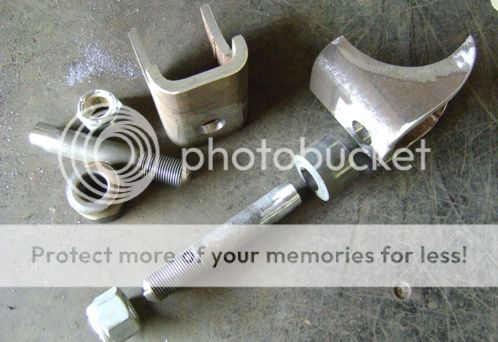
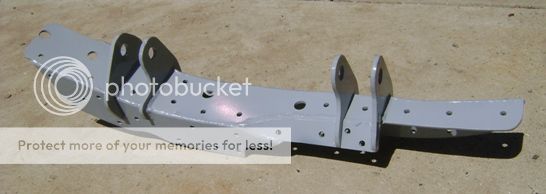
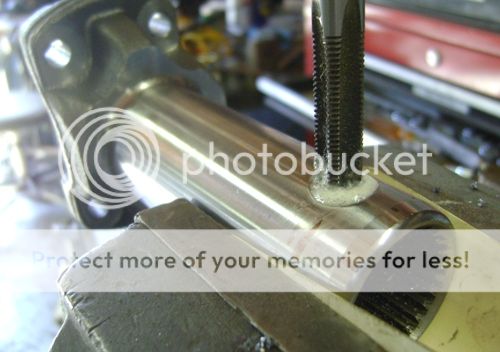
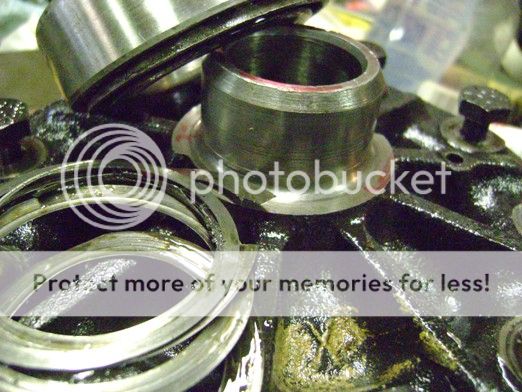
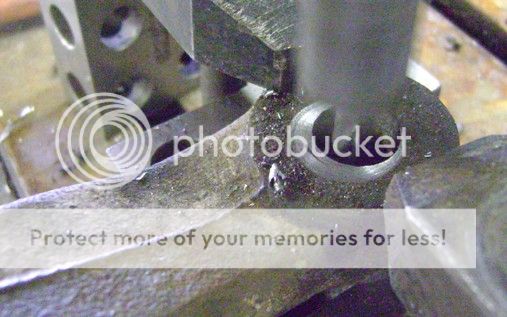
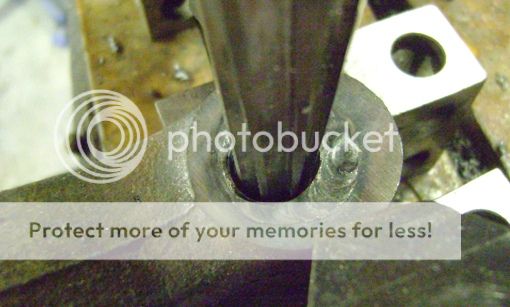
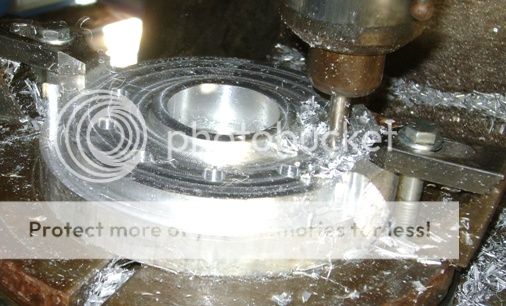
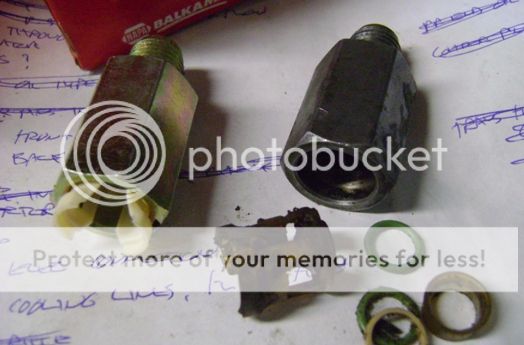
            Then using a lathe, the stock tailshaft housing was sectioned down to position the sleeve bearing in a good place and drilled/tapped in a mill for a pipe plug to provide access to the yoke set screws which go in after the housing.
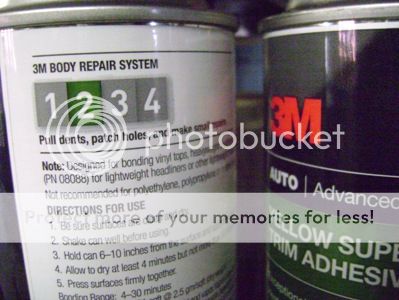


            The shaft assembly, which is actually a stock front unit shortened an inch, installed. Welding on the aluminum extension housing got ugly due to impurities etc. in the die-casting but is not for looks. The new yoke set screws were put in with red Loc-Tite and will hopefully stay in place! We’ll hear from them if they don’t.


            We needed a front bumper tough enough to take some knocks and support tow hooks and a winch. I started by making a pattern then asking a shop to bend up a 1 3/4” tube to front the lower edge.


            Then I torch-cut some 3/16” plate in a shape to pick up what there is of the stock “frame” in some spread-out locations, and added bends for strength and fit. This in turn was welded to the tube to make the bottom of the bumper.


            To get the face and sides formed symmetrically on both sides, I cut wood blocks to wrap .09” sheet steel around. Weight concerns kept me from using any thicker steel, the real strength needed will be along the bottom and the top will be there just for minor hits. I do not want a 4,000 lb vehicle here.


            After some trimming I tack-welded the face plate to the tube.


            I added a flat area along the top front for appearance. For all my work, when I hear people say something “looks stock” I’m usually happy.


            After that I made a frenched-in area for the license plate, extra ends at the rear to blend with the fenders and added some loops for tie hooks...installing the bare bumper during the process to check looks and fit.


            I included a low open area at the center front to mount a winch and to provide air flow to an auxiliary cooling radiator I made from a motor home heater core. I would be nice if we could drive along in 100+ degree heat without worrying about checking the temperature guage.


            When I cut tie loops for the bumper, I made a bunch of extras.


            These loops will mount to the edge of the roof, along the sides. We should then be able to strap down anything from a canoe (Gail snorts at that one) to plywood sheet more securely than with just the stock rack. Gail actually wants a safari-type (larger) rack for luggage and other stuff, but that will have to wait.
            Last edited by Loren; July 4, 2013, 09:45 AM.
            ...

            Comment


            • #7

              Back to the engine. There are two idlers in the stock serpentine belt system, both had noisy bearings. One was an easy fix, with an off-the-shelf sealed precision bearing pressed into a steel pulley. The other was this die-cast aluminum bracket with a bearing/shaft assembly pressed inside to mount a cooling fan on the front, and no obvious way to repair. A bit of internet research showed people pulling out their bad units to replace with junkyard “not-bad-yet” parts, or purchasing new entire assemblies from Jeep for hundreds of dollars. Neither sounds like a good idea.


              After some hammering and pulling I was able to remove the unitized shaft/flange/bearing assembly from the casting. It looked suspiciously like something from a Chevy water pump, and I disassembled a junk pump to confirm it was the same part. Great, but pump bearings are a special item and cannot be had from any local parts stores. A Corvette catalog had them in a rebuild kit for $40, but since whole new water pumps are also $40 I asked the guy at NAPA to pull some from stock and found one with the same bearing diameter (barely measurable with a calipers behind the pulley flange). This then came home to get split in two on the band saw, and the new bearing was retrieved and carefully pressed into the Jeep bracket/pulley mount for a perfect fit. All this took a few hours of measuring, banging, sawing, pushing and sometimes bewilderment, but now we have a new bearing in there which should out-last the car and I’m not out big bucks for the one from Jeep.


              These stock quick-disconnect trans line brackets were a pain. Keeping track of a set of washers and o-rings was bad enough, two tries at bringing home new plastic clip components was worse. Nothing fit right or worked. As it turns out, we’re supposed to buy the entire new assembly for $12, times two. (Remember tube nuts, for .75 they screw-in in seconds and last forever?) Anyhow, after finding the part number and a quick phone call, NAPA had the new assemblies at the counter the next morning (if you ever do this yourself, Summit has them for $7).

              A few other minor tasks such as wiring and adding oil, and the motor fired up and ran perfect.


              Gail really wanted mirror-tinted glass in this car and our other Cherokee, now slated for parts use, had a nice factory-optional set so I spent much of a weekend swapping out rear, side and door glass and adding optional opening front vent windows where ours had been standard-issue fixed units. A little white lithium grease woke up the lazy power windows back to normal. This was a good time to freshen up the headliner also. Like in many cars, it all falls down around your head after a few years. The problem is deterioration of the foam backing on the headliner material, so it all needs to be scraped off clean.


              Remember my Best Product award to Curry Enterprises? Our old friends at 3M get the one for worst. Claimed to be strong enough to pull dents, in actuality $54-worth of “high-strength” spray glue purchased in California and used as instructed, could barely hold a four-pound $25 piece of dash-protector-fabric material to the ceiling against its’ own weight. There are companies in CA which in 2013 are happy to sell high-priced so-called adhesives (in green cans, whoopee) which conform to regs but do not work, I was disappointed to see that once-trustworthy brand in there with the rest of them.


              A better choice was good ‘ol Shoe Goo from K-Mart, which is the reason my old tennies can still be stumbled around in without the front of the sole flapping (do I seem like a cheap b@s%d yet? Hey, part of the fun for me is seeing how inexpensive I can keep it sometimes). With a dab every few inches where that other stuff failed, our headliner is hopefully in there to stay.


              There was a once a weekend in the Mojave wilderness where our radiator hose blew out and then shorty after, the water pump followed. With gracious help we hobbled back to camp and got the hour-ride to a parts store, but I will never be without extra parts again. The huge space behind our stock negative-offset spare wheel has room for the vital pump and hoses, plus a starter and even an alternator if you stick the pulley into the hub hole. Using ½” round steel bar and a gas torch, I formed up a mounting bracket to hold it all, then built a toolbox shaped to fasten and lock against the side of the car behind it.


              Spare tire, parts and tools now tuck out of the way. The tire still pulls out pretty easily if we need the sleeping space
              ...

              Comment


              • #8


                Finished! …for now.

                The first time out, we rode along the ridges and mountainsides in the eastern Anza-Borrego desert in an area where a couple century-old gold mines still exist.

                All modifications on our Chero (and the fact that we would bother fixing up a Jeep Cherokee in the first place) were based on observation (i.e. in the areas local to us, what we can see works and what doesn’t) so there is little reason for concern as for capability now. The stock-Ford rear posi seemed to function well enough, I hope it can save us the expense of a selectable locker but we’ll have to see…a front locker will be a must, later. Unfortunately the tires are a bit too close to the fenders and limit travel, I either need to cut some sheetmetal or go back and give it another inch or so of lift which at this point would be a full day job. Certain trails in the Borrego desert can actually have the vehicle tilted halfway on its’ side, to run on just the two tires and their sidewalls and I don’t think our rolling stock is out far enough to do that without a lot of body damage so I guess those are a no-go unless I build a set of pretty-stout rocker panel guards.

                Chero’s have a very light roof structure and do not seem to take rollovers without the top crushing down at least partway (at least those I've seen), but at low speeds that’s not going to hurt anybody. If I were into the 90mph thing like some people, I’d need to put in a roll cage as well as other body and chassis bracing but I think we’ll go without until it really looks like it’s necessary. Roll bars are a tough package in these cars and without all the belting and restraints can hurt as well as save.

                This thing will need an air compressor and tank. I think I’ll get a piece of 6” round 1/8” wall crs tubing and build a combo tank/rr bumper before the next off-road season, then a compressor can ride in the back rear corner.

                While we’d love a CJ or something with a removable top, I have to note that all those guys come into camp at night and sleep in their motorhomes and we want to be able to stop where we are and crash in the back. For that advantage, we have to deal with feeling a little caged-in during the day but I may fabricate up a set of cut-down “half-doors” to address it, ideally something that would pin-in in a few minutes and then give us some air and visibility which, frankly, is most of the reason we go out in the first place.

                Would we buy a new Jeep…ever? I like the Rubicons and have seen modded ones do some amazing stuff along riverbeds, but other than that probably not. We know that when Daimler-Benz was in charge, much of what made a Jeep a Jeep was in their crosshairs and the product line they bred with its’ made-in-Korea styling and preposterous features does nothing for me. If ever they made a 1992 Cherokee straight-six again (the chances of which are the same as for Ford to re-issue the 1962 Falcon), well then we would probably sign up. Otherwise, we have our ticket to the wilderness when we wish it in this light, simple, older vehicle that we can beat on without remorse. I think we’re set with that.
                ...

                Comment


                • #9
                  Where's the part about applying the Hello Kitty decals?
                  BS'er formally known as Rebeldryver

                  Resident Instigator

                  sigpic

                  Comment


                  • #10
                    D'oh! My having axed Gail's old "Hello Kitty" decal on the window is kind-of a sore point around here...


                    (...and, here's a slight update added to this thread at a later date, a posting and pics copied from General Discussion where we actually have the car in the desert:)

                    By the time we finished last winter's re-do of Gail's Jeep, it was well into spring and already too hot to do many desert trips. Today in November it was 70 degrees, Gail is getting real tired of sitting around the house all day on medical leave and it might be time to start going to Anza-Borrego and enjoy some winter sunshine.
                    Click image for larger version  Name:	jeepindesert1.jpg Views:	5 Size:	19.9 KB ID:	1202976


                    We haven't really taken the car out since the rebuild save for an initial break-in run, it's just been doing transportation service. This is a little more fun...

                    Click image for larger version  Name:	jeepindesert2.jpg Views:	5 Size:	44.0 KB ID:	1202977

                    OK so it'll do hills...a previous problem with wheel-hop at the limit when it's slippin' and slidin' seems to be cured with a couple of mods performed. It did OK in sand...however I wouldn't get too brave there. But will it go up steps?

                    This concrete pad from some abandoned industrial installation of unknown purpose was just asking for us to try. The front end went up OK...


                    But when we got to the rears, all four tires just slipped against the smooth concrete. Maybe with some traction compound?

                    This is where another advantage of using a double-cardan u-joint at the end of the transfer case and having the diff nosed-up to align comes in. If it weren't for that, the driveshaft would be very hung-up on the concrete right here.


                    Click image for larger version  Name:	jeepindesert5.JPG Views:	5 Size:	66.5 KB ID:	1202978

                    Back to the trail, and what we really wanted this car for...find some neat places in the desert we love and just kick back and survey the view. So far that posi is working well enough for us, hopefully we won't have to spring for an air locker there.

                    Click image for larger version  Name:	jeepindesert6.jpg Views:	5 Size:	45.9 KB ID:	1202979

                    There is plenty of rough beauty out there...and room. Like a lot of places in the good 'ol U.S., I'm sure everybody has their favorites.
                    Attached Files
                    Last edited by Loren; May 30, 2018, 11:35 AM.
                    ...

                    Comment


                    • #11
                      Originally posted by Loren View Post
                      Doh! My having axed the old "Hello Kitty" decals is kind-of a sore point around here...
                      Be a good hubby and go buy Gail new ones.
                      BS'er formally known as Rebeldryver

                      Resident Instigator

                      sigpic

                      Comment


                      • #12
                        That's a heck of a lot of fabricating! Pretty cool. Nice job sourcing the water pump bearing and re-purposing it!
                        Escaped on a technicality.

                        Comment


                        • #13
                          nice job on the Jeep

                          I just finished an air compressor install - I love the Viairs, spendy, but IMO worth it.
                          Doing it all wrong since 1966

                          Comment


                          • #14
                            Thanks, SBG. I saw you did a pretty tight install on the SAR rig. I bought a cheapo compressor once, and won't again.

                            Randall, you might need that trick someday, the reason the pump was cut was I couldn't press the bearing out by the race and if I pressed on the shaft I'd ruin it. The old bearing in the Jeep...who cares. Those suckers go in there tight, I thought the aluminum bracket was going to crack but it didn't.

                            Scott, I think...like, they totally stopped making "Hello Kitty" decals...none out there at all...unexplainable. We'll just have to remember the old one with a fond heart...right? Please?

                            ----------------------------

                            Another post copied here from General Discussion much later but pertinent to the project:

                            This being So. Cal. desert season and figuring to check out the main Jeep/4x4 event in March, I caught up on a few of the next mods I wanted to do on our daily-driver '91 Cherokee. The ol' black box sits just a tiny bit too low in front, it needed more height but not enough to put front-end geometry out of whack. In the course of building something else I had come up with a pair of front spring spacers that could be installed without removing the coils as it's a bugger to get those drawn down over bump-stop columns inside. As you'd figure, these just clamp in from the sides. They're only an inch in height gain but that will do.


                            Click image for larger version  Name:	fetch?id=1192528&d=1520262387.jpg Views:	1 Size:	34.4 KB ID:	1202937

                            At the rear, one of the things that has been a problem is needing a tie-down and jacking points. Cherokees just don't have a good place back there. Up 'til now we've had to hook around the rear axle which risks brake line damage plus I don't much care for crawling around underneath the car to lift it when out in the dirt or rocks. 1/4" steel brackets mount behind the bumper, connect to channels that attach under the frame rails (if you could call them that) such as a trailer hitch would, and clevis shackles from the hardware store hang below. They can swing free up to 90* where they stop and let a high-lift jack catch in. You can barely see on the left, while I was at it I pulled the rear springs apart and added a second main leaf for a tiny bit more lift. They curve around the bottom of the originals to make a semi-"military wrap" to reduce the likelihood of breakage there. Leaf springs do break and when they do you're screwed. Incidentally, now that the back end is a little stiffer, another hazard addressed is the rear sway bar, which while being essentially a safety device will on Jeep XJs tend to jam into the rear wheel or tire on very uneven terrain, which is something that had recently gotten us stuck out on the trail. After I couldn't seem to come up with a reasonable way to re-configure, it's gone now, no more rear sway bar. Car seems to drive about the same.
                            Click image for larger version  Name:	fetch?id=1192529&d=1520262445.jpg Views:	1 Size:	97.6 KB ID:	1202938


                            We've had an OK combination of traction and streetability with a Ford Racing posi unit in the rear 8.8, but the front Dana 44 has been open and helped get us stuck a couple of times when one front wheel lost it and wound up just spinning in the air. I had originally wanted what they call a "lunchbox locker" in there, not wishing for the expense and hassle of a selectable, and finally pulled the trigger. I had a bad time trying to research these units, even the supposed off-road experts in their remarks about how these things work only tell you what they do...not how they work. Yeah we know what they do, that's why we'd get one, but understanding operation would help somebody to choose among the three-or-so most common brands. Anyhow, they are comparable to a clutch-type posi if you could imagine you were using the posi clutches only to drive the vehicle and not spider gears, except: Instead of clutch packs on each side there are positive locking splines which can engage/disengage, and instead of side force for that being applied by outward pushing of side gears by spiders, the notches that the big center pin fit through to transfer torque are angled to create side thrust, i.e. input torque causes outward movement of the center "drivers" and engagement into the driven sides which connect to the axles. For one side to disengage around a corner; when pushed along by the outside wheel rather than being driven, half of the driver set can rotate forward a few degrees relative to the other on it's angled pin ramp and release the force on that side, letting things back out enough for free spinning. Small pins with springs under them that come out of a hole on one side and slide around against a flat spot on the other provide pre-load, similar to the spring on a clutch posi. Better pics of all this would help, I know, but I didn't think of grabbing the camera until this point.
                            Click image for larger version  Name:	fetch?id=1192530&d=1520262494.jpg Views:	1 Size:	96.1 KB ID:	1202939

                            What are the big flat spots on the center drivers for? That's just so they can fit into the case...otherwise, they wouldn't go through the hole.

                            I wound up choosing a locker branded "Spartan". Fits in the stock case like they all are supposed to, looked about like the others, got decent reviews, and I was happy to see when opening the box that everything looked very well made. Seems a little water has been getting in the old diff oil, you can see the cloudy color....since no oil has been leaking out I imagine the seals are still good. The hose on the top case vent had broken away at some point and could have been letting water in there so I guess that's what that was about.

                            --------------------

                            On a hillside overlooking a few thousand fellow campers, out for the annual "Tierra Del Sol" off-road meet last weekend. Normally that kind of stuff is too crowded and dusty for me but once a year is OK. We are camped well on the outskirts in the foothills to the right of photo
                            .
                            Click image for larger version  Name:	fetch?id=1192532&d=1520262535.jpg Views:	1 Size:	81.9 KB ID:	1202940


                            We cruised around a bit to check out all the goings-on then...OK let's try that front locker now. This is some pretty soft dirt with a few rocks in it to climb up:
                            Click image for larger version  Name:	fetch?id=1192533&d=1520262598.jpg Views:	1 Size:	124.4 KB ID:	1202941

                            Gets pretty tight in there. A wider vehicle wouldn't have fit, there are a few such places in the Anza-Borrego desert Badlands which is why I've chosen to keep the Cherokee narrow instead of using wider axles/wheel offsets etc. which might be appropriate for other-type offroad areas.
                            Click image for larger version  Name:	fetch?id=1192535&d=1520262704.jpg Views:	1 Size:	73.1 KB ID:	1202942

                            Soft uneven terrain? No problem now, every time a front wheel started to slip the other one took over and pulled us right through. Now we're having fun!
                            Click image for larger version  Name:	fetch?id=1192536&d=1520262740.jpg Views:	1 Size:	92.2 KB ID:	1202943

                            And up over the top. Wonder what that flag on the back of the car is for? That's so somebody coming the other way can see you before flying over the top of the hill and having a head-on collision which is not a totally unusual event. Required safety stuff, much of the time.
                            Click image for larger version  Name:	fetch?id=1192537&d=1520262776.jpg Views:	1 Size:	153.5 KB ID:	1202944

                            What about that locker in normal operation? Is it clunky, does it jerk around a bit/not disengage when it's supposed to, and cause a little steering weirdness? Yes, to all that, to a degree. I don't think I'd use one in the rear of a street vehicle. Up front, when you're not in four-wheel mode the downsides are never noticed.

                            The Chero on the right could have been what we built, but we've gone different in a few ways. Start with front overhang...believe-it-or-not, that front license plate on our car on the left would only have a few more hours to be straight and undented before I'd be smacking it into a hillside while going up something. (edit: attempting to go up something.) As far back as it is with the bumper style and the front wheelbase pushed out a couple inches, we still catch on things sometimes, with any more crap hanging off the front we'd never have a chance at some of the terrain in our part of the land. What about the winch? Um, yeah that will hang over a little if/when it goes in there, but not much. You can't see steering shaft/panhard rod angles on ours but with the box lowered and the tie rod points raised we're much closer to level for better road manners, the guy on the right has the more-common but freaky handling offset. Sticking with "small" 32" tires means the spare can go inside and not be on the roof helping to tip the car over, or be out back blocking the view.

                            Click image for larger version  Name:	fetch?id=1192538&d=1520262834.jpg Views:	1 Size:	85.3 KB ID:	1202945

                            Hey look, a carpeted car that looks like a dog, with a dog on it. The little Isuzu or whatever it is didn't go far without having a tow strap and helper attached to the front.
                            Click image for larger version  Name:	fetch?id=1192539&d=1520262884.jpg Views:	1 Size:	69.5 KB ID:	1202946

                            It's hard to see in this pic but there's a big rock and a puddle of oil under this guy's front diff. He would come out on a tow strap too.
                            Click image for larger version  Name:	fetch?id=1192540&d=1520262922.jpg Views:	1 Size:	50.5 KB ID:	1202947

                            A fun couple of days then off to home. Cheap old truck, cheap old camper, low-budget Jeep that just has some time and effort into it.
                            Click image for larger version  Name:	fetch?id=1192541&d=1520262961.jpg Views:	1 Size:	61.9 KB ID:	1202948
                            Last edited by Loren; May 30, 2018, 11:13 AM.
                            ...

                            Comment


                            • #15
                              I think the "Hello Kitty" logo but with a pic of a lion at full roar instead of the cartoon cat might be kinda cool. Maybe a compromise?

                              Dan

                              Comment

                              Working...
                              X