 Tweet
Tweet
I finally got it fired up. All the changes I made to the fuel system and some wiring just seemed to eat away at my time. Had two injector o-rings that got cut on install so had to replace them. I didn't RTV the bottom side of the valve cover gaskets and I may have to go back and do so as the passenger side one appeared to weep a bit and the driver's side plain leaked until I put more torque down on the bolts, but I'm not convinced it fully stopped the leaks.
The new cam pulls a ton more vacuum than the old one for sure. Before it used to idle at 65% load (MAP/Baro) and the new one idles around 22-25% load (MAP/Baro) so the old tune was not happy at all. I ha So back to the basics of tuning EFI yourself.
One of the issues that confounded me for the first 20 minutes though was it would just die after sitting at idle for 10-15 seconds. A little throttle and I could keep it running, but after checking that it wasn't a fuel pressure issue, the data logs would show a drop off of commanded fuel and it'd sputter out. I kept adding fuel, but it kept doing it. Then I realized what was going on, it was switching over to the mini "Idle VE" table, which wasn't re-scaled and that was commanding less fuel. D'oh! Once I shut that feature off the tuning effort got easier and it started doing exactly what I wanted it to.
First step was to lock the timing and verify it at the crank. MegaSquirt makes that easy with a simple drop down selection to lock the timing at a set value. I picked 18� because if the timing is off one way or the other ~15� it shouldn't hurt the engine. Due to the crank trigger's location being fixed the timing was spot on Then leaving it locked so the only variable should be fuel.
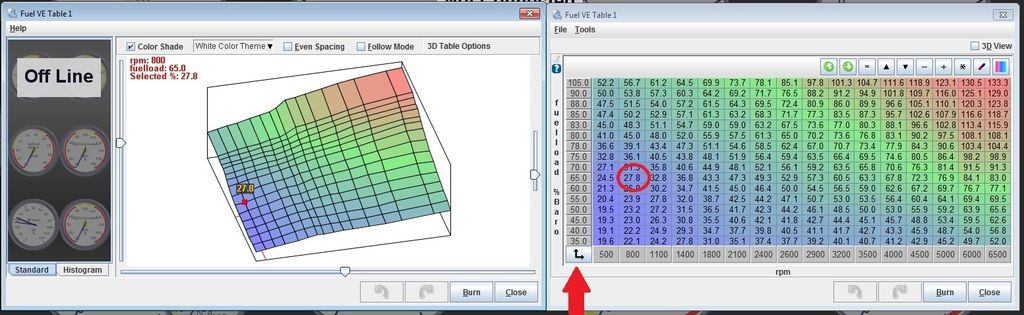
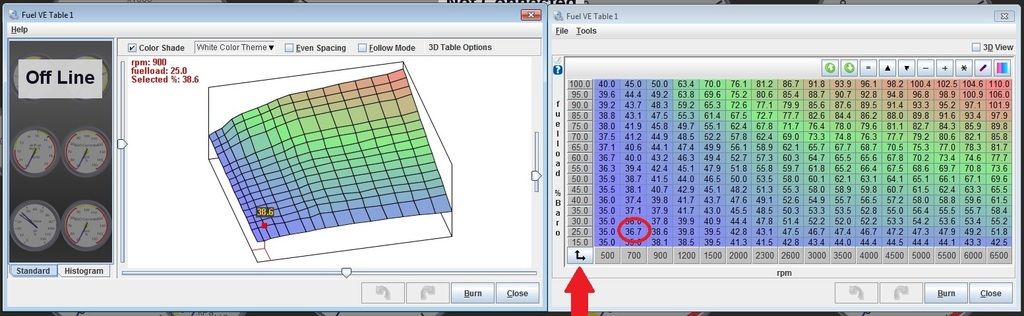
Then over to the VE fuel table (which I already tampered with to get it to idle long enough to check the timing) I had to re-bin the tables because the lowest on my old table was 35kPa, and the engine now wanted well below that. Then I grabbed a group of blocks around where it was idling and added fuel until it was happy at 13:1 AFR then re-scaled the rest of the table from there so it had a similar shape as the old table. Of course it's just a base line that will need re-fining. A few free rev's already told me it was too lean to start with, but it was getting late and I'm sure my neighbors don't want me at this hour repeatedly revving the engine as I make changes.
The old and "new" table. Its set to be running rich at idle at the moment as its far easier to tune rich to lean than lean to rich. The y-axis is the load range, which I re-scaled, and may re-scale again depending what it wants when actually driving. I re-scaled the spark advance table as well, but have the timing capped at 32� to keep it on the safe side. I'll give it more timing when I am satisfied enough with the fuel that it won't ping from too much timing.
I have a pile of yard work to take care of tomorrow, but if I get it done I'm hoping to get the car out on the road
The new cam pulls a ton more vacuum than the old one for sure. Before it used to idle at 65% load (MAP/Baro) and the new one idles around 22-25% load (MAP/Baro) so the old tune was not happy at all. I ha So back to the basics of tuning EFI yourself.
One of the issues that confounded me for the first 20 minutes though was it would just die after sitting at idle for 10-15 seconds. A little throttle and I could keep it running, but after checking that it wasn't a fuel pressure issue, the data logs would show a drop off of commanded fuel and it'd sputter out. I kept adding fuel, but it kept doing it. Then I realized what was going on, it was switching over to the mini "Idle VE" table, which wasn't re-scaled and that was commanding less fuel. D'oh! Once I shut that feature off the tuning effort got easier and it started doing exactly what I wanted it to.
First step was to lock the timing and verify it at the crank. MegaSquirt makes that easy with a simple drop down selection to lock the timing at a set value. I picked 18� because if the timing is off one way or the other ~15� it shouldn't hurt the engine. Due to the crank trigger's location being fixed the timing was spot on
Then leaving it locked so the only variable should be fuel.Then over to the VE fuel table (which I already tampered with to get it to idle long enough to check the timing) I had to re-bin the tables because the lowest on my old table was 35kPa, and the engine now wanted well below that. Then I grabbed a group of blocks around where it was idling and added fuel until it was happy at 13:1 AFR then re-scaled the rest of the table from there so it had a similar shape as the old table. Of course it's just a base line that will need re-fining. A few free rev's already told me it was too lean to start with, but it was getting late and I'm sure my neighbors don't want me at this hour repeatedly revving the engine as I make changes.
The old and "new" table. Its set to be running rich at idle at the moment as its far easier to tune rich to lean than lean to rich. The y-axis is the load range, which I re-scaled, and may re-scale again depending what it wants when actually driving. I re-scaled the spark advance table as well, but have the timing capped at 32� to keep it on the safe side. I'll give it more timing when I am satisfied enough with the fuel that it won't ping from too much timing.


I have a pile of yard work to take care of tomorrow, but if I get it done I'm hoping to get the car out on the road


Comment