


I made the conscious decision to not treat this 1976 Charger the same as every other project car that I’ve owned over the past three decades. Any change from the way the car was when I first loaded it onto the trailer had to have a purpose and had to improve the car in some way other than just aesthetically. I didn’t want to tear into a low-mile car and start changing stuff out just because I could. And over a year into ownership, I’ve stuck to that goal, with the every bolt turned and part removed resulting in an inspection and a decision…will there be an improvement over how the car works? If not, what the hell are you doing?
Well…one of our first modifications was putting us in a bind. That electric in-tank fuel pump we put in? It works, but we kept running into the same issue: some kind of power feed issue that kept the Charger restricted to the Bowling Green area…and even then, some days that wasn’t enough and every now and then the car would wind up on the side of the road, hood up, cooling off, and the owner somewhere nearby boiling over. Yes, we managed to drive to the Somernites Cruise and back without much of an incident in May, but the very next week we found ourselves on the side of Highway 68/80 once more.
Well…let’s say that I went overboard with the parts cannon this time. Not only was I going to move the fuel pump’s power wire into an MSD 75643-HC Solid State Relay Block, but I was going to replace the spark plugs, wires, coil and distributor while I was under the hood. Follow along to see the progress:

Step one: Battery disconnected or removed. Common sense, folks. There might not be enough to go around anymore, but you don’t want to ride the lightning.
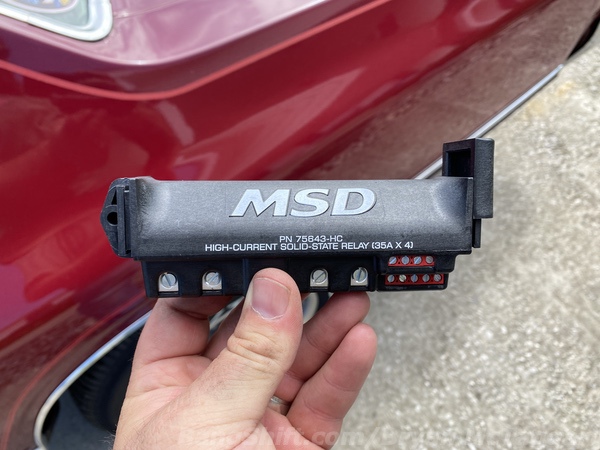
The MSD Solid-State Relay Block is available in a standard and high-current form. Where my thumb is located is where a 4-gauge wire directly from Battery Positive will go. The four channels are your outgoing power points. The two layers of small wire pins on the right are trigger points…the top four are 12V triggered, the bottom four are ground triggered. The fifth ground pin on the right is the ground point for the relay.
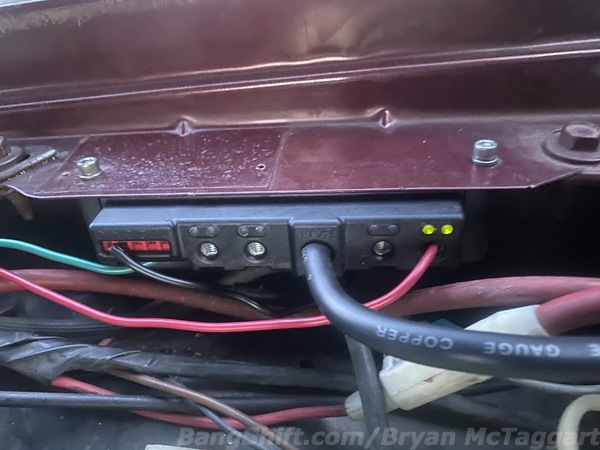
After ditching the Charger’s data tag (and cleaning up some rust), the Solid-State relay was mounted to the fender lip, rearward of the battery and next to the windshield washer reservoir. This location keeps the relay out of the way of road spray or incoming minced insects. In this picture, you can see the basic wiring for the fuel pump: Red is 12V to pump, green is 12V key-on power, small black is relay block ground and the big boy is the wire straight to the battery.

Moving on, it was time for the stock distributor to hit the bench. So, before I turned a 30-minute project into a day-long debacle, the cap was removed, the rotor button was checked, and a strip of aluminum tape was placed to mark the cylinder. This was also the time where I used an inordinate amount of engine cleaner to remove the grime and tiny leaves surrounding the distributor mount.

Behold, the MSD Ready-to-Run distributor for 318 and 360 Chrysler (p/n 8388). There’s basically three things you need to know about this distributor: how fast want your advance set up (which uses the springs, as shown), what size advance stop bushing you want, and how to wire it up. The directions can’t be any clearer. We left the distributor stock, with two heavy silver springs and a blue stop bushing for a slow curve. After that, there’s four wires to contend with: Red (coil positive); Orange (coil negative); Black (ground); and Gray (tach signal). Easy, right? Not quite. Ma Mopar’s famous wiring quality comes into play. Instead of hoping and praying that we’d get a good 12 volts from the ballast resistor system, we instead ran 12 volt hot to coil positive from the solid-state relay with a key-on 12 volt trigger. Solves that problem!

Next up, spark plug wires. Once again, back to the MSD catalog for a set of 8.5mm Super Conductor wires (p/n 32749 for a set for LA Chrysler). Not much else to say here…they’re beefy and are designed to keep electromagnetic interference inside the wire and not all over the engine bay. The wires were easy enough to rig up. Having to take a 3-foot-long breaker bar to every last freaking plug while praying the threads didn’t come with them was not. Now I fully understand Ford 5.4 fans and their troubles. The stock plugs looked ancient but fine, so a fresh set of the same Champions went right back in. Don’t mess with what works, right?

I did run into one issue: the heat stove on the driver’s side exhaust manifold and the wire for Cylinder #1 were in constant contact. Two half-inch nuts later, and the stove is gone and the wire safe.

The coil is another item that went away. On our Charger, the coil was mounted in a bracket on the intake manifold that also pinned down an engine ground strap, the coil condenser and the choke’s ballast resistor (that white thing with wires about mid-picture). The new coil is an MSD Blaster High Vibration unit (p/n 8222) that is designed to lay on its side and shake around. Most parts store coils hate that. I also cleaned up a LOT of ground points about this time, including those two mounting points on the intake.

With everything installed, the plug wires nestled in their retaining clips (barely) and the vacuum advance hose replaced after it snapped in half like a twig, we fired it up and set our timing for 36-degrees of advanced.

Those two stickers are more than just something in the accessory pack. Since the Charger is well within range of any smog police anywhere, those are the “get out of jail free” cards for the coil and distributor. 50-state legal, baby, complete with the CARB EO number.

After one last sweep of things, I decided that the pretty much shot ground wire for the battery was due for the trash can as well. If you think this view is bad, you should’ve seen the end that bolts to the cylinder head.

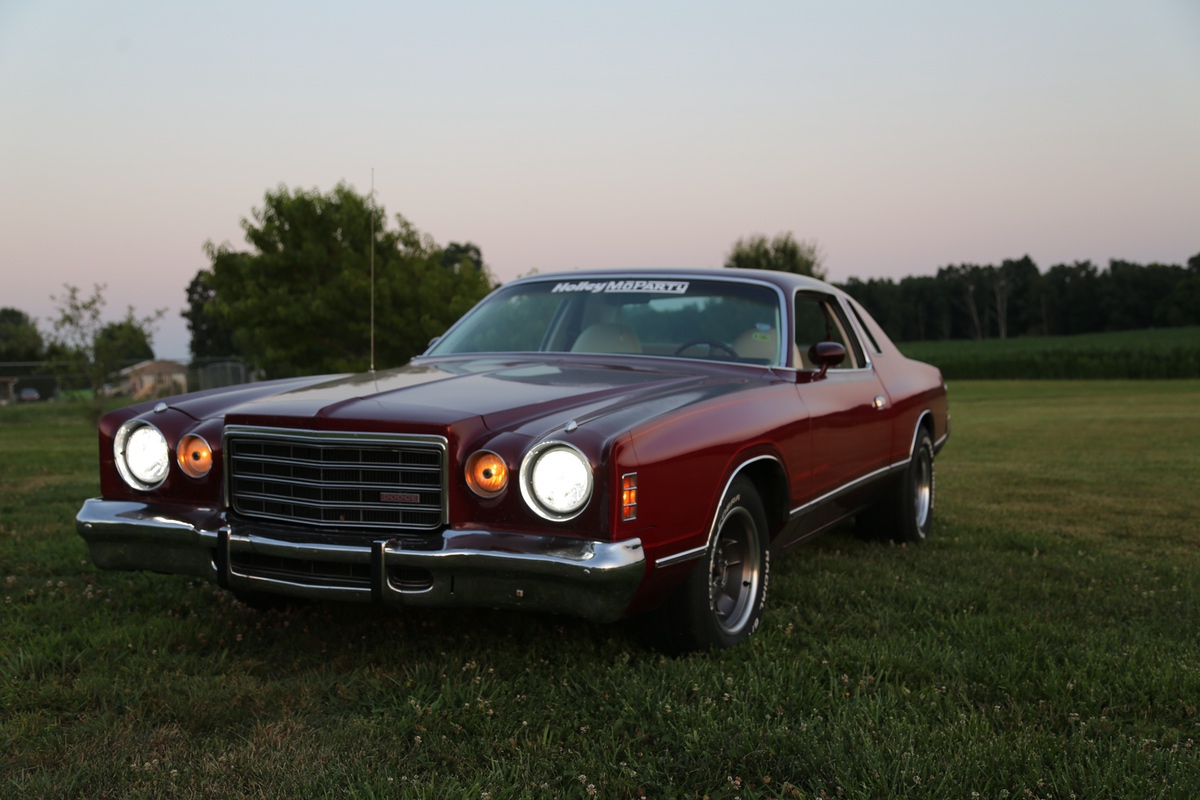
Finally, in my quest to get the Charger to Interstate road trip worthy, the halogen headlights were retired for a set of Holley RetroBright 5700K headlights (LFRB155). Yes, they cost a mint, I get it. But I cannot begin to explain just how much nicer it is to actually see things after the sun has gone down without resorting to high-beams everywhere I go. (Photo: Hunter Madison)
That’s where the Charger sits now. Minus the windshield wiper bushings (a job that I’m dreading), I’ll hop in this sucker and drive it pretty much anywhere at this point. The air conditioning is still dead, the heater core is still bypassed because it’s a colander, the brakes need to be looked over soon and the suspension has all the stiffness of a fresh marshmallow at both ends. But in order to get this car to stall out, I had to force a vapor-lock situation that involved 45 minutes of stop-and-go rush hour traffic followed up by sitting nose-down on a hill through three left-turn lights on a 97-degree day before the Charger had enough. I’m seeing about 20 MPG on the open road and I can see at night.
Every part replaced has a purpose, every part improves the car in some way, shape or form.
Past Charger Articles
- The Introduction
- Part One: The First Assessment
- Part Two: Trunk Paint, Instrument Cluster Work
- Part Three: Deeper Instrument Panel Work and the EFI-Ready Fuel Tank
- Part Four: The Heater Core Job We Should Have Been Worried About
- Part Five: Fuel Pump Troubleshooting, Wiring Fixes, Halibrand Mags And Tires, First Dragstrip Pass


Great updates! Well done.