 Tweet
Tweet
Installment I
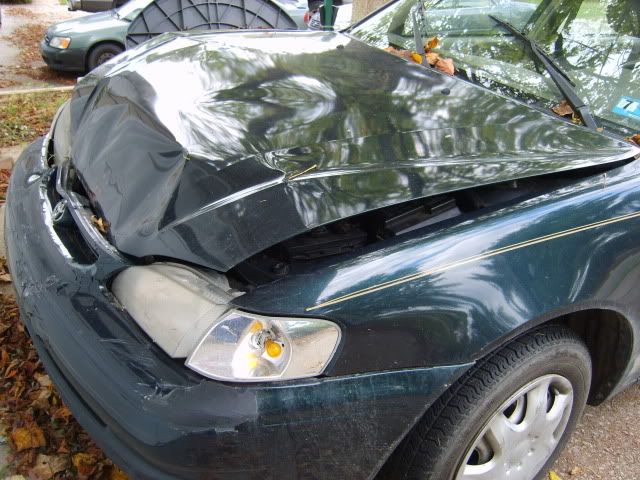
Nobody (including me) is going to give a rip about the subject vehicle (my 16 YO Grandson Casey's '99 Toyota Corolla) but I thought some of you might be interested in the process of putting the front end back together. He hit something straight on, his nose to whatever he hit (that info is not yet forthcoming and probably doesn't matter). I can't be too hard on the guy - he's just recently been diagnosed with Chrone's Disease and they're still dealing with some acute issues surrounding that.
But enough of that. The first "opportunity" was to get the hood open. The hood had been pushed down into the latch and there was no way it would let go of the latch bar.
A shot of the car as it came to me (I stole this pic from my daughter as it's MUCH better than the one I had).
A shot from the passenger's side.
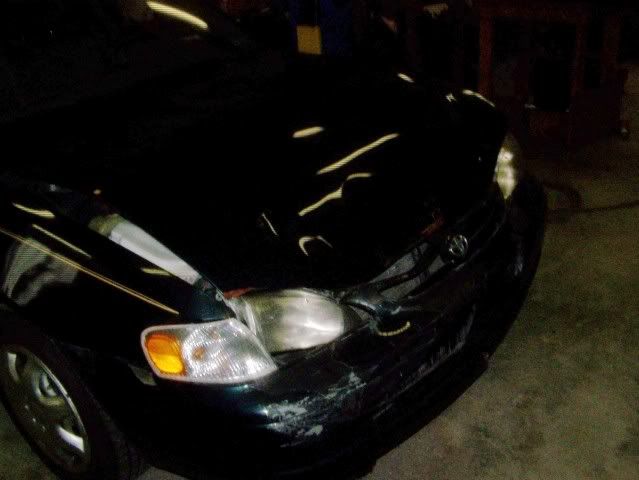
I cut a hole in the hood around the latch area and eventually was able to lift the hood off the latch. Whizzer wheels are a good thing. The hood was definitely a goner so it didn't matter if I cut it up. If I think I can save the hood I'll attack from the bottom and see if I can get it to release.
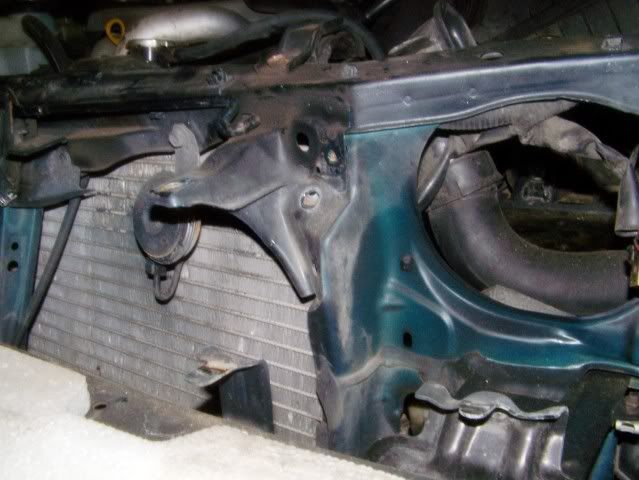
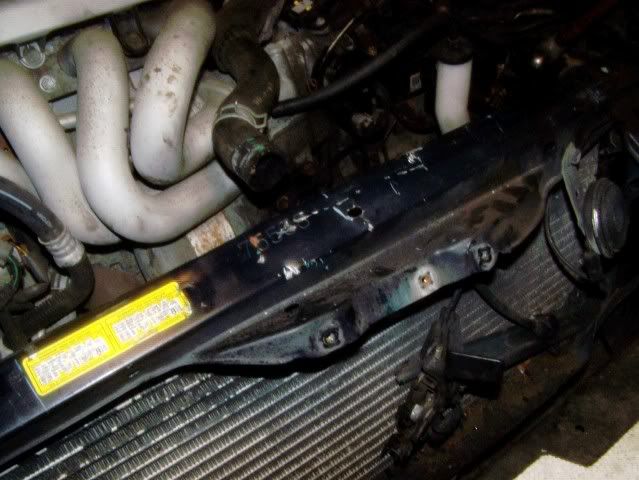
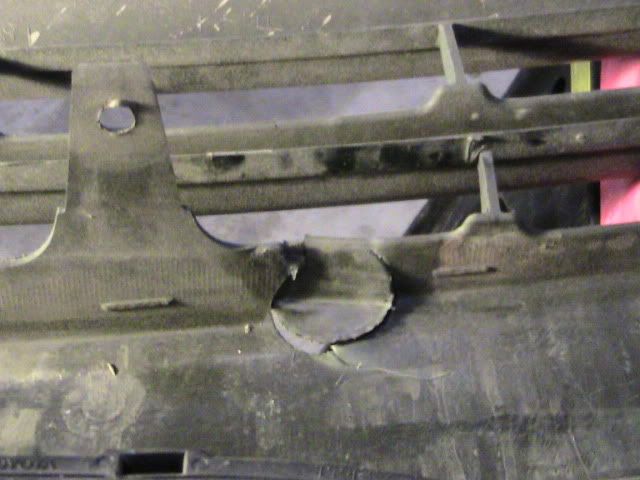
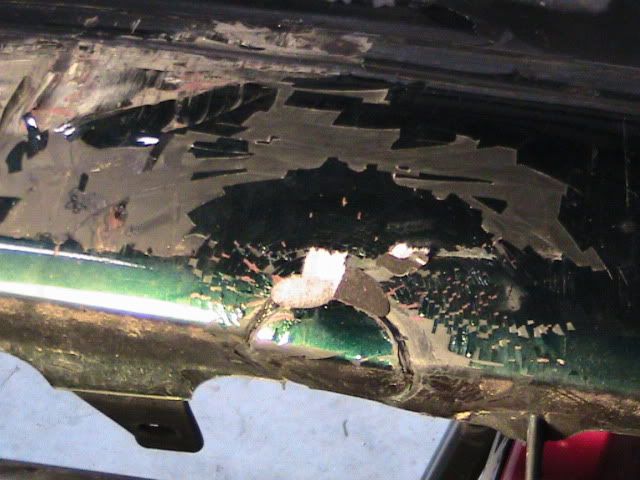
After I got the bumper cover off I found the bumper support bar and foam to be OK (he went over all that). The core support, however, was pushed down and back. The "back" part is no big deal. The "down" part is more of a PITA, given the equipment I have. If you look at this pic carefully you can see that everything is smashed downward.

Tomorrow I'll remove the radiator, brace the back side of the top rail of the core support, and see if I can pull the whole deal up with the engine hoist.
So far the parts list looks like this:
2 headlights w/mounts
2 side marker lights
1 hood
To Be Determined
Radiator
Core Support
More segments to come, including painting the hood and other tasks.
Hope you guys find this interesting
Dan
Installment II
I finally got a couple of hours to put into it - here's the results. Tomorrow I'll go parts shopping - probably some from <shermanparts.com> after I scour the local salvage yards.
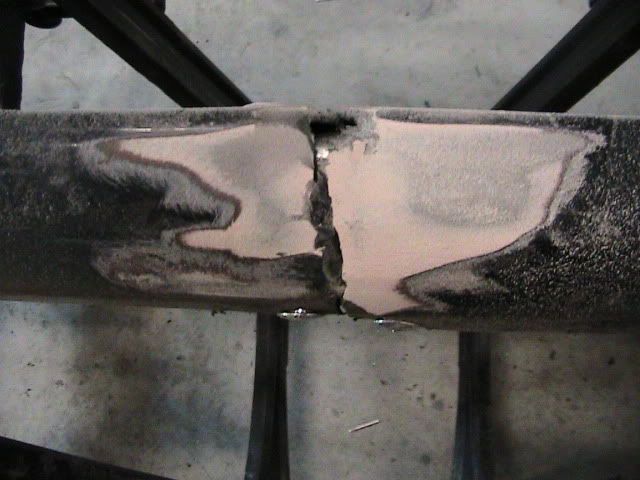
This is the driver's side of the core support before I pulled it. Passenger's side is similar. I hope you can see that the whole deal is pushed down a bit.
Here I'm set up to pull it. The backing piece is a 3/4" x 1 1/2" piece of oak I had kicking around in the wood working area. I've used this for a BUNCH of projects. This braces the "C" channel on the top of the core support so I don't just fold up the whole deal. With this brace in place I was able to pry the section forward quite a bit but it was still too low.
Here I have the cherry picker and the spreader set up to pull the core support upward. Again, the oak block kept the core support from just folding up and the spreader distributed the force across the entire area so it all pulled up pretty evenly.
The pull upward was pretty successful. I hope you can see that the extra fold in the sheet metal (as shown in the first pic in Installment II) is pretty well gone. As I applied force from the cherry picker I was tapping on the bent areas so that the sheet metal would release it's stored energy. This went well.
Here's the area which is now adequately straightened. While I could mess with it until it was perfect, that really isn't necessary for this repair. If this was a customer's car a pro would likely have replaced the core support.
Another little area needing attention. The front fender corner on the right (passenger's) side was slightly pushed in. This is a fairly common type of damage and I've had good luck straightening these by carefully prying them back and tapping on the bent areas.
Before:
After:

You can probably see that no paint work or further effort is needed on this spot, other than a little brush touch up so the formerly bent area doesn't get rusty.
Forgot to mention - with body work, anything that works is OK. Oak can be useful and is an approved technique if it gets the job done. I've had people ask me if it's OK to pry a fender out with a 2X4. The answer is "Hell YES!".
I'll get the parts coming ASAP. It would be ideal if I can find a donor car at the local cheap salvage yard but that remains to be seen.
Dan
II.5
A little bit of progress while waiting for parts. I bolted on the new/used hood - it fit pretty well. The fender that was tweeked in was too far outward for the hood gap to be at all decent. I made the front fender mounting hole bigger and adjusted the fender - all is great on that front. The gap on both sides is kind of wide but I doubt that has anything to do with the accident.
I also got the hood latch straightened and back in place. Everything works and fits but I found out that the left side hood bumper is shot. Also that there are grille inserts in the bumper cover and the right side one is missing, which allows the grille opening to sort of sag. So I got both on order. The news here is that I actually found a DISCOUNT source for Toyota parts (I haven't had much luck with this in the past). Go to <toyotapartsexpress.com> if you need bits for a 'Yoda.
No pics today - I'm feeling lazy and I'll post 'em the next time I head out there.
Dan
INSTALLMENT III
FINALLY! All the parts are here and I the weather is a bit warmer so I headed back out today. The goal is to paint it on Monday - the weather is expected to cooperate and I don't have the heater installed or the booth in place so I'm at the mercy of ambient conditions.
Be prepared - I took a BUNCH of pics with ME's new camera so there's lots of documentation.
First thing - I promised to post how I knew this car had been wrecked before. One dead giveaway is the quality of the paint but it's hard to capture that in a pic (at least for me). Toyota paint is generally pretty good and very consistent over the whole car - robot painters, you know. But here's some other tell-tale signs -
Under the bent hood:
Under the "new" hood from the salvage yard:
I highlighted the stamped lettering with a soapstone but it is clearly visible to even my crummy eyes.
Next - how to work up stone pecks. The replacement hood has who knows how many miles on it and was pretty well pecked up. Lots of folks have asked me how far you have to go with these to assure paint adhesion. Here's what I've found from my experience -
Not adequate:
Notice the "stains" remaining. Even with self-etching primer the paint is likely to "pop" from these areas. I kept working at these for a few more minutes and here's what I got -
All this sanding was done with 80 grit. Pros would likely use 60 or even coarser (remember, a lower number is coarser) but every scratch you put in there you'll have to remove eventually. This takes a while but I'm not being paid by the hour (or at all, in this case!).
The hood had a couple of divots after all it's years of road miles. First here's one that stuck up - in it's past life someone closed the hood on a tool or something. When I found it -
Sand these FIRST! It's tougher to get paint out of a divot. The punch points to the high spot.
Then sunk under the surface. A real pro would metal shrink this but when did I say I was a "real pro"? It's hard to get to the back of this one and modern metal is pretty thin so I accept this as an OK fix. Look closely and you can see a small downward dimple.
How do you mix filler? Here's my process and the "tools' (I use the term loosely) that work for me. BTW - use a fairly light filler even though it may tend to slide off vertical panels - if it needs to be that thick you need more metal working!
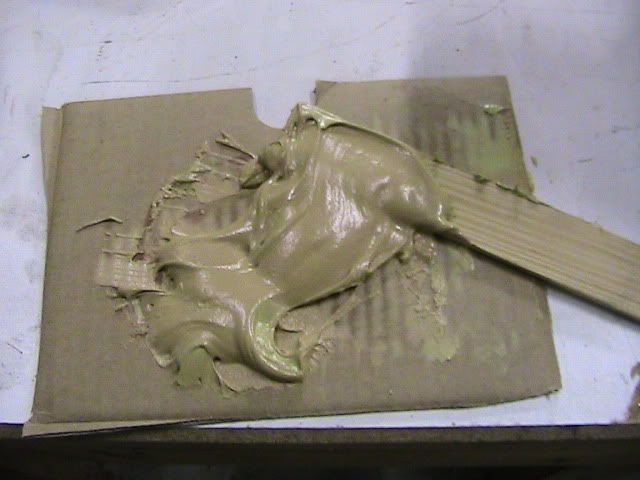
I use cardboard - just throw it out when you're done. I HATE clean up. I also get as many stir sticks as the paint store will let me have - these are my "spatula" for mixing. Slide the stir stick horizontally across the cardboard and under the glob of filler then fold the whole deal over on top of itself to mix - it works pretty quickly.
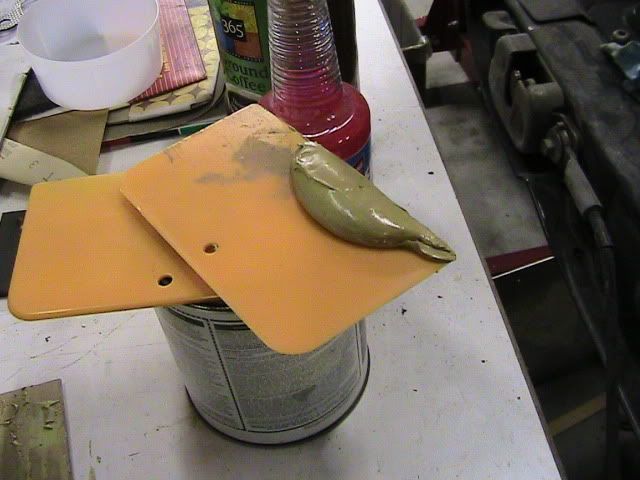
Common question: how much hardener? This is about it for me but this isn't brain surgery. A little more or a bit less is no big deal.

Ready to spread. I hope you can see the color change. There are different colors of hardener and all are OK from my experience.
I'd rather mix too much than not enough. Compared to paying for body work this stuff is CHEAP and running out half way thru is a PITA. Besides, you can gather up the extra on the spreader and it breaks off the spreader more easily once hardened. Spreaders are cheap - buy the real deal and don't be afraid to replace them when they get funky.
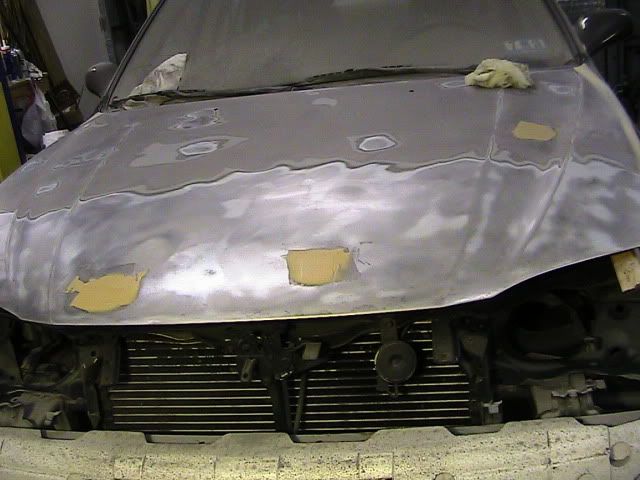
The hood with the first coat of filler. As you can see, just a few spots.
A few notes:
I left the hood on the car for this part because the hinges hold it firmly and you don't have to chase it around. I'll remove it to prime and paint.
Sandpaper is SUPPLIES, not TOOLS. Folks have a tendency to keep using it WAY past it's useful life. I used about 8-10 sheets of 80 grit on a 6"DA sander, as well as about 3-4 sheets of 150 for the work you saw in this Installment. When you're getting those rust stains out you're actually sanding away a small amount of metal so naturally it's going to eat up some abrasive to do that.
Sorry for the delay but I hope this Installment was worth the wait.
Also, I'm writing this as though the reader knows NOTHING - hope no one feels "talked down to".
Dan
INSTALLMENT IV
Saving parts today. Specifically, the front fascia, AKA bumper cover.
I was actually planning to sand this up today but I had forgotten it needed repair. I could have bought a new one but that was another $85 or so and we're doing this on the cheap. Turns out it had 2 damaged areas, one at the very bottom center and one in the middle. I resorted to JB Weld and aluminum. It would have been handy to have Loren's mad fab skills but I pounded out something that will work. Here's what I did:
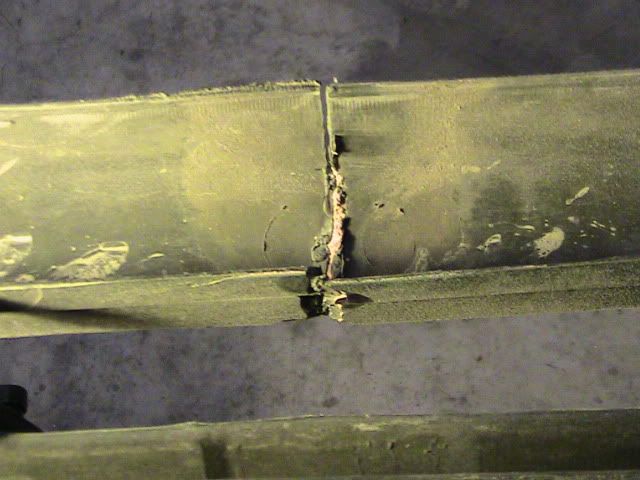
Here's the rip thru the bottom "rail" of the cover -
I decided that rivets wouldn't show too much all the way down there so I pop riveted the patch in place. What you can't see is that there's a goober of JB Weld under it.
Here's the one in the middle. The pieces didn't really want to realign themselves but I think I finally forced everything into position. The aluminum patch was MUCH easier to make for this one.
Before -
Setting up. I may try to pop some rivets on the horizontal surface just to reinforce this a bit.

Tomorrow I'll break out the flexible filler/adhesive (a 3M product) and fill the spots. Then sand and prime. I also have the hood back off and I'll get going on the back side so I can paint the edges - not doing that is pretty tacky, in my opinion.
Hope you're enjoying this thread
Dan
Installment V
Fixing the Fascia (or Bondoing the bumper cover?)
Here's how crappy the paint is on this thing. As I said, this front end was "fixed" (and I use the term loosely) before. More evidence of the sloppy repair - evidently, the fascia was painted straight over the factory top coat - a sort of primer-like substance in black. Evidence that this is inadequate is shown in this photo - the paint just pealed right off with very poor adhesion. I'll strip it as much as possible (it's difficult to get in the little cracks and character lines) and prime with flexible primer.
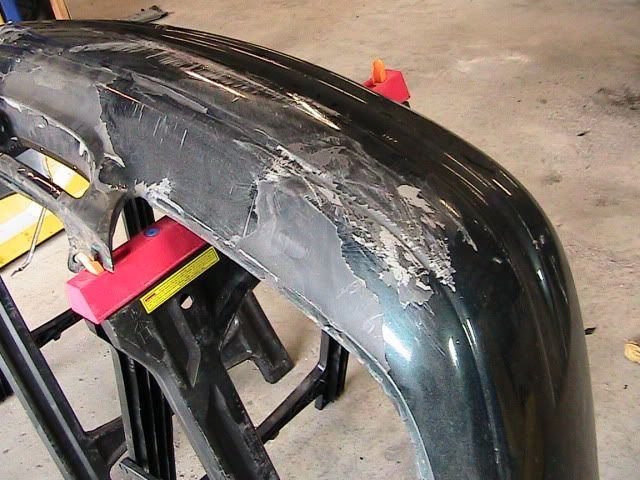
Exhibit 2 -
They also used regular body filler instead of the flexible stuff, which I'm guessing is a type of epoxy judging from the smell. Here's the wrong stuff:
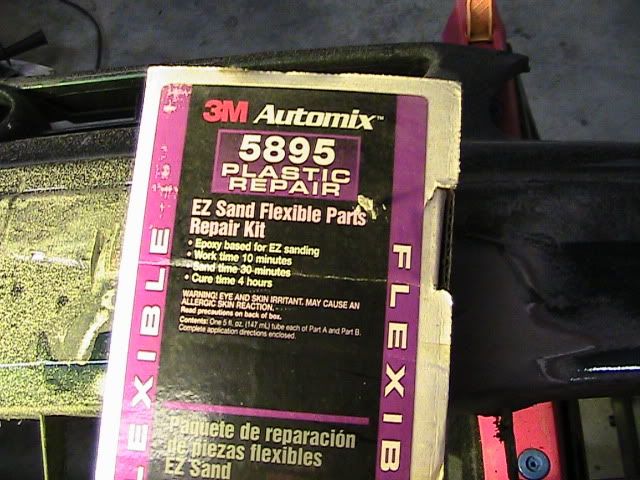
Here's what you need to use. It not only fills the damaged area, it's also a strong bonding agent and helps strengthen the damaged area. I'm a real believer that if you're going to fix these areas you HAVE to back the damage with something. The aluminum works pretty good from my experience. The filler I'm using happens to be 3M and is pricey but I'm sure SEM and others make similar products.
The damaged area with the JB Welded patch which I showed yesterday:
Same spot with the first coat of the filler/adhesive. You can see a couple more divots which weren't really obvious until I sanded that area. I'll just fill them as there really isn't much you can do to "bump" these out or anything. They might improve with careful application of the heat gun but I think filling with the flexible epoxy should be fine.:
Now it's a matter of fill and sand until it looks as good as I can get it. This repair is a compromise - a new fascia would have made for an invisible repair but this will be, I think, good enough. I have another layer setting up right now and I'm sanding away on the rest of the cover as time and interest allow. Sanding all those little bars and such is a royal pain but you just keep at it until it's done.
Dan
INSTALLMENT VI
First paint steps.
I finished sanding the fascia - or so I thought. Seems I'll have more to do to get it right - pics to follow.
Here's the squadron to prep the bumper cover. On the left is a real, genuine tack cloth. It's essentially a piece of cheese cloth impregnated with resin of some sort. Notice how it's opened all the way - most folks, even pros, don't do this properly. If it's opened fully it allows the maximum surface area and you get the most for your money as you use it. See, I DID learn something in trade school!
Next item is wax and grease remover, often called "Prep-Sol" (a brand name). Amazingly, it removes wax and grease. The right way to use this stuff is to soak one rag in the Prep-Sol (I use the lint-free disposable shop rags) and use a second clean, dry one to wipe up. The idea is that you dissolve the junk with the wet one and wipe off the loose stuff with the dry rag.
Third item has several names, including Sand Free, which is the name of this SEM product. BTW - SEM makes all kinds of miscellaneous paint chemicals like this one. Anyhow, it softens the surface of the existing substrate and is especially useful in hard-to-sand areas like door jambs. Given that I was having a heck of a time getting all the nooks and crannies on the fascia I thought it might help.
The last item is aerosol flexible primer. I won't do enough of these bumper covers to make it worth buying a quart of the stuff so I went with a spray can.
However, the best laid plans...... The fascia has a bunch of areas where I missed poor adhesion of the old paint. The primer points it out so I can see what to fix. Just takes more time.
But I AM ready to spray the back side of the hood. There's a fairly large hood pad the covers the center on the hood so I just had to spray the edges. First I had to clean off the crud thrown up from what looked like a failed belt from the engine on the hood donor. Then Prep-Sol, followed by a scrub with a Scotch Bright pad. Another attack with Prep-Sol and it was time to spray.
Here's my setup:
The gun is my trusty Binks #7. NOT HVLP but it sure works great. Notice the gallon of lacquer thinner in the background - the cheap stuff. It takes a lot of gun cleaning to complete all the steps. I actually buy thinner in a 5 gallon can and pump it into the one gallon can to make it easier to handle - it's cheaper. The glass jar holds the thinner that I stored in the gun when I put it away the last time. I use that for the first gun cleaning after I use the gun. A paint trick for us low-volume painters - ask the paint store to thin the paint for you. You won't have to stock all the thinners and you know it's ready to spray when you open the can. Of course, you can't have them add the hardener that way!
Why the Crescent wrench? I take the gun apart to clean it, as shown. That way you can be sure the needle is clean (DON'T bend it!).
Back of the hood in color. It doesn't show that well in the pic but I mask off underhood stickers. I think it looks more professional and passes along info to anyone who may have to work on the car later (belt routing, etc. The hood is actually from a '98 this car is a '99) but at the info is probably pretty close.

I'll let it dry overnight and take the whole project up tomorrow.
Dan
Nobody (including me) is going to give a rip about the subject vehicle (my 16 YO Grandson Casey's '99 Toyota Corolla) but I thought some of you might be interested in the process of putting the front end back together. He hit something straight on, his nose to whatever he hit (that info is not yet forthcoming and probably doesn't matter). I can't be too hard on the guy - he's just recently been diagnosed with Chrone's Disease and they're still dealing with some acute issues surrounding that.
But enough of that. The first "opportunity" was to get the hood open. The hood had been pushed down into the latch and there was no way it would let go of the latch bar.
A shot of the car as it came to me (I stole this pic from my daughter as it's MUCH better than the one I had).
A shot from the passenger's side.
I cut a hole in the hood around the latch area and eventually was able to lift the hood off the latch. Whizzer wheels are a good thing. The hood was definitely a goner so it didn't matter if I cut it up. If I think I can save the hood I'll attack from the bottom and see if I can get it to release.
After I got the bumper cover off I found the bumper support bar and foam to be OK (he went over all that). The core support, however, was pushed down and back. The "back" part is no big deal. The "down" part is more of a PITA, given the equipment I have. If you look at this pic carefully you can see that everything is smashed downward.
Tomorrow I'll remove the radiator, brace the back side of the top rail of the core support, and see if I can pull the whole deal up with the engine hoist.
So far the parts list looks like this:
2 headlights w/mounts
2 side marker lights
1 hood
To Be Determined
Radiator
Core Support
More segments to come, including painting the hood and other tasks.
Hope you guys find this interesting
Dan
Installment II
I finally got a couple of hours to put into it - here's the results. Tomorrow I'll go parts shopping - probably some from <shermanparts.com> after I scour the local salvage yards.
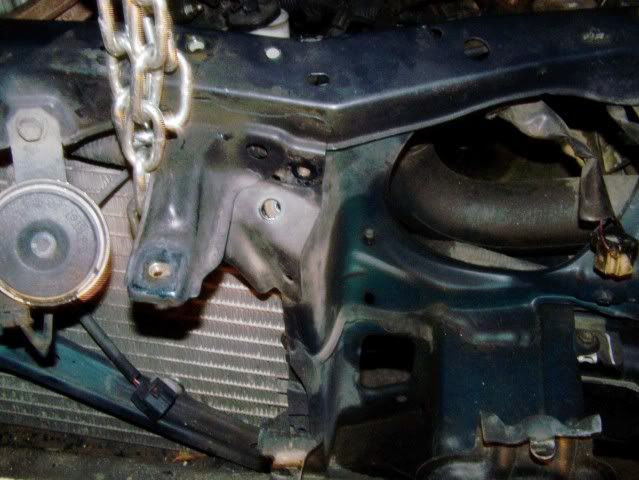
This is the driver's side of the core support before I pulled it. Passenger's side is similar. I hope you can see that the whole deal is pushed down a bit.
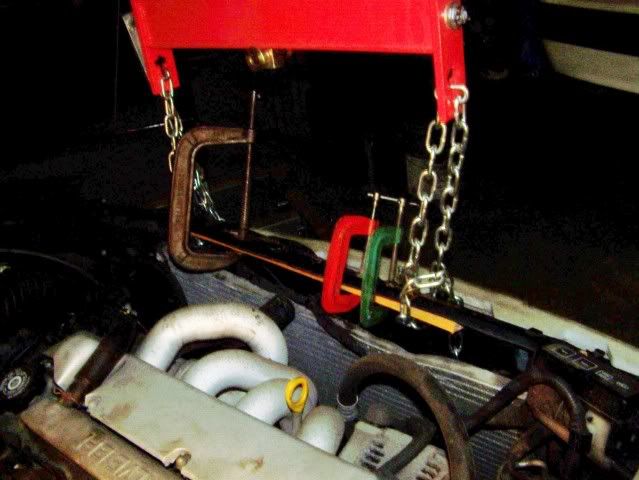
Here I'm set up to pull it. The backing piece is a 3/4" x 1 1/2" piece of oak I had kicking around in the wood working area. I've used this for a BUNCH of projects. This braces the "C" channel on the top of the core support so I don't just fold up the whole deal. With this brace in place I was able to pry the section forward quite a bit but it was still too low.
Here I have the cherry picker and the spreader set up to pull the core support upward. Again, the oak block kept the core support from just folding up and the spreader distributed the force across the entire area so it all pulled up pretty evenly.
The pull upward was pretty successful. I hope you can see that the extra fold in the sheet metal (as shown in the first pic in Installment II) is pretty well gone. As I applied force from the cherry picker I was tapping on the bent areas so that the sheet metal would release it's stored energy. This went well.
Here's the area which is now adequately straightened. While I could mess with it until it was perfect, that really isn't necessary for this repair. If this was a customer's car a pro would likely have replaced the core support.
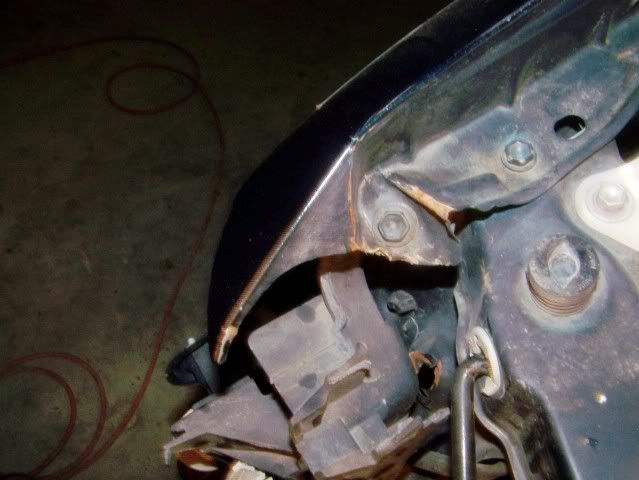
Another little area needing attention. The front fender corner on the right (passenger's) side was slightly pushed in. This is a fairly common type of damage and I've had good luck straightening these by carefully prying them back and tapping on the bent areas.
Before:
After:
You can probably see that no paint work or further effort is needed on this spot, other than a little brush touch up so the formerly bent area doesn't get rusty.
Forgot to mention - with body work, anything that works is OK. Oak can be useful and is an approved technique if it gets the job done. I've had people ask me if it's OK to pry a fender out with a 2X4. The answer is "Hell YES!".
I'll get the parts coming ASAP. It would be ideal if I can find a donor car at the local cheap salvage yard but that remains to be seen.
Dan
II.5
A little bit of progress while waiting for parts. I bolted on the new/used hood - it fit pretty well. The fender that was tweeked in was too far outward for the hood gap to be at all decent. I made the front fender mounting hole bigger and adjusted the fender - all is great on that front. The gap on both sides is kind of wide but I doubt that has anything to do with the accident.
I also got the hood latch straightened and back in place. Everything works and fits but I found out that the left side hood bumper is shot. Also that there are grille inserts in the bumper cover and the right side one is missing, which allows the grille opening to sort of sag. So I got both on order. The news here is that I actually found a DISCOUNT source for Toyota parts (I haven't had much luck with this in the past). Go to <toyotapartsexpress.com> if you need bits for a 'Yoda.
No pics today - I'm feeling lazy and I'll post 'em the next time I head out there.
Dan
INSTALLMENT III
FINALLY! All the parts are here and I the weather is a bit warmer so I headed back out today. The goal is to paint it on Monday - the weather is expected to cooperate and I don't have the heater installed or the booth in place so I'm at the mercy of ambient conditions.
Be prepared - I took a BUNCH of pics with ME's new camera so there's lots of documentation.
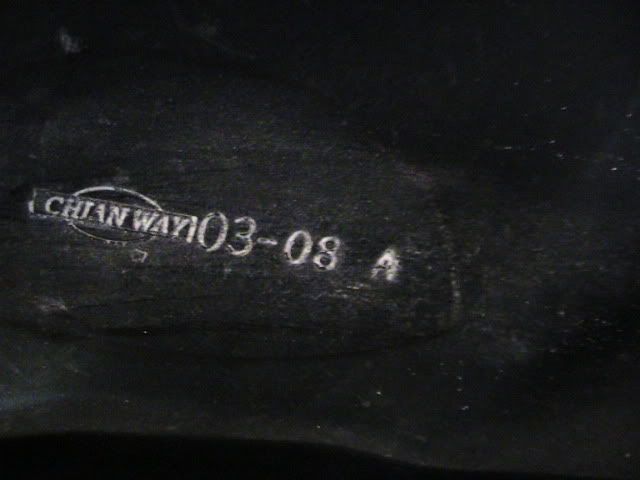
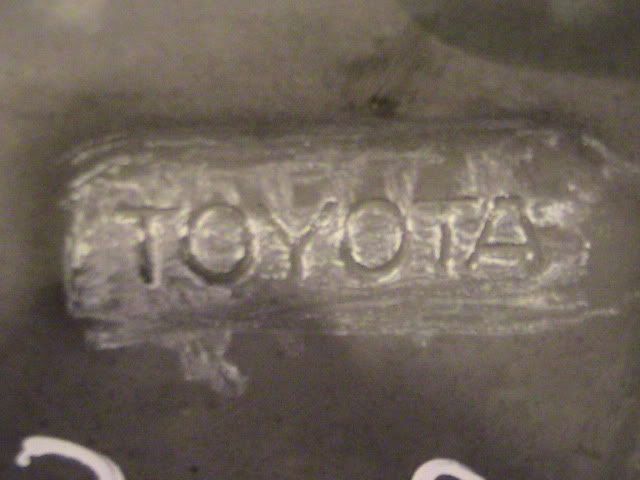
First thing - I promised to post how I knew this car had been wrecked before. One dead giveaway is the quality of the paint but it's hard to capture that in a pic (at least for me). Toyota paint is generally pretty good and very consistent over the whole car - robot painters, you know. But here's some other tell-tale signs -
Under the bent hood:
Under the "new" hood from the salvage yard:
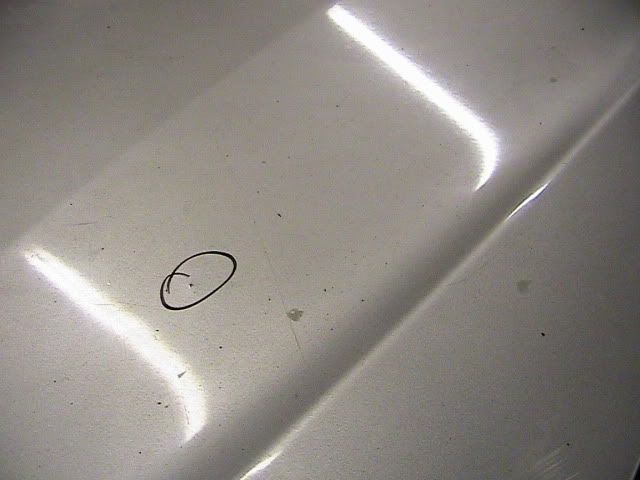
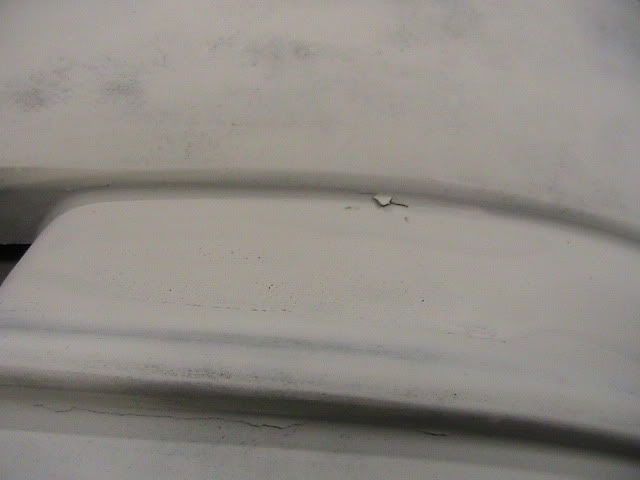
I highlighted the stamped lettering with a soapstone but it is clearly visible to even my crummy eyes.
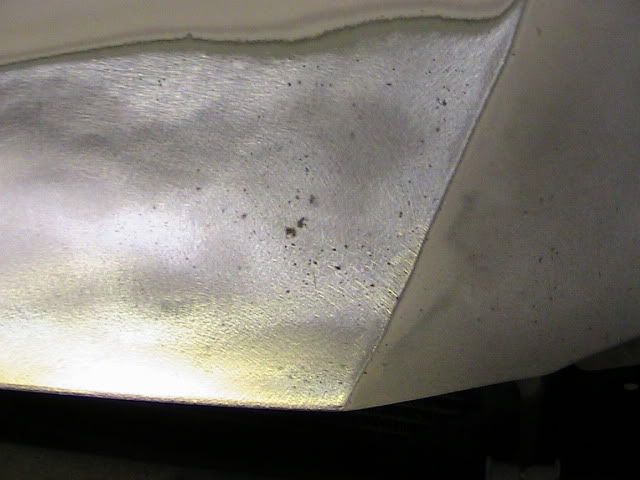
Next - how to work up stone pecks. The replacement hood has who knows how many miles on it and was pretty well pecked up. Lots of folks have asked me how far you have to go with these to assure paint adhesion. Here's what I've found from my experience -
Not adequate:
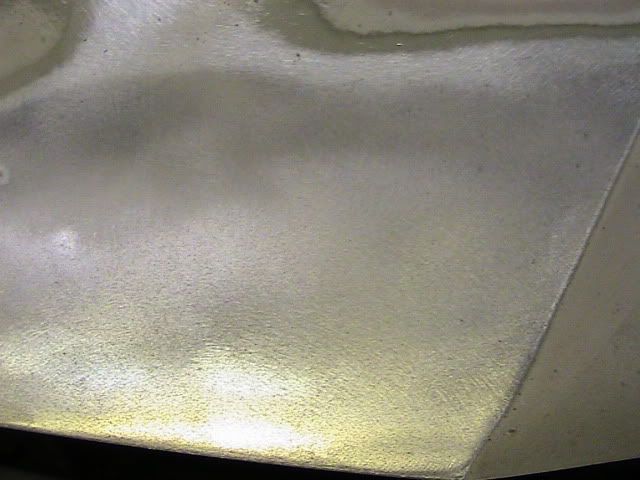
Notice the "stains" remaining. Even with self-etching primer the paint is likely to "pop" from these areas. I kept working at these for a few more minutes and here's what I got -
All this sanding was done with 80 grit. Pros would likely use 60 or even coarser (remember, a lower number is coarser) but every scratch you put in there you'll have to remove eventually. This takes a while but I'm not being paid by the hour (or at all, in this case!).
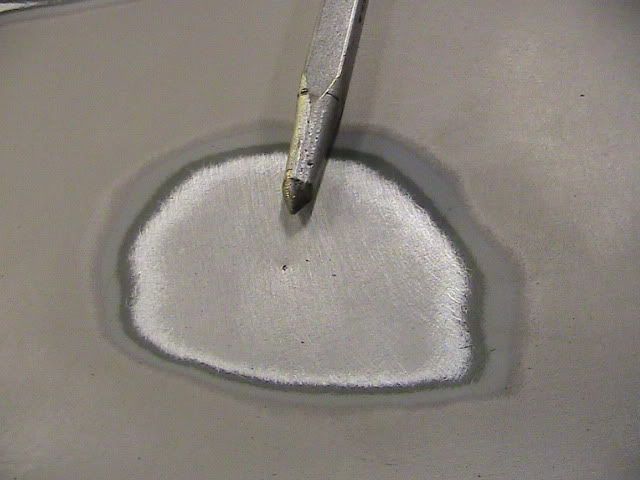
The hood had a couple of divots after all it's years of road miles. First here's one that stuck up - in it's past life someone closed the hood on a tool or something. When I found it -
Sand these FIRST! It's tougher to get paint out of a divot. The punch points to the high spot.
Then sunk under the surface. A real pro would metal shrink this but when did I say I was a "real pro"? It's hard to get to the back of this one and modern metal is pretty thin so I accept this as an OK fix. Look closely and you can see a small downward dimple.
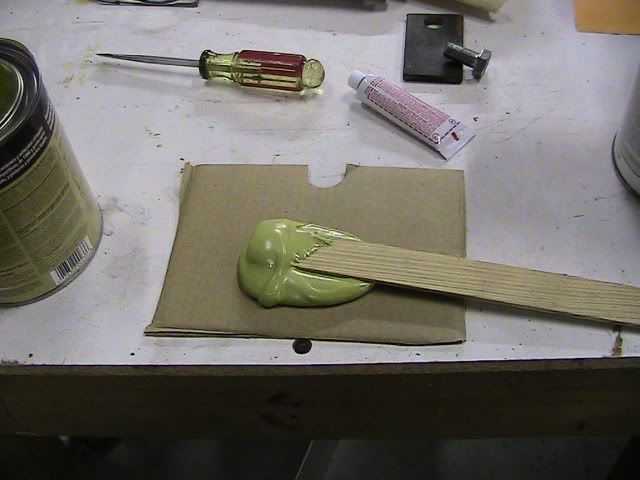
How do you mix filler? Here's my process and the "tools' (I use the term loosely) that work for me. BTW - use a fairly light filler even though it may tend to slide off vertical panels - if it needs to be that thick you need more metal working!
I use cardboard - just throw it out when you're done. I HATE clean up. I also get as many stir sticks as the paint store will let me have - these are my "spatula" for mixing. Slide the stir stick horizontally across the cardboard and under the glob of filler then fold the whole deal over on top of itself to mix - it works pretty quickly.
Common question: how much hardener? This is about it for me but this isn't brain surgery. A little more or a bit less is no big deal.
Ready to spread. I hope you can see the color change. There are different colors of hardener and all are OK from my experience.
I'd rather mix too much than not enough. Compared to paying for body work this stuff is CHEAP and running out half way thru is a PITA. Besides, you can gather up the extra on the spreader and it breaks off the spreader more easily once hardened. Spreaders are cheap - buy the real deal and don't be afraid to replace them when they get funky.
The hood with the first coat of filler. As you can see, just a few spots.
A few notes:
I left the hood on the car for this part because the hinges hold it firmly and you don't have to chase it around. I'll remove it to prime and paint.
Sandpaper is SUPPLIES, not TOOLS. Folks have a tendency to keep using it WAY past it's useful life. I used about 8-10 sheets of 80 grit on a 6"DA sander, as well as about 3-4 sheets of 150 for the work you saw in this Installment. When you're getting those rust stains out you're actually sanding away a small amount of metal so naturally it's going to eat up some abrasive to do that.
Sorry for the delay but I hope this Installment was worth the wait.
Also, I'm writing this as though the reader knows NOTHING - hope no one feels "talked down to".
Dan
INSTALLMENT IV
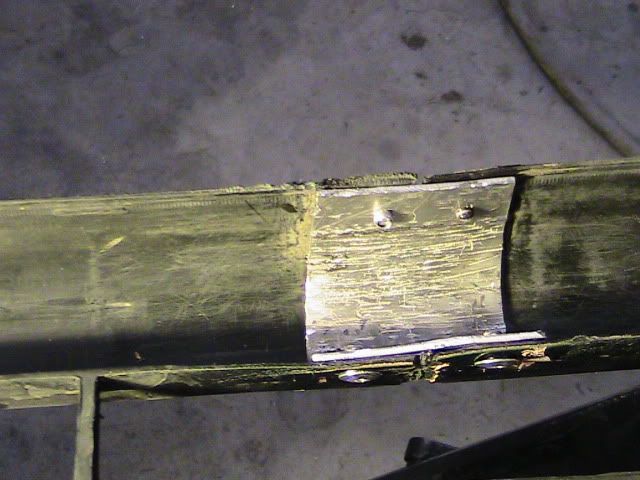
Saving parts today. Specifically, the front fascia, AKA bumper cover.
I was actually planning to sand this up today but I had forgotten it needed repair. I could have bought a new one but that was another $85 or so and we're doing this on the cheap. Turns out it had 2 damaged areas, one at the very bottom center and one in the middle. I resorted to JB Weld and aluminum. It would have been handy to have Loren's mad fab skills but I pounded out something that will work. Here's what I did:
Here's the rip thru the bottom "rail" of the cover -
I decided that rivets wouldn't show too much all the way down there so I pop riveted the patch in place. What you can't see is that there's a goober of JB Weld under it.
Here's the one in the middle. The pieces didn't really want to realign themselves but I think I finally forced everything into position. The aluminum patch was MUCH easier to make for this one.
Before -
Setting up. I may try to pop some rivets on the horizontal surface just to reinforce this a bit.
Tomorrow I'll break out the flexible filler/adhesive (a 3M product) and fill the spots. Then sand and prime. I also have the hood back off and I'll get going on the back side so I can paint the edges - not doing that is pretty tacky, in my opinion.
Hope you're enjoying this thread
Dan
Installment V
Fixing the Fascia (or Bondoing the bumper cover?)
Here's how crappy the paint is on this thing. As I said, this front end was "fixed" (and I use the term loosely) before. More evidence of the sloppy repair - evidently, the fascia was painted straight over the factory top coat - a sort of primer-like substance in black. Evidence that this is inadequate is shown in this photo - the paint just pealed right off with very poor adhesion. I'll strip it as much as possible (it's difficult to get in the little cracks and character lines) and prime with flexible primer.
Exhibit 2 -
They also used regular body filler instead of the flexible stuff, which I'm guessing is a type of epoxy judging from the smell. Here's the wrong stuff:
Here's what you need to use. It not only fills the damaged area, it's also a strong bonding agent and helps strengthen the damaged area. I'm a real believer that if you're going to fix these areas you HAVE to back the damage with something. The aluminum works pretty good from my experience. The filler I'm using happens to be 3M and is pricey but I'm sure SEM and others make similar products.
The damaged area with the JB Welded patch which I showed yesterday:
Same spot with the first coat of the filler/adhesive. You can see a couple more divots which weren't really obvious until I sanded that area. I'll just fill them as there really isn't much you can do to "bump" these out or anything. They might improve with careful application of the heat gun but I think filling with the flexible epoxy should be fine.:
Now it's a matter of fill and sand until it looks as good as I can get it. This repair is a compromise - a new fascia would have made for an invisible repair but this will be, I think, good enough. I have another layer setting up right now and I'm sanding away on the rest of the cover as time and interest allow. Sanding all those little bars and such is a royal pain but you just keep at it until it's done.
Dan
INSTALLMENT VI
First paint steps.
I finished sanding the fascia - or so I thought. Seems I'll have more to do to get it right - pics to follow.
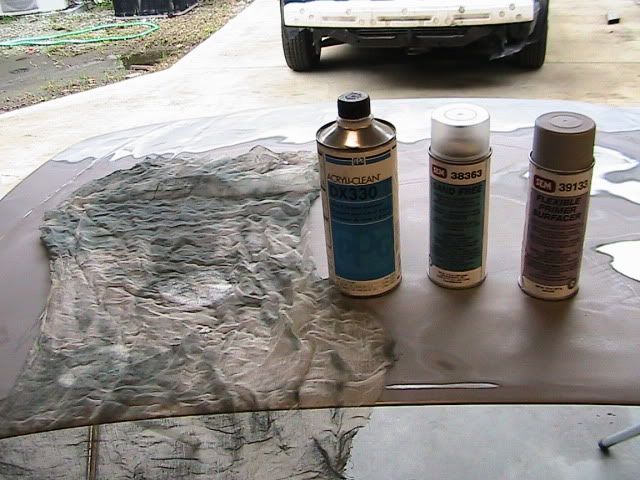
Here's the squadron to prep the bumper cover. On the left is a real, genuine tack cloth. It's essentially a piece of cheese cloth impregnated with resin of some sort. Notice how it's opened all the way - most folks, even pros, don't do this properly. If it's opened fully it allows the maximum surface area and you get the most for your money as you use it. See, I DID learn something in trade school!
Next item is wax and grease remover, often called "Prep-Sol" (a brand name). Amazingly, it removes wax and grease. The right way to use this stuff is to soak one rag in the Prep-Sol (I use the lint-free disposable shop rags) and use a second clean, dry one to wipe up. The idea is that you dissolve the junk with the wet one and wipe off the loose stuff with the dry rag.
Third item has several names, including Sand Free, which is the name of this SEM product. BTW - SEM makes all kinds of miscellaneous paint chemicals like this one. Anyhow, it softens the surface of the existing substrate and is especially useful in hard-to-sand areas like door jambs. Given that I was having a heck of a time getting all the nooks and crannies on the fascia I thought it might help.
The last item is aerosol flexible primer. I won't do enough of these bumper covers to make it worth buying a quart of the stuff so I went with a spray can.
However, the best laid plans...... The fascia has a bunch of areas where I missed poor adhesion of the old paint. The primer points it out so I can see what to fix. Just takes more time.
But I AM ready to spray the back side of the hood. There's a fairly large hood pad the covers the center on the hood so I just had to spray the edges. First I had to clean off the crud thrown up from what looked like a failed belt from the engine on the hood donor. Then Prep-Sol, followed by a scrub with a Scotch Bright pad. Another attack with Prep-Sol and it was time to spray.
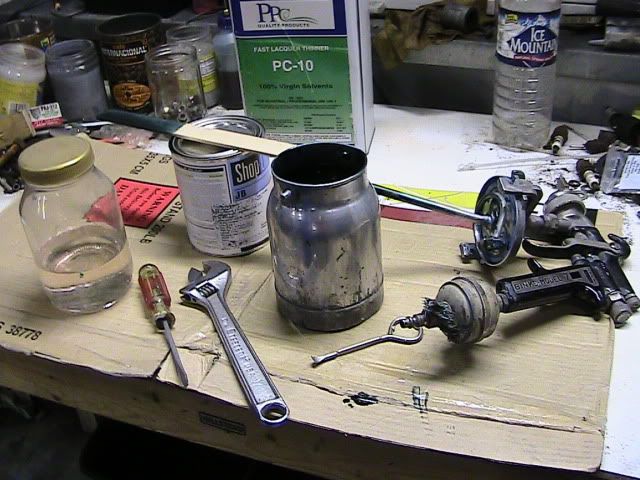
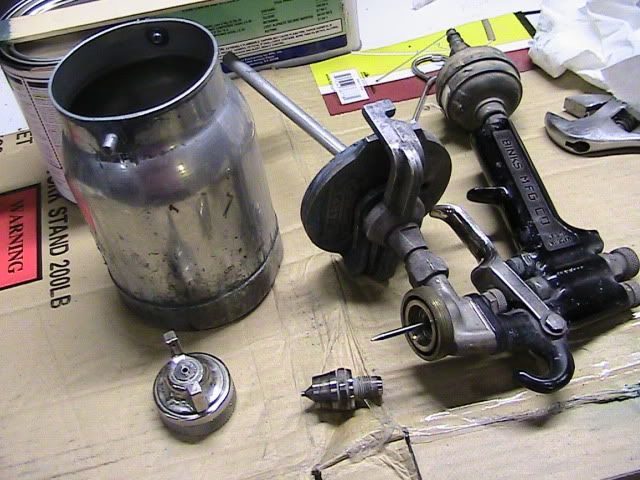
Here's my setup:
The gun is my trusty Binks #7. NOT HVLP but it sure works great. Notice the gallon of lacquer thinner in the background - the cheap stuff. It takes a lot of gun cleaning to complete all the steps. I actually buy thinner in a 5 gallon can and pump it into the one gallon can to make it easier to handle - it's cheaper. The glass jar holds the thinner that I stored in the gun when I put it away the last time. I use that for the first gun cleaning after I use the gun. A paint trick for us low-volume painters - ask the paint store to thin the paint for you. You won't have to stock all the thinners and you know it's ready to spray when you open the can. Of course, you can't have them add the hardener that way!
Why the Crescent wrench? I take the gun apart to clean it, as shown. That way you can be sure the needle is clean (DON'T bend it!).
Back of the hood in color. It doesn't show that well in the pic but I mask off underhood stickers. I think it looks more professional and passes along info to anyone who may have to work on the car later (belt routing, etc. The hood is actually from a '98 this car is a '99) but at the info is probably pretty close.
I'll let it dry overnight and take the whole project up tomorrow.
Dan

Comment