Project Franken-Riviera -1964 Buick Riviera-

Collapse
X
 
  • Time
  • Show
Clear All
new posts
  • CTX-SLPR
    Legendary BangShifter
    • Jan 2008
    • 6011

    #61
    Re: Project Franken-Riviera -1964 Buick Riviera-

    As promised PICTURES!!!

    I didn't get anything done on the car today, too busy hanging out with buddies, comforting a wife who's being beaten up from the inside by our baby, and redoing the prep for a bathroom repaint.

    The Big 4 in the Radio

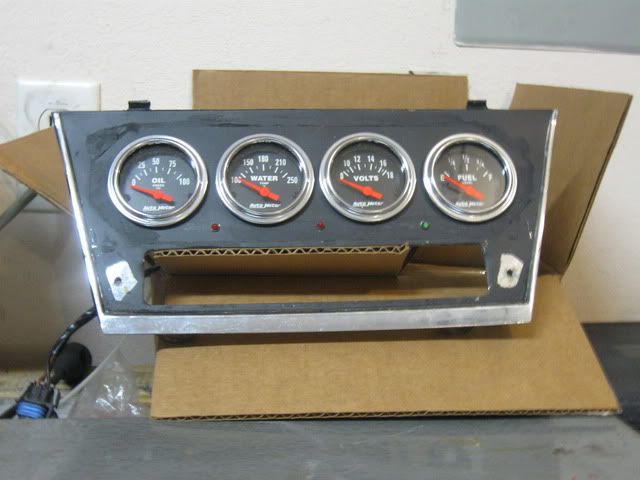
    The "bodywork" done to fill in the plate is JB Weld and I don't really care as it's going to be covered over in veneer once I pick some out for the car. Thinking a dark reddish wood.

    The Fuel Tank Access

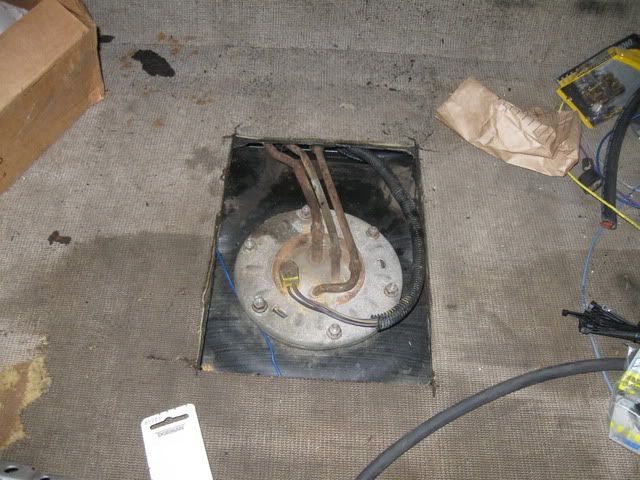
    You can see the top of the 96 Impala SS tank in there with the fuel pump and sending unit sticking out. I'm really seriously considering extending the cut back to the rear axle kick-up and putting a hinge in it so you can pull the whole thing without dropping the tank.

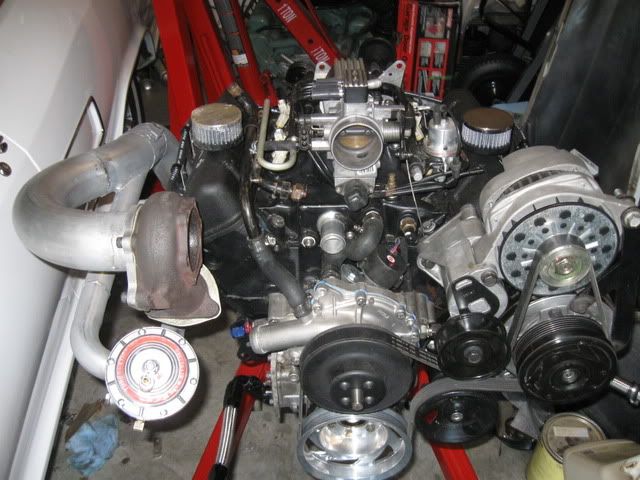
    Downpipe with O2 Bungs


    That's the whole "upper" downpipe. Right now the WBO2 is in front of the NBO2 but they are easily swapped and I have a plug for the WBO2 most of the time.

    Stock vs. Lokar "Eliminator" gas pedal

    Right now I'm just going to go with the Lokar as is since style wise it matches pretty well. However I am considering splicing the 2 together at a later date.
    Central TEXAS Sleeper
    USAF Physicist

    ROA# 9790

    Comment

    • CTX-SLPR
      Legendary BangShifter
      • Jan 2008
      • 6011

      #62
      Re: Project Franken-Riviera -1964 Buick Riviera-

      More Pictures (is anyone else's forum not letting them watch what they type after they get to a certain line?)
      Backer Nuts

      Not welded yet but the result of threading an SAE bolt into a Metric threads and putting a ratchet to it. DOH!

      Overall Passengers side Header and Crossover

      Pretty obvious what is going on, had to play with that crossover tube quite a bit to get it tucked up tight, out of the way of the centerlink, pitman arm, idler arm, starter, transmission cooler lines and the torque converter shield!

      Cam Sensor

      Boring but very needed, after I found the TDC mark on the balancer I measured the balancer found 25deg ATDC in inches and rotated the engine over and dropped the stub in. I then played with the housing clocking so the light was in the front and the wire was in the back and screwed it down at approximately 25deg. Going to have to set it again in the car with power on so I can line it up on the leading edge of 25 instead of just "close enough".

      Stupid Long Tru-Cool cooler


      Stupid things don't come with the ports tapped properly! That's the 2nd fitting that I've had one eat and the second cooler that's done it! Always run a tap through the dang threads if you buy one to make sure it's clean and won't go all cross threaded on you. Also the 1/2in NPT ports on the are rather shallow, running a tap will let you run it in deeper than leaving alone as well.
      Central TEXAS Sleeper
      USAF Physicist

      ROA# 9790

      Comment

      • CTX-SLPR
        Legendary BangShifter
        • Jan 2008
        • 6011

        #63
        Re: Project Franken-Riviera -1964 Buick Riviera-

        And on to wiring and the current state of the car

        Interior


        Engine Bay


        Trunk mounted stuff

        Up on the rear axle kick-up I mounted my amp (so I can run my 6x9 in bridged mono instead of a single side) and a nice relay block out of an early 90's GM H-body. All of this fits behind the spare tire.

        Taylor battery box with a Schwartz Extreme Performance Optima battery clamp in the bottom so I can actually get the battery out of the box without getting under the car. You can just barely see the rear Aux fuse block on the rear wheel well.

        It's kinda hidden by the wiring but there's the starter solenoid, it's not completely wired up yet but it's also the main power feed and distribution point for the rear of the car.. Sort of modeled after MAD Electrical's design.

        How I got the wiring out of the interior

        That's behind the dash on the very outside of the car going into the cowl vent "tanks". I'll be sealing the extra slop in the grommet with RTV when I'm done with it.
        Engine bay Exits

        Passengers side, not bad

        Drivers side, Buried down under the wiper motor and barely clearing the inner fender.
        All the wiring goes up under the fenders before coming out either into the fuse box mounted behind the passengers headlights or the ECM mounted in the old Battery tray. It'll look cleaner once the fenders are on and I put some loom on the wires.

        Last item for this set of updates, how I mounted the coil packs. I got an aluminum bracket from a FWD 3800 (I think early 90's H-body) that had a 90 bend and the bolts to mount the DIS module and coils to. After drilling some holes to rotate the coils 180deg and trimming it down I bolted it to the lugs on the intake for the stock coil pack bracket and then bent up a piece of aluminum strap to hold the top steady to the back of the plenum. I don't see any issues with mounting the coils like this as the 60deg V6's had them on the side of the block tilted up like this. Anyone else see an issue?
        Central TEXAS Sleeper
        USAF Physicist

        ROA# 9790

        Comment

        • SuperBuickGuy
          No Life Outside BangShift.com
          • Jan 2008
          • 32246

          #64
          Re: Project Franken-Riviera -1964 Buick Riviera-

          despite everything, progress... excellent..... just out of complete, idle curiosity.... do you have a self-darkening helmet? ;)
          Doing it all wrong since 1966

          Comment

          • CTX-SLPR
            Legendary BangShifter
            • Jan 2008
            • 6011

            #65
            Re: Project Franken-Riviera -1964 Buick Riviera-

            Yes I do have a self darkening helmet, absolutely love it since I'm really bad at keeping my spot when I flip my hood down. Why do you ask?
            Central TEXAS Sleeper
            USAF Physicist

            ROA# 9790

            Comment

            • CTX-SLPR
              Legendary BangShifter
              • Jan 2008
              • 6011

              #66
              Re: Project Franken-Riviera -1964 Buick Riviera-

              More Progress!!!

              Got that stupid wastegate pipe done! Since I only have 1 set of hands, the wife is scared of the welder (especially now she's pregnant), and no buddies can make it over; I mocked it up enough to know that I wouldn't hit anything in the engine bay then fabbed it up out of the car. This took me from around 0900-1700 today to finally get it done!

              First I mocked the pipes up and ground/flared them so they would sorta fit (I really want a tubing notcher but won't settle for a cheap one and can't afford a good one). Then I welded them in place; I'm not very good one handed yet so yes, I missed a few times. To make a tracing, I used some scrap spray paint and used it to make the outline. I doubled checked how good it was after I cut the tackwelds out.


              Then I used a step bit to drill 4 holes marking the rough corners of the diamondish cut out shape and connected them with a cutoff wheel.

              Think I did pretty well


              I mocked it up for final welding on the engine and rough welded it up before pulling it apart to weld it on the bench.... shouldn't have done that though! What I ended up with was the angles inceasing in the tight sections and when I tried it again afterwards... the wastegate wouldn't bolt in by a good 3/8in total misalignment!! Oh I got mad and broke out the hammers! They got most of the misalignment fixed but I ended cutting off one of the mounting flanges, hammering the pipe into the right spot and then rewelding it on. A deadblow actually was really effective on it.
              Pipes chilling in my "paint booth"

              Finished product

              Central TEXAS Sleeper
              USAF Physicist

              ROA# 9790

              Comment

              • CTX-SLPR
                Legendary BangShifter
                • Jan 2008
                • 6011

                #67
                Re: Project Franken-Riviera -1964 Buick Riviera-

                Engine mocked up for show and to make sure the pipes didn't walk on me again!!


                See how the plug wires actually fit pretty well on the back of the engine? I made those brackets out of sheet aluminum, Made For You products looms with longer screws, and some hardware store stainless spacers.
                Central TEXAS Sleeper
                USAF Physicist

                ROA# 9790

                Comment

                • TheSilverBuick
                  ALMOST Spidey !
                  • Nov 2007
                  • 22145

                  #68
                  Re: Project Franken-Riviera -1964 Buick Riviera-

                  Dude, these pictures need to go into the Engine Porn thread! Very nice.
                  Escaped on a technicality.

                  Comment

                  • CTX-SLPR
                    Legendary BangShifter
                    • Jan 2008
                    • 6011

                    #69
                    Re: Project Franken-Riviera -1964 Buick Riviera-

                    Originally posted by TheSilverBuick
                    Dude, these pictures need to go into the Engine Porn thread! Very nice.
                    check the thread, I put some there.
                    Central TEXAS Sleeper
                    USAF Physicist

                    ROA# 9790

                    Comment

                    • SuperBuickGuy
                      No Life Outside BangShift.com
                      • Jan 2008
                      • 32246

                      #70
                      Re: Project Franken-Riviera -1964 Buick Riviera-

                      To the abovementioned screen problem. In IE, click on "tools" then click to check the line that says "compatibility view" and voila the screen will stay put when you type....

                      Doing it all wrong since 1966

                      Comment

                      • SuperBuickGuy
                        No Life Outside BangShift.com
                        • Jan 2008
                        • 32246

                        #71
                        Re: Project Franken-Riviera -1964 Buick Riviera-

                        Originally posted by CTX-SLPR
                        Yes I do have a self darkening helmet, absolutely love it since I'm really bad at keeping my spot when I flip my hood down. Why do you ask?
                        LOL... no reason ;D
                        Doing it all wrong since 1966

                        Comment

                        • CTX-SLPR
                          Legendary BangShifter
                          • Jan 2008
                          • 6011

                          #72
                          Re: Project Franken-Riviera -1964 Buick Riviera-

                          MASSIVE DOH!!!! :o

                          I put the pistons in upside down!!! The dishes are profiled to the chamber and I tried to "science it out" myself and stuck them in with the big pad under the sparkplug. In my thread on the TurboBuick board I posted a summary set of pictures including the assembled short block and someone pointed out I had them upside down!

                          Well today I thought I'd just tear it down (check, around 2hrs from full dress to short block) pull the rods (1.5hrs fighting to get them to separate the caps cleanly without putting crap in the engine or dinging the piston from underneath), then swap them side to side (ERROR).
                          It's an offcenter motor that means the rods have an offset to them, it just so happens that none of the combinations of "F", dish clocking, and rod offset worked anywhere. So I broke out the picks and pulled the spirolocks and flipped all the pistons over then traded the rods side to side. It's a good thing that I'm pretty good with getting those stupid boogers out because I had to do all 6.
                          After that I just cleaned stuff up, wiped down the bores, bearings, and the crank. Hosed the bores down with WD40, the pistons with the same, and put 50/50 STP and 30weight mixture on the bearings before getting it back together. All bolted together now but will need to torque/stretch the rod bolts tomorrow.

                          On a side note, I confirmed that my oil rings were correct (had been bugging me thinking I'd overlapped the ends) because they are pre set for a 4.00in bore SBC and my bore is 3.995. Also get to swap the heads side to side to completely eliminate the EGR passage.

                          Tiring but a good day and evening.
                          Central TEXAS Sleeper
                          USAF Physicist

                          ROA# 9790

                          Comment

                          • CTX-SLPR
                            Legendary BangShifter
                            • Jan 2008
                            • 6011

                            #73
                            Re: Project Franken-Riviera -1964 Buick Riviera-

                            Well the engine is now buttoned back up and since I wasn't so supremely confident in my assembly lube I busted out my engine oiler.
                            Many of ya'll will recognize this from a CC article on how to prime a distributorless engine. Well while I still have the distributoresque cam sensor stub, it does not drive the oil pump anymore. So I built this using the cheapest SBC oilpump, pickup, and driveshaft from the parts store, a 2gal bucket, 5/8in heater hose, and a handful of -6 AN fittings. Basically the bucket holds the oil and the SBC pump hangs from the lid. I screwed a 1/4in NPT to -6 AN adapter into the outlet of the pump and cut the pickup in half and used heater hose to bridge the gap so it put the pickup screen in the bottom of the bucket.


                            Since I'm not that fancy I just drilled a hole for the return line and used 3/8in vinyl tube as a return line. In the pictures, it's blocked by the fender washer to keep crap out of the oil while it's sitting.


                            Hooked it up with a spare -6 line and drilled a hole threw a 1/2-20 bolt and welded a stub of 3/8in steel line on it as the drain hook up.


                            Since I'm just getting it ready to be rolled around and such I wasn't too concerned with the pressure so I just ran the drill on the lowspeed gear box for 2-3 min then pulled the valve covers and checked that yes I did have oil coming out of the rollers on the tops of the valves. Now it's sitting there draining to try to lighten the engine up a bit before I swing it in.
                            Central TEXAS Sleeper
                            USAF Physicist

                            ROA# 9790

                            Comment

                            • Scott Liggett
                              No Life Outside BangShift.com
                              • Oct 2007
                              • 21561

                              #74
                              Re: Project Franken-Riviera -1964 Buick Riviera-

                              I read the same article. Very cool.

                              As for the pistons being in backwards, better to find out before the engine is in the car and making ugly noises.
                              BS'er formally known as Rebeldryver

                              Resident Instigator

                              sigpic

                              Comment

                              • CTX-SLPR
                                Legendary BangShifter
                                • Jan 2008
                                • 6011

                                #75
                                Re: Project Franken-Riviera -1964 Buick Riviera-

                                Engine is in! Bolted down and ready to get dressed. I was going for speed so I didn't take any along the way pictures and it's raining again (not that Nashville needs anymore) so I can't get any new ones till I can open the garage door. This weekend I blitzed the car to get as much done and take advantage of the 60-70 degree weather. Here's the list: the oil cooler mounted and plumbed, the Lokar "Eliminator" pedal (just like the one in CC this month but I didn't use the floor spacer) mounted and stock firewall opening plugged, transmission mated with the engine, discovered I had the wrong ARP converter bolts (had plenty of stockers so just used them), transmission cooler lines cleaned and plumbed, harness reinstalled and plugged in, accessory drive on, converter shield modified and installed, starter jumpered for an external solenoid, sparkplug wires on, positive battery cable made and installed, radiator installed, gas tank filler neck installed, and resoldered the VSS wires that I ripped off during the removal.

                                I was exhausted but it was very very worth it and I'm mostly wiring and a block off plate or two from attempting to check my work and get it running. Don't know how much I'll get done as the baby is due really any time now and I know I'll be doing little work on this thing for the first month at least.
                                Central TEXAS Sleeper
                                USAF Physicist

                                ROA# 9790

                                Comment

                                Working...