


Welcome back to our coverage of Project Power Laggin’! Follow along as we take a tired 1979 Dodge W150 Power Wagon we found in Central Maine and transform it from a derelict roadside attraction to a dependable, powerful weekend workhorse that lives up to it’s given name! In this installment, we’ll try and figure out what exactly we dragged home!
In our last installment of Banghift’s Project Power Laggin’ build, we introduced the Power Laggin’ in all its glory, and gave a bit of history on what these late 70’s Mopar trucks were all about. After rescuing it from the wilds of Central Maine in the dead of a cold New England winter, we immediately dug in to assess the purchase. In some ways, this thing is in great shape, and in others, well… we’ll let the pictures do the talking!
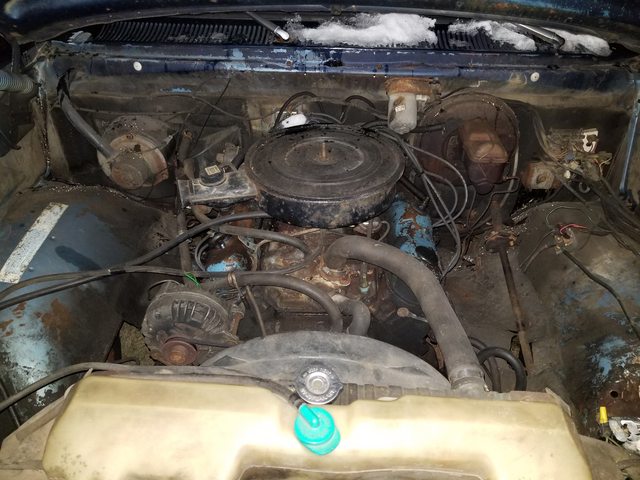
On the night the truck came home, I started digging into see what exactly I had just bought. In there somewhere under a pile of grease and grossness is a 318ci V8 with a 2bbl carb. It ran well enough and drove around the guy’s yard, and that was good enough for me! Generally, these old 318 LA engines are tough as nails and dependable, so I figured if it at least ran, I could work with it.

This is not a good sign. It’s like a “who’s who” of bad Mopar stuff going on here. First, you have a number of scotch locks haphazardly connecting things, which is never a good sign. The ballast resistor was there, but cracked, the main bulkhead connection for the harness was nasty, and if you look close, you can see evidence of a leaking ignition module sweating out its potting material. That’s never a good sign, but it’s very common on old Mopars. Every Mopar guy I know keeps a spare in the vehicle for this very reason.

Peeking under the air cleaner, I spotted a newer 2bbl (Carter?) carb, which is probably why the thing even runs at all. It starts right up as it should, and seems to work as well as it should. This will do, for now. You can also see that bright blue distributor cap; the previous owner treated it to a new cap, rotor, wires, and plugs before I picked it up.

Moving inside, these items were in the glove box. Clockwise from the top left: an ancient road flare, an old Ballantine Ale can and bottle opener from the days before pull-tabs, a tag indicating the carb was replaced and tuned by an engine builder up in Maine on 10/9/2017, and the original owner’s manual. Score!
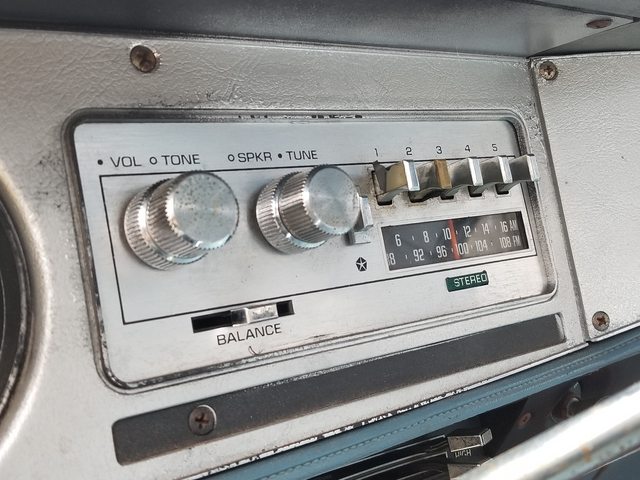
While I thought this was the original radio for the truck, a friend well versed in classic Mopar trucks pointed out that it is not. This truck is only equipped with a single dash speaker, and this clearly has a speaker balance control as well as a front-to-rear fader. After doing some research, it turns out this came from an early 80’s Dodge 600 or a Chrysler Lebaron. It sorta works, and the only speaker is blown out bad, so an audio upgrade is in the cards at some point.
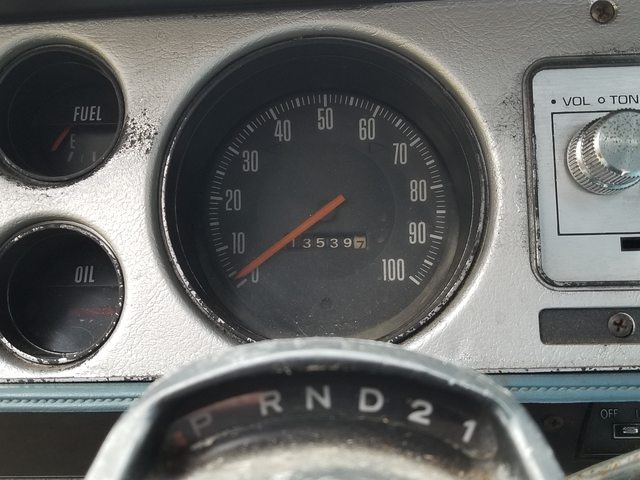
As far as instrumentation goes, this has a basic cluster without the optional tachometer. The 5-digit odometer shows just over 13,000 miles, and how many times it has rolled over is a mystery, if it has rolled over at all. From the story I got from the seller, the truck was purchased with the sole intention of plowing some guy’s lot at a salvage yard or impound lot, and it’s evident that it lived inside for a good chunk of it’s 40 years on Earth in rural Maine, so it’s entirely possible that this thing actually has just over 13k miles on it. Who knows!
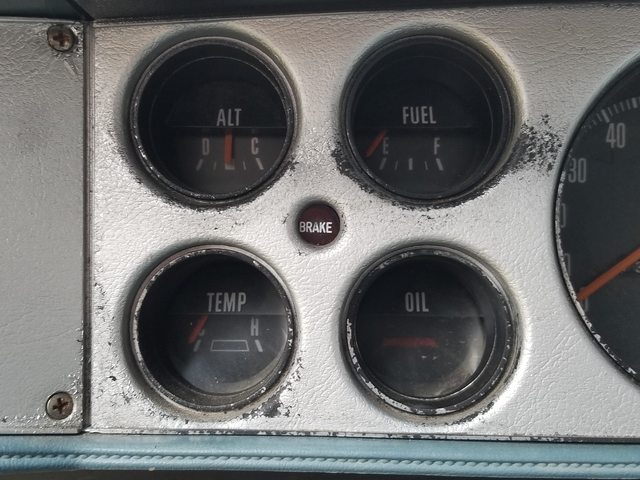
More on the instrumentation: the 1972-80 Dodge trucks used very similar gauges throughout their initial run, and although the dash changed around 1975-76, the gauges themselves remained the same. You got an ammeter, a fuel gauge, and optional coolant temp and oil pressure gauges. Mine got the coolant temp gauge but did not get the oil pressure gauge, so it has a warning light instead. The only gauges that worked were the ammeter and the coolant temp; the fuel gauge didn’t work, which isn’t great, and the oil pressure light didn’t shine, which is probably a good sign. On top of that, the back lights did not work. This is going to be fun to sort out. We will be replacing the notoriously troublesome ammeter with a voltmeter, as well as swapping in an oil pressure gauge in a future installment.

More evidence of Power Laggin’ previous live could be found hanging below the dash. Here, you can see the old mechanical plow controls as well as a switch for the plow lights. The switch is still wired up, and will cut the headlights when switched on. This will all need to be removed at some point.
This thing attached to the dash is apparently a Mopar card holder that held small reference cards with oil change and maintenance info from when the vehicle was serviced at the dealer. It was a precursor to those oil change stickers that service departments use now. It’s cool that it’s still there!

When we picked up the truck, the seller said something about the alternator not working and that he didn’t know why. Just a hunch, but it could be because the wires were literally TWISTED TOGETHER on the back of the alternator. No solder, no butt connectors, and no electrical tape. Just bare wires twisted together. Awesome.

In addition to the alternator not working, the horns also did not work. Again, more BARE WIRES twisted into place! And that’s not all…

In addition to finding more bare wires in a few different places in the engine bay, I found wire-nutted hackery holding together important stuff. This one was further downstream on the horn wiring. I’m admittedly not great at wiring, but have always wanted to learn how to get better at it, so the Power Laggin’ will be my canvas.

About a year after the truck was built, someone added a second 23 gallon fuel tank in the rear to compliment the stock 18 gallon saddle tank. Sadly, all that remains of the tank installation is this door jamb tag, and some general hackery that occurred in its removal. More on that in a minute.
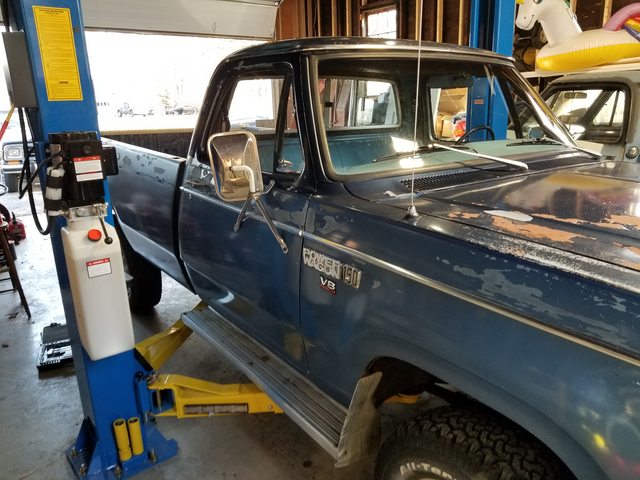
After fixing some of that butchered wiring and getting the alternator working, I took the truck on its maiden voyage to a friend’s place to toss it up on his lift. Immediately, we ran into a problem. The truck had those old 1980’s aluminum running boards on it, and they were in the way of the lift arms. They were removed and tossed. It’s no big loss, as they were mangled and installed with household wood screws anyway, so don’t feel bad.

Another thing that was removed while it was up in the air was the old plow frame. The plow was long gone, as was the rest of the frame, and we kept banging our shins on the thing when wrenching on the truck. Off you go!

The plow frame tied into the front bumper brackets, and over time, they needed some repairs. Looks like the same guy who did the repairs on the wiring harness dabbled in welding. Can you say boogers? We’ll need to replace these bumper brackets ASAP.

One of the first things I looked at was the transfer case linkage. I was unable to get the shifter to budge, and I suspected it was in 4-Hi-Lock, as it was chirping around corners. After spraying the linkage with some penetrating oil, it freed up and shifted as it should. And I was right: it was in 4-Hi-Lock, so I was able to shift it to 4-Hi-Open for more friendly drive-ability around town.

And I thought this thing was nasty on the top side! This is officially the grossest, nastiest, and sludgiest vehicle I’ve personally turned a wrench on. At some spots, the gunk was close to an inch thick! This thing has been leaking various fluids for the better part of 40 years now. If you look closely, you can see that the front oil pan seal behind the harmonic balancer is cracked, which is a likely source for this Exxon Valdez-like leak.
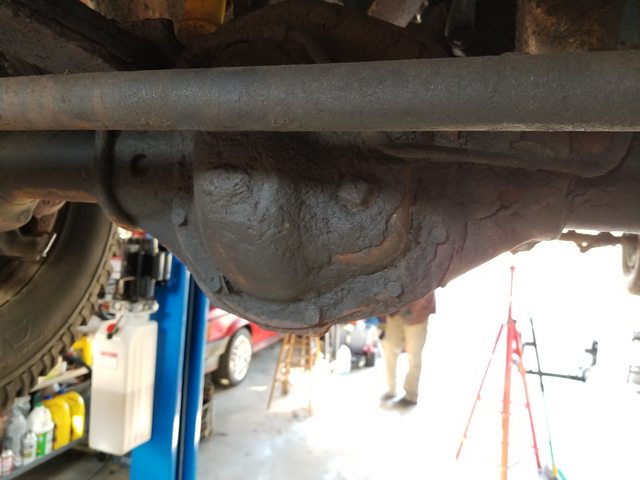
Just NASTY. On a positive note, all that oily sludge is probably the reason why this particular truck has survived to 2019, when many of these had broken in half in the Northeast by around 1993.
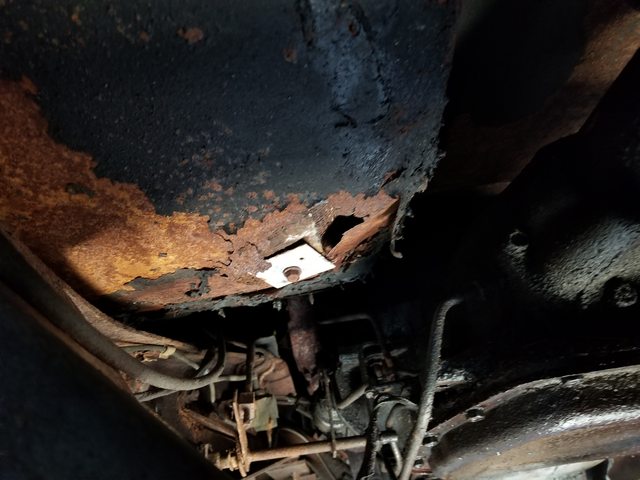
The seller mentioned how solid the floors were, but I knew better. I spotted this bit of car cancer when looking at it initially, He knocked off some money after I pointed this out. New Englanders know that any projectvehicle will also involve at best some floor repair. This one was already repaired once and rotted through because it wasn’t done properly. A new driver’s side pan is sitting in its box, ready to get welded in for a later installment in the series.
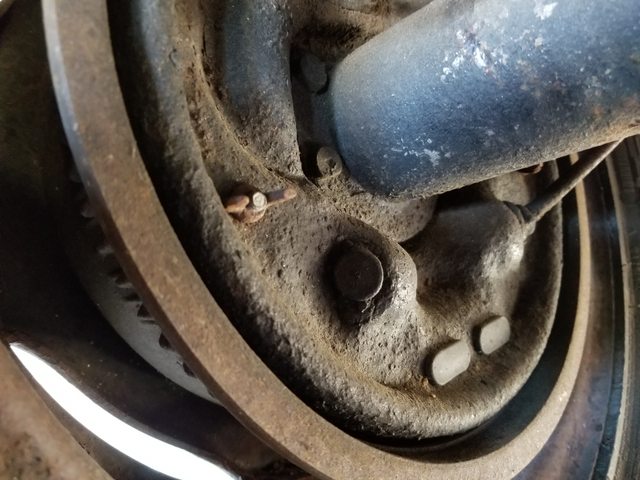
Yup, that’s a wing nut holding on some brake drum hardware. Wonderful.

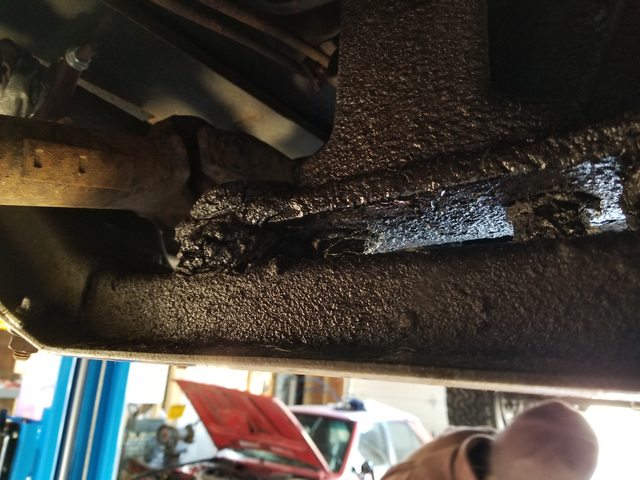
The truck exhibited an especially flatulent exhaust leak under the cab, and this is why. Someone jammed some random 2.5″ muffler on a 2.25″ pipe, tossed a random clamp on there, and said “there, I fixed it!”. No. No, you didn’t.
This greasy, wet mess you are looking at is what’s left of the original transmission mounts. Upon first driving it, the driveline was clunking when applying and removing throttle, especially on deceleration. Skeletal, oily remains of transmission mounts could do that.

The ancient shocks on the truck are rotting out, so that’s a good sign they should be replaced. And speaking of suspension: we noticed that the truck lists a bit to the left. After some measuring to make sure the frame itself wasn’t bent, we determined that the front left leaf spring has collapsed. We’ll be replacing both of the front leaf springs and the shocks in a future installment.
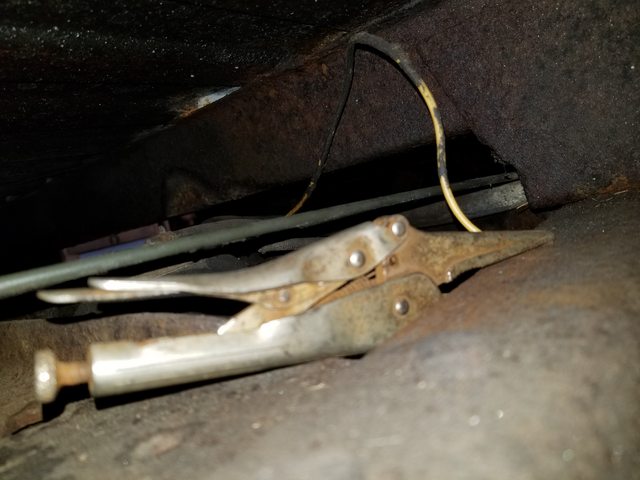
Remember earlier when I mentioned that the fuel gauge wasn’t working? Well, this is the ground wire for the sender. If your recently acquired project vehicle doesn’t come with at least one permanent repair made with locking pliers, you’re doing it wrong.

Even though there’s plenty of dumb stuff wrong with Project Power Laggin’, it’s really solid underneath and a great starting point for building something cool. Aside from that soft spot in the floor, the rest of the truck is rust free. The frame is in unbelievable shape, the bed is, well, there, and the cab is workable. For reference, in New England, it’s extremely rare to see most trucks that are 15 years old with bodies and frames that are this clean, and it’s unheard of to say the same for something that just turned 40.
After assessing the state of the Power Laggin’, it became apparent that we’ll need to make some repairs before we can really have fun with it. As you can see, the wiring harness has been butchered in spots, essential gauges aren’t working, and it’s leaking enough oil to be declared a federal disaster area-on-wheels. The good news is that it’s still a running, driving, solid vintage rig, and we’re keeping at it as we roll along! As always, let us know how we are doing with this old rig in the comments section below!


Looks like the same “electrician” worked on my truck and yours. On my ’88 GMC the wiring for all of the lights on the flatbed and rear brake/turn lights is done using wire nuts. No tape to even try to insulate it.
I suggest swapping the ignition module for a 4 pin GM HEI – that’ll get rid of both the factory ignition module and ballast resistor, and probably a lot of those evil Scotchlocks too. Very easy conversion on Mopars.
Turns out both of those scotch locks were on the same wire and have nothing to do with the ignition at all! They do, however, have to do with the fuel gauge issue. We’ll cover that one in an upcoming story (hint: it still doesn’t work, hahaha).