


(Words and Photos by Steve Magnante – SteveMags.com) – I love building model cars. There, I’ve said it. Even though certain voices in society call model building a childish pursuit, don’t believe them for a second. Few other activities are as effective at nurturing the problem solving and task-completion facets of the human brain as model building. In my case when I’m not working the Barrett-Jackson auction block for Speed TV, cranking out stories for car magazines or wrenching on my trio of real-life altered wheelbase Match Bash cars, I’m building model cars.
I’ve been a builder since about age 7. I remember well my introduction to the world of 1/25 scale plastic model car kits. The year was 1972 and my young mind had already become frustrated by the limited realism and detailing offered by 1/64 scale die cast metal cars from Matchbox, Corgi, Johnny Lightning, Hot Wheels and the rest. At best, their one-piece chassis pans might suggest a rear axle, dual mufflers and a deep oil pan, but I needed more.
I visited a grade school buddy’s house one afternoon and saw his older brother’s collection of models. I was awe struck by several things. First, the stacks of kit boxes wore the most mouthwatering illustrations I’d ever seen. In those days before the Carter administration’s sweeping crackdown on the toy industry, model kit manufacturers were free to decorate kit boxes with exciting full color illustrations of the built model spitting flames, burning out and pulling wheelies (often all at the same time). After the Carter administration’s onslaught, truth-in-advertising laws became stricter. After 1976, model makers like Revell, MPC, AMT, JoHan, Lindberg, Monogram and others were penalized for sins committed by other segments of the toy market. The wild artwork gave way to uninspired photographs of the actual built model kit – for better or for worse.
But I digress. Inside those outrageously decorated kit boxes were faithful recreations of Dana 60 rear axles, deep sump oil pans, Cragar mag wheels, Hilborn fuel injectors, Holley carburetors, Hooker headers, M&H Racemaster slicks, GMC 6-71 superchargers and just about any other item you could imagine on a real car. This stuff blew my mind. This says nothing of the highly detailed model cars themselves. From Corvettes to ‘Cudas, there was something for every taste. I immediately traded my Hot Wheels cars for plastic model kits and never looked back.
Thus, for 41 of my 48 years, I’ve been hacking away at one model car project or another. But a funny thing has happened to me in the last few years. I have set myself free from the burden of taking every kit project seriously. I used to build my models with a focus on accuracy, realism, detail and crisp execution. All through the Eighties and Nineties my car models had to be as close to perfect as my skill set allowed or I wasn’t happy.
Though I cranked out a bunch of nice replicas (mostly muscle cars, Super Stocks and altered wheelbase machines), won a hand full of Second and Third place trophies at contests and even got a couple of cars pictured in Scale Auto Enthusiast magazine, that level of effort takes a lot of time. I found myself getting bogged down and eventually putting un-finished projects away out of frustration, one after another.
But I’ve recently had a revelation and have begun to blast my car models together without any paint or body work. That’s right, they go together straight from the box – often heavily modified, sometimes box stock. I have given myself permission to simply have fun again. Being a nut for altered wheelbase funny cars from the Sixties, most of these 1/25 scale creations feature relocated axles and butchered bodies, so I call them Funny Car Folk Art.
Aside from a large stash of spare parts (from which to gather the right axles, wheels, tires, engine parts, etc. for each build) the key ingredient is cyano-acrylate glue, a.k.a. super glue or CA. In the old days (before 1980 or so) model builders were forced to use slow-setting bonding agents like Testors or Pactra model cement which literally melted the parts together. Sold in paste or liquid form, this stuff could take up to 10 hours to cure, during which time you were forced to do something else. But with the advent of super glue, assembly is almost immediate. Note I say “almost”. In most instances super glue cures in a minute or two. If that isn’t fast enough, a quick spritz of chemical accelerator “kicks” the glue immediately. The only down side to kicker is that it leaves a stain on surrounding areas. It’s a non-issue on my bare plastic beauties.
Let’s take a look at some of my recent creations. Maybe you’ll get some ideas you can use on your own. And remember, if you see something you like, each car is for all sale at $200 a piece (complete with a CD with construction pictures and an autograph). Naturally, this is a first come, first served offer. To make a purchase, contact me via email at [email protected] or by phone at 508-637-1514.

The mad scientist at work!

Regardless of the kit, wheelbase alteration starts with marking the body for surgery. But make sure to choose a subject vehicle with plenty of distance between the wheel opening and door cut line. Pony cars and compacts typically lack enough “real estate” to deliver worthwhile results. The flanks of the AMT ’57 Chrysler 300-C kit offer plenty of potential.

I make my cuts using a flame-heated hobby knife. Alternate cutting options include time consuming cold cuts (make sure you’ve got plenty of sharp X-Acto blades on hand) or a Dremel tool fitted with a rotary cut-off wheel. Use the thinnest wheel possible or you’ll create a gap that requires filling.

Fast forward a mere 10 minutes and the body panels have been trimmed, juggled and secured thanks to super glue followed by a shot of accelerator spray. Super glue comes in various thicknesses, I prefer the thicker viscosity for its ability to fill gaps.

Wheelbase alteration is not limited to the rear axle. Shoving the front wheels forward really enhances the funny car effect. This AMT ’66 Buick Wildcat body shell is shown in-process.

After trimming the edges square, the fender insert is repositioned forward and nailed down with glue and kicker. Complex surface details like the Wildcat’s faux vents and elaborate rocker trim can be sanded away, matched with scrap or simply ignored depending on how high your fever is running during construction. I ignored them on this fast forward buildup.

In most situations the chassis pan supplied in the kit can be easily modified to suit the altered body shell. But some older kits have integrally molded suspension details. I junk ‘em and go for a replacement from my spare parts box. Like many Sixties vintage AMT kits, the ’66 Wildcat comes with this lame, promo-style chassis. It’s got to go.

The chassis solution came from a Revell ’55 Chevy kit. With it’s free-standing leaf spring rear suspension it’s a good match for the Wildcat – after wheelbase juggling. The leaf springs and 8-3/4 rear axle are from a Revell Mopar kit, by way of my spare parts box. Note how I added a ton of arch to the driver-side leaf spring. Bent over a lit candle, the effect simulates the look of a torqued-over launch pad stance. Amazingly, these models sit on three wheels and hover on their own without the need to add ballast to the right rear corner of the chassis.

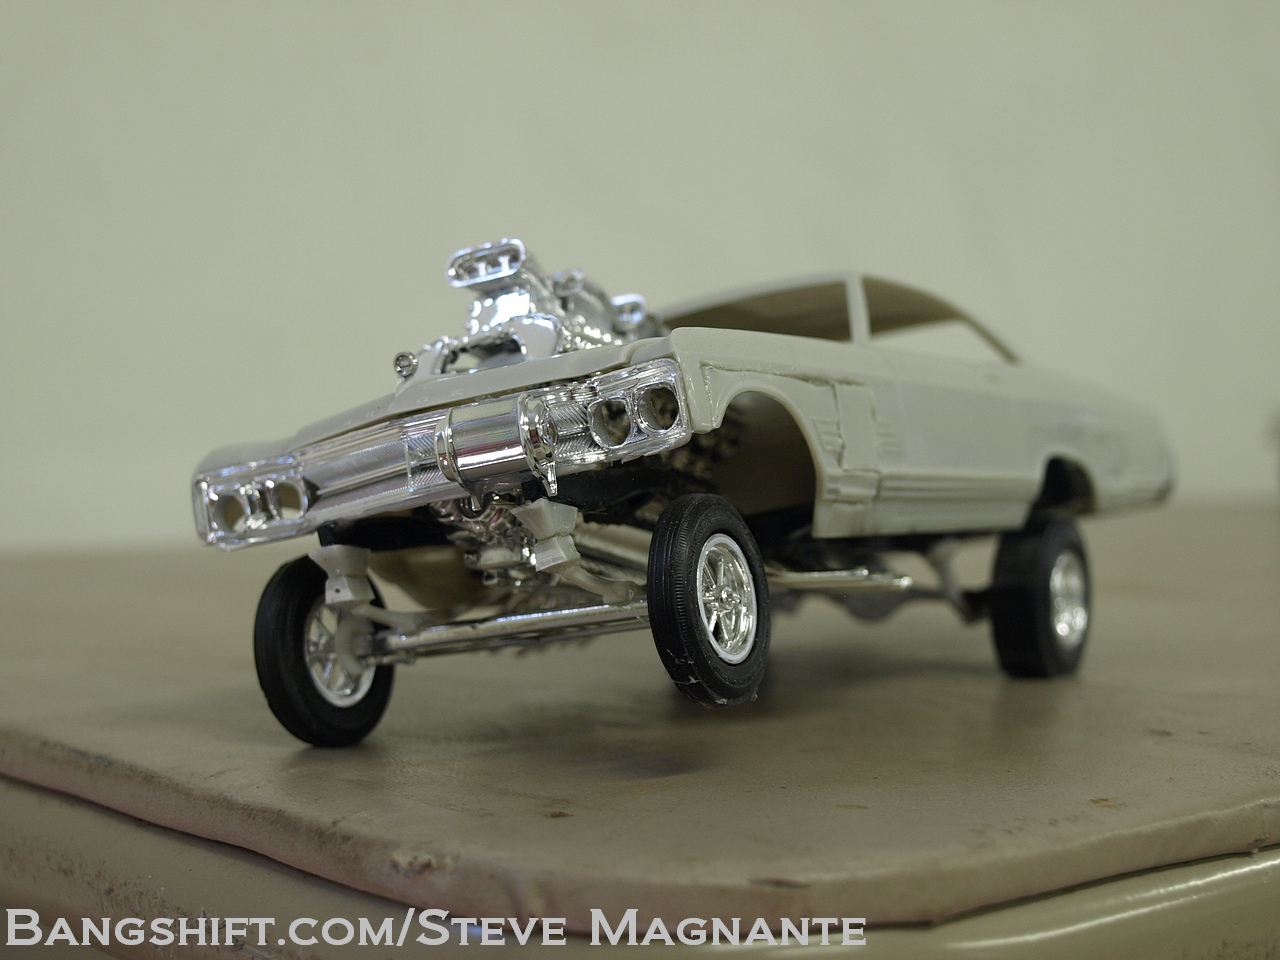
This is the modified rear suspension under a Revell ’62 Impala I whipped together in a frenzy one winter day. Packing a Hilborn injected 427 Chevy and TH400, it’s coil spring rear suspension was manipulated to achieve the torqued over look by doubling the length of the driver-side coil. The shock absorbers were trimmed or lengthened (depending on the side) to suit the stance. Up front, I replaced the stock A-arm suspension with a Dodge A100 beam axle robbed from Lindberg’s 1990 re-release of the IMC Little Red Wagon kit from 1966.

Power plant selection must match the mood of the car. For this fantasy Buick Wildcat, I skipped the obvious Hilborn injected nail head and went with a chromed AMT Allison V12 aircraft engine. The triple GMC blower setup is pure koo-koo, but that’s the joy of model building…anything goes if you have enough super glue. To accentuate the crazy airplane engine, I mounted it high to look like its busting loose from its mounts and heading back to the sky.

The final hood hole hugs the shape of the big Allison’s beautiful cam covers. The Allison V12 was immortalized on the ground by the Arfons brothers in a series of gas dragsters during the infamous NHRA nitro ban. EJ Potter even stuffed one in a Dodge Dart station wagon and briefly ran the exhibition circuit. All of my Funny Car Folk Art creations feature a Moon fuel tank and empty headlamp openings in the grille for a nasty vibe.

Front suspensions are the most challenging aspect for me since I ran out of straight axle parts long ago and have to improvise most of the time. This Revell ’69 Nova got plenty of front suspension ride height to compliment the raised driver-side rear suspension attitude. Since the front axle is simply along for the ride as the car blasts off the starting line, it gets installed at “full drop”. So long as the driver-side rear spring is set higher than the passenger side unit, the left front tire will float above the table / track and simulate the gravity-defying look of a hard launch.

I agonize over engine choice since it sets the tone for the rest of the car. But sometimes it’s OK to goof around a bit. For this Nova I considered a Chevy 409, 427 Rat and even a Torqueflite-backed 426 Hemi before settling on – a chrome plated Corvair flat six from the AMT Parts Pack. See it on the right.

I am not prejudiced and dig all types of cars. To my eye, the 1971-’73 Mustang fastback looks especially sleek with both axles moved forward. This AMT ’71 Mustang got the full treatment. The stock chassis pan is workable but needs major slashing to suit the funny car formula. I chose a Hilborn injected Boss 429, backed by a T&C top loader 4-speed stick.

Seen here during construction, the ’71 Mustang kit’s floor pan has been sliced to provide a resting place for the Boss-Nine and the front wheel house architecture has been sliced away. A straight axle, transverse leaf spring and trailing arms from the spare parts box replaced the kit-supplied stuff.

The AMT Rat Packer ’65 Nova kit replicates an altered wheelbase match racer, so body and chassis surgery is not needed. That’s not to say there isn’t room for improvement. For kicks, I crammed the twin Chevy V8 engine module from the recently re-issued AMT / Round Two Double Dragster kit. The downside to making this model was how it depleted my stash of Hilborn extra-long ram tubes. Waaah.

Beneath the twin-Chevy Nova we see the mostly stock Rat Packer chassis and suspension parts except for a Chrysler 8-3/4 rear axle robbed from the JoHan Chrysler Turbine car kit. The passenger side rear spring was heavily arched over a candle – again, to deliver the torqued-over stance. The transmission is the Lincoln-based automatic from the Revell Fairlane Thunderbolt kit, centered behind the dueling mice.

This low angle shot displays how the Mustang (like all of my Funny Car Folk Art critters) rests naturally on three wheels. I shave the bottoms of the rear slicks with a hobby knife to replicate the look of real slicks digging into the starting line.

My finger points out where the Mustang’s passenger side A-pillar has a blemish from being compressed prior to being placed in the kit box by the folks at AMT. I checked the rest of the body and kit before building it and saw no other damage. So if you buy this model and see this, remember it was blemished before I altered the wheelbase. I didn’t have access to another AMT ’71 Mustang kit so I just went with it. In this shot the grunge on my hands is from replacing the water pump on the 512 Max Wedge in my Rampage altered wheelbase ’63 Dart. With models, my hands stay a lot cleaner!

I have six Funny Car Folk Art contraptions for sale at $200 each (plus a flat rate of $10.00 for shipping and handling). This double-altered ’71 Mustang was completed on 5-10-13 and features a bunch of engine setback. A signed wheel stand picture of my Wilshire Shaker Nova is included with each Funny Car Folk Art offering, as is the original box for the kit.

This ’62 Impala was completed on 3-21-13, has pose-able steering and is also priced at $200 (plus a flat rate of $10.00 for S&H). There are two ways to handle the rear wheel opening during alteration. You can relocate the entire unit and keep the stock body lines, or (as seen here) you can stretch it. A signed wheel stand picture of my Wilshire Shaker Nova is included with each Funny Car Folk Art offering, as is the original box for the kit. Speaking of stretched wheel openings, that’s the configuration I chose for the Wilshire Shaker Nova.

Repositioning the front axle centerline forward is also part of most alteration jobs. On some kits / cars there is enough body panel surface area to move the entire wheel opening (see the ’71 Mustang in this collection). But on others – like this Chevy – space is minimal so I leave the wheel opening alone and simply locate the axle forward about 6 scale inches (roughly 1/8 inch in plastic). If the ride height is increased enough, the tire doesn’t interfere with the bumper and a brutal gasser look results. Here’s another shot of how I slice a flat spot in the base of each slick. Hollow drag slicks don’t work here. Instead the best slicks are the solid Goodyear 9.00-15 items found in many AMT kits.

This dual-engine ’65 Nova is priced at $200 (plus $10.00 S&H) and was completed on 3-21-13. The base kit was first introduced by AMT around 1967 and has been re-released several times since. Most commonly known as the “Rat Packer” from its 1978 re-release, the Model King offered the re-released kit a few years ago with this groovy “Twister” box art – which is quite similar to the original packaging. A signed wheel stand picture of my Wilshire Shaker Nova is included with each Funny Car Folk Art offering, as is the original box for the kit.

Shot from down low on the deck, the Nova’s sixteen Hilborn injector stacks feed the twin Chevy small blocks. The most expensive aspect of this offering is the fact I broke up a complete AMT Double Dragster kit (the limited edition version in the metal tin that retails for $46.49) to get the twin engine setup. But now that the kit has been raided, the rest of its many neat parts are ripe for plucking for future Funny Car Folk Art contraptions. I went overboard on the engine since the rest of this unit is mostly box stock. I add a Moon tank and hog out the headlamp openings on every Funny Car Folk Art critter for a gutted, all business vibe.

This revamped AMT ’66 Buick Wildcat was completed on 3-29-13 and is priced at $200 (plus $10.00 S&H). Though Chicago’s Ron Pellegrini ran the “Super Bird” flip-top Skylark funny car back in ’67, the massive Wildcat was ignored by the Match Bash set. I wanted to fix that. With plenty of surface area to work with, I relocated the front and rear wheel openings forward a bunch. A signed wheel stand picture of my Wilshire Shaker Nova is included with each Funny Car Folk Art offering, as is the original box for the kit.

I conjured a beefy straight axle to support the heft of the AMT Allison V12 mill. It’s a very rugged model and won’t come apart unless really manhandled. The double-altered wheelbase combines with the sleek fastback roof line to make it seem like the chassis is trying to lunge forward so fast the body can’t keep up. Again, the Moon tank and “skulled” headlamp openings add brutality. The stock wrap-around front bumper was deleted in Gasser fashion.

The trio of top-mounted GMC 6-71 blowers gave me an opportunity to display three classic injector hat types (from the front); the 3-hole Hilborn, 4-hole Crower and 4-hole Hilborn.

This AMT ’57 Chrysler 300 was finished on 5-5-13 and for $200 (plus $10.00 S&H) it can be yours. The configuration of the massive front bumper and fender precluded body surgery, which was reserved only for the rear wheel openings. Though a 392 Hemi would be the obvious power choice, I had some fun. The single row of Hilborn injection stacks and sextet of header tubes over the front tire are a tip off there’s a Slant Six under the hood. Sourced from the Dodge Deora kit, the engine depicts the aluminum block version of the famed six popper. A signed wheel stand picture of my Wilshire Shaker Nova is included with each Funny Car Folk Art offering, as is the original box for the kit.

Chrysler marketed the 300 as “the beautiful brute” so I gutted the grille opening and headlamps for extra brute points. You may notice the use of relatively large front tires on most of my Funny Car Folk Art creations. I prefer tall, skinny front runners. A review of mid-Sixties vintage drag racing magazines will reveal that smaller front tires were mostly used on lightweight flip-top funny cars. By contrast, the steel-shell door slammers used medium sized skins so that’s what I go with.

I whipped up a Ford-style transverse front spring and straight axle to support the flat six. The semi-fastback Nova body really takes to the altered wheelbase treatment. Non-altered Novas look awkward after you spend enough time staring at the reconfigured version. Up front, there isn’t enough real estate to nudge the wheel openings in the fender skins for meaningful results. Instead, I pushed the axle ahead a smidge and made sure the ride height was high enough for tire clearance – gasser style.

By 1969, the altered wheelbase treatment had been replaced by tube frames and flip-top fiberglass body shells. But there’s no law against having fun. This Revell ’69 Nova was completed by me on 4-13-13 and bends the laws of reality with its Corvair flat-six engine. It can be yours for $200 (plus $10.00 S&H). A signed wheel stand picture of my Wilshire Shaker Nova is included with each Funny Car Folk Art offering, as is the original box for the kit.

I toyed with the idea of stuffing the pancake mill in the trunk – just like a real Corvair – and great for traction. But the vast, empty engine bay haunted me in a bad way. Instead I opted for a conventional mounting. The chromed mill comes from the re-released AMT engine parts pack kit (which also includes a Chevy 283, Pontiac 421, Chrysler 392, Allison V12 and a Model T body shell). Though a turbocharged version is included, I went for the base 2×1 carbureted induction so I could feed them with ultra-long ram tubes. A perfect set was found in my parts box and were originally on a JoHan Haulin’ Hearse model I got when I was about 11 years old. I cut a pair of pass-through holes in the stock Nova SS hood.

Underneath, the usual heat-arched left-rear leaf spring treatment ensures that the driver side front tire will “defy gravity” and float. The transmission behind the pancake mill is a Top Loader from the AMT ’66 Fairlane GT kit. The rear axle is a ’57 Chevy item from a recent Revell kit. My signature is visible in the gap between the rear bumper and chassis pan. I sign and date all of my Funny Car Folk Art creations.

So you don’t get the wrong impression and assume I’m a ham fisted butcher with zero skills, I include this picture of my more serious altered wheelbase efforts. The red, white and blue Sox & Martin ’64 Plymouth and candy striped Ramchargers ’64 Dodge were built way back in the late Seventies when I was about 14. The Robie Ford ’66 Fairlane and Palomino ’67 Chevelle were constructed in the Nineties and are some of the last “serious” models I’ve built. As their floating front tires attest, I’ve been toying with the “launch mode” stance for decades. The New Funny Cars magazine was published in 1967 and has been in my collection since about 1980, when I bought it at a tag sale. It is the most influential vintage magazine I’ve ever owned.
CONTACT: SteveMags.com, 508-637-1514, [email protected]


So a few comments for Steve ;
1) Great post . The sad thing being building models is getting harder by the day as more and more hobby shops close their doors . Paint and glue becoming rare as hens teeth to track down
2) Kit Bashing – Jeeze Steve … a little late to the game wouldn’t you say ? ( though better late than never ) In truth i began the Kit Bashing quest after about my tenth model in fifth grade . V12 Hemi creations ( taking 8 from one and 4 from another ) Indy Roadsters turned street cars .. custom M/C’s etc
Next up for your consideration . Adding details like working pistons/crankshafts .. detailed wiring etc . Then you’re truly in the big leagues … for us Big Boys 😉
3) Model building even back in my day ( 60’s ) was as much for adults as for the kids … and still is
4) Great bunch you’ve shown us … more finished ones if you please
I love building models. I have the attention span of a 3 year old during daily routines BUT, when I am wrenching, lifting, drawing or building models…I am peaceful and intensely focused.
Sadly the hobby, much like building cars is becoming crazy expensive. I went to Hobby Lobby recently and priced a kit at 25 bucks! 25 dollars? I went to a local mom and pop joint and they were just as expensive. I remeber paying between 3 and 5 dollars for a kit. I even loked on e-bay but finding a deal there on anything anymore is like striking oil in a second floor apartment.
There was a book I used to check out of the middle school library, I was the only one to check it out, and I had it out almost a full 4 years. It was written in the 60’s and was about building models. There were all sorts of tips and tricks to build great modles with stuff you can find around the house rather than pay even more money for wiring kits and such. I would give a few teeth for a copy of that book.
Great write up, I enjoyed it very much….
I’ve found that ebay CAN be a good place to look. I love to find previously built kits and either restore/restify them or, if they turn out to be glue bombs, cannibalize them for the good parts. Sometimes the sipping fees are already included. I got an old assembled Jo-Han Chrysler Turbine car for well under ten bucks! I need to redo it since the entire thing was painted with a brush! And even though the original wheel covers were badly distorted by a lake of glue, I spent less than five bucks for some AMT/MPC Chrysler rally wheels to put on it. Yeah, I’m not willing to spend $25 per month on a kit. To me that’s expensive, but there are options on the cheap!
Shipping, not sipping. Freud himself would have giggled at that slip!
Enjoyed the article… I too have built kits since a very early age, but most of what I’ve done for the last 20 years is drag slot cars. I’ve got a closet full of unbuilt kits that I may get to someday.
I still build model cars myself, usually during the winter when its too cold to turn wrenches on my Duster in the garage.
Joe, I have that same book and did the same thing in elementary school . was able to get a copy of it aftwer it was rebound . And yes the models are expensive but go online and find them cheaper and as for hobby lobby get thier 40% off coupons make copies and go in multiple times .
And Steve those are awesome i would love to have the nova but i will just have to do one myself
thanks for posting those
Do you know the name of the book? Author?
I used to build models in the testors putty age. Most of mine were tanks and planes though, cars not so much. Still all the tools and kits are available if you look around online a bit. Gearz even runs a model building contest every year.
I tried my hand at model building years back and pretty much have come to the conclusion on who they make Lego’s for. This guy, lol.
I’m still building at 59, love it! I have about 100 kits stashed away, some pretty rare ones, and i will build them. Check out AlienOrifice on youtube to see some builds. I tried to detail my builds after seeing all these incredibly detailed builds out there, but like Steve, i found it bothersome after a while. Now i concentrate on paint and maybe a distributor/mag with plug wires, if the motor is visible. Don’t think i could be happy with no paint, but that’s me. Great article, thanks Steve!
Great article Steve. Love all your Stuff. I’m 60, and still slopping glue across the windshield.
The superglues have some really nasty side affects, healthwise. Every friend that was a prolific Radio Control model builder has quit using it.
In recent years, I have lost three modelbuilder friends I blame their long term use of superglues for being a contributing factor in their deaths.
Be aware, and take care