


Welcome to a new weekly recurring feature here on the site. It Came From the Fab Shop is being written by Loren Krussow, who is known as KSO4 on our forums. Loren has a fabrication business and along the way has built some pretty bitchin’ stuff. He’ll be sharing stories of shop projects, stories from his gearhead life, and whatever neat, motorized randomness that happens to cross his path on a week to week basis. Here’s his opening salvo.—Brian Lohnes
(By Loren Krussow) – Since the 1980s it’s been pretty common to see incredible CAD (computer-assisted design)-created three-dimensional models that can be built, modified and manipulated with the push of a mouse. Anyone into fabrication would love to have access to such a system (and the skill to operate it). Building a model of something before actual construction is nothing new, however.
When my friend Jake and I first discussed building a nice little land-speed car just for fun, we had the understanding that he’d come up with the tubing bender and I would try the design. I own a basic CAD system but at my skill level didn’t think I’d be able to do anything useful with it in this case, so I got out a pencil and paper and started some sketches. Looking at other cars and reviewing web sites such as purplesagetradingpost.com got me rolling but soon I had so many tubes going so many places that I couldn’t keep track and it was time for something 3D. So, while Jake carted in a 16-foot-long used mandrel bender to form tubing, here’s how I cheated a little on my end and traveled back in time to the simpler days of model-building.
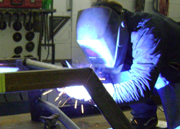
With 3/32-inch welding rod, a pair of pliers, and a welder, I modeled what I believed was a credible tube chassis. When it was all stuck together we could hold it in our hands, we could twist on it and see if it was rigid, if not we could watch for any opposing movement between two members and know where to add more structure. We could imagine how any crash or rollover would impact the rollcage structure. We could guess the amount of tubing required, and the weight, and discuss the location of items such as batteries and ballast. As we built the real car, anyone helping out would have a better concept of how it should look. We didn’t need the model to be exact in dimension so much as we just need to know that there’s a rail here, a hoop there. With the welding-rod model we could sit back and ponder if it just looks “right.”
We smugly took our attempt at LSR chassis design over to someone with experience: The Bean Bandit’s Julio Hernandez. Because it was all laid out and obvious what we were proposing to build, he was able shoot us to pieces in about 30 seconds instead of the two hours of discussion and miscommunication it would normally take to convince us we were hopelessly unaware of what we were doing. So this saved him a lot of time anyhow!
After tearing out some offending members and welding in others where he said they’d be required, we tried again. When the rulebook looked satisfied and Julio was satisfied, we were ready to start on actual construction and all involved have the model to refer to. For $5 in welding rod and some time we gained the assurance that we’ve minimized at-the-outset the chances of this small group of fools making big mistakes in our chassis construction. Well spent.


