


Claims of Project Buford T Justice’s demise have been greatly exaggerated, although I have not done a lot of quell them because of a lack of suitable update stories this summer, but the fact is that in the Spring I upgraded the car using an Atomic EFI kit from MSD and proceeded to drive the sucker all summer long. My schedule kept me away from the house a lot but when I was home, Buford got driven. It got taken to cruise nights, car shows, and just bombed around town with the boys in the back seat. High heat, rain, etc, the MSD Atomic EFI has fed the car reliably and accurately since the birds started chirping in the trees to let us know that warmer temps were on the way. Now that we’re sliding down the other side of that curve, I have a very accurate picture of what this system is, how this system works, and how it helped improve the performance of the car in both a fun to drive aspect and by far the fuel economy aspect. I installed the kit as most of you would, in my driveway. I wanted to do it this way because while I could have stuck it in a friend’s shop and made the whole situation a day-long affair, I felt that most guys would be tackling the job at home by themselves or with a buddy.
I am going to give you the blow by blow account of the install below. The whole job took me a day and a half. That was mainly because I didn’t do the “pre work” like having the bung welded in the header for the oxygen sensor ahead of time. I started the install with getting that stuff done. Had I done that, this was clearly a one day job. What you see below is how it really went. There’s no skipped steps or camera tricks, mainly because I am so bad at taking photos, the only trick I can perform is to actually get a photo to come out in clear focus.
While I didn’t plan on waiting this long to write the story, I did want to write it after I had gathered some really concrete impressions on driving the car. It is one thing to bolt this setup on, have the car start and report that all is well but it is another to get the system on and rack up a bunch of miles in sweltering heat and other conditions to see how it actually works. SPOILER ALERT: I have been very happy with the MSD Atomic EFI. It “self-learned” my car well even though the cam specs are on the outer edges of what they recommend, it has immeasurably increased the responsiveness of the motor, and it is delivered fuel economy gains of nearly 30% on the highway over the double pumper that was on the car before. Here’s how the whole thing came together.
I’M GOING TO TELL THE STORY OF MY ATOMIC EFI EXPERIENCE THROUGH THE PHOTOS AND CAPTIONS BELOW –
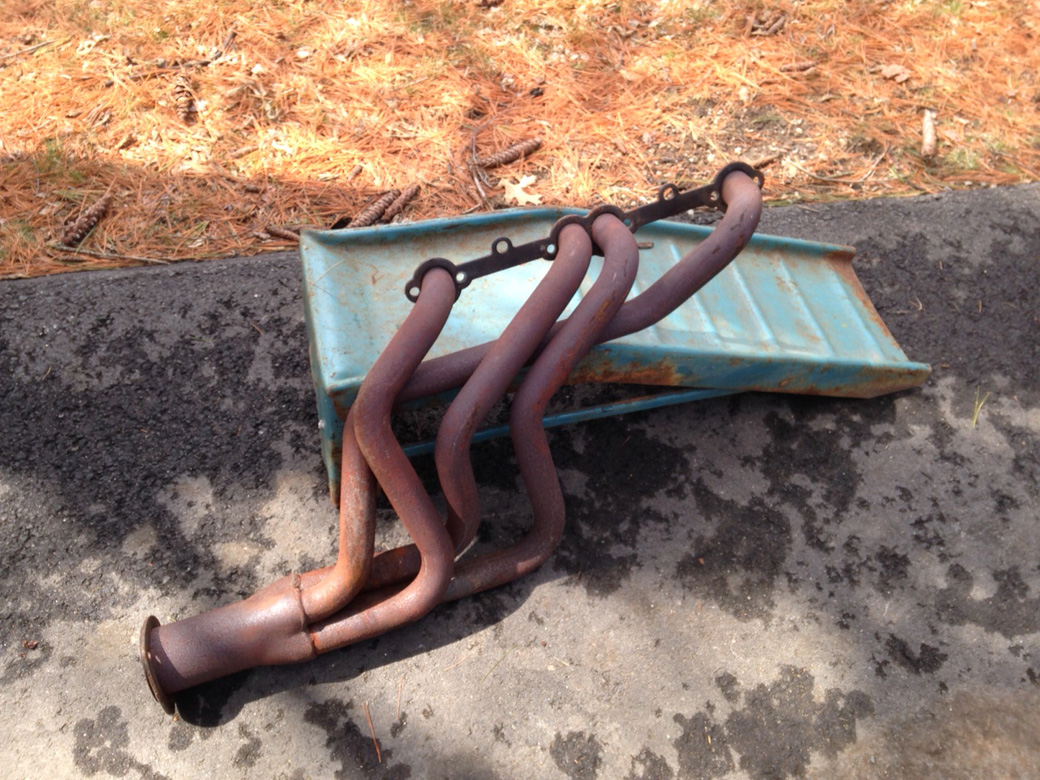
The first order of business was to yank off the header on the passenger side so that I could get the oxygen sensor bung welded into the collector. I’d consider this the “pre-work” of the install. My welding skills border on the horrendous so I called up Jon Sandahl and asked if he could glue the sucker in there. Thankfully, he agreed.
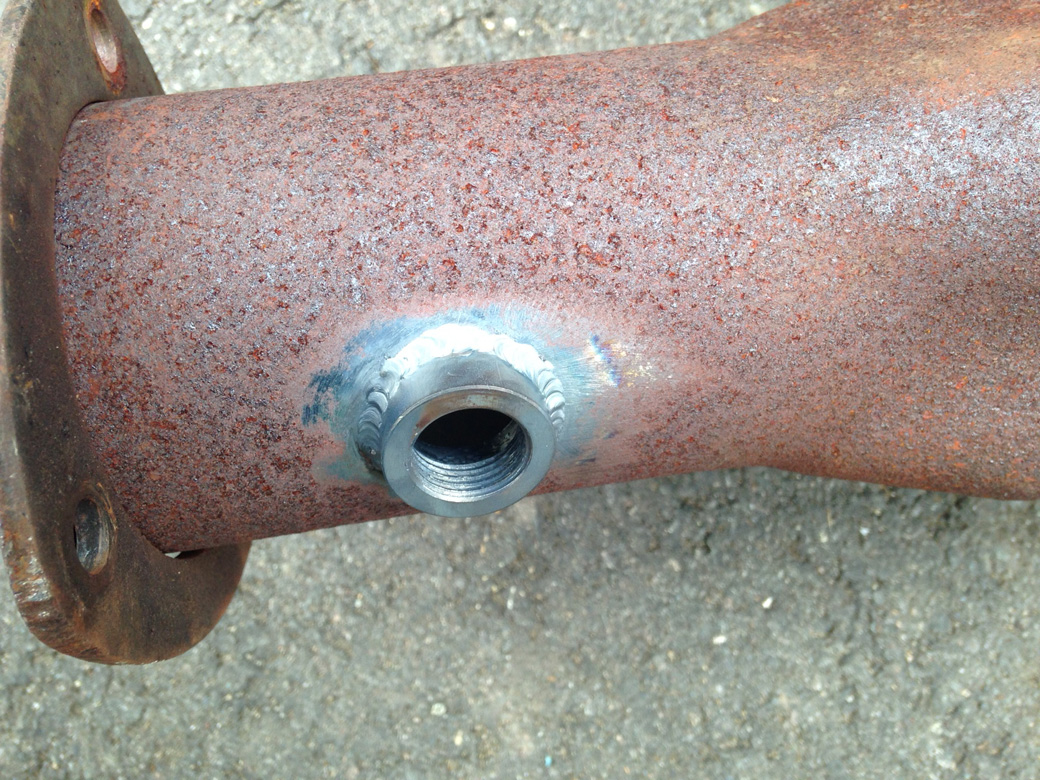
Once again, Jon’s work is the best looking stuff on the car and it’ll be hidden below the floor. Such is the life of a chassis guy I guess. I followed MSD’s instructions on where they wanted the bung mounted. Pulling the headers on this car is easy stuff so I went home and bolted it right back in.

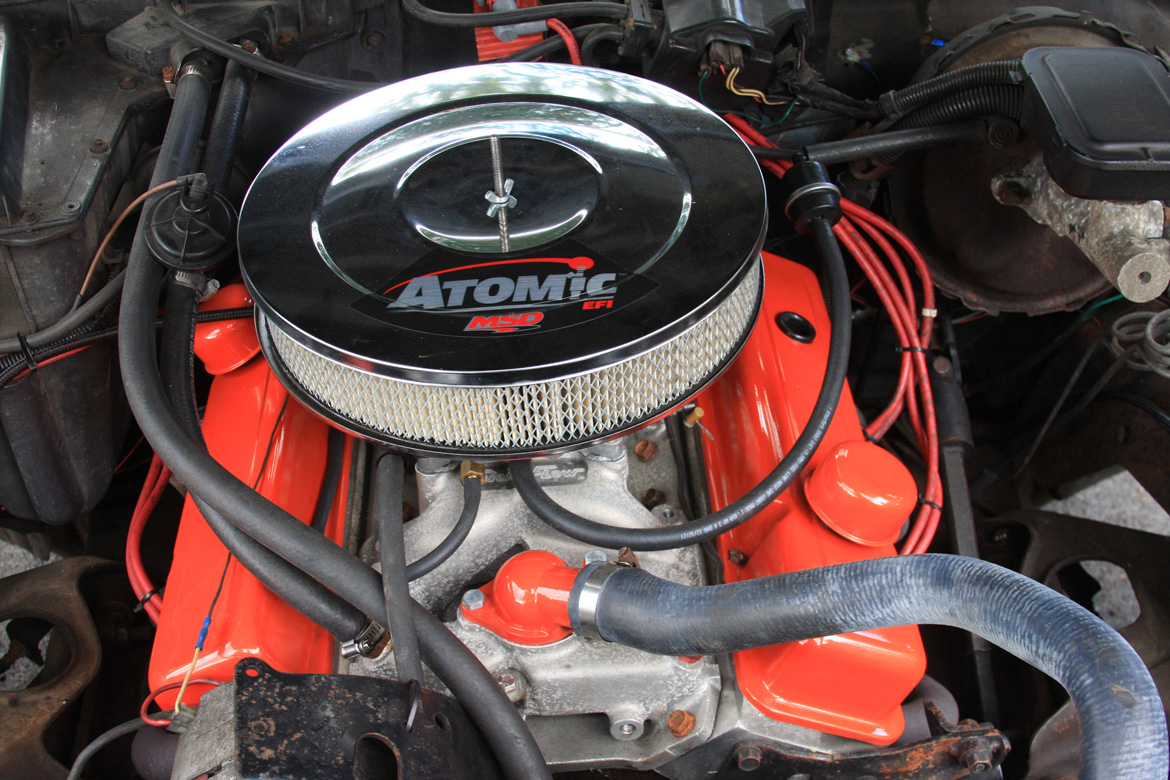
Before I bolted the header back in I took one last photos of the engine with the double pumper on it. That carb served me very well and will find its way onto another engine in the not too distant future, but its days of feeding the needs of Buford were over after I zapped this photo.
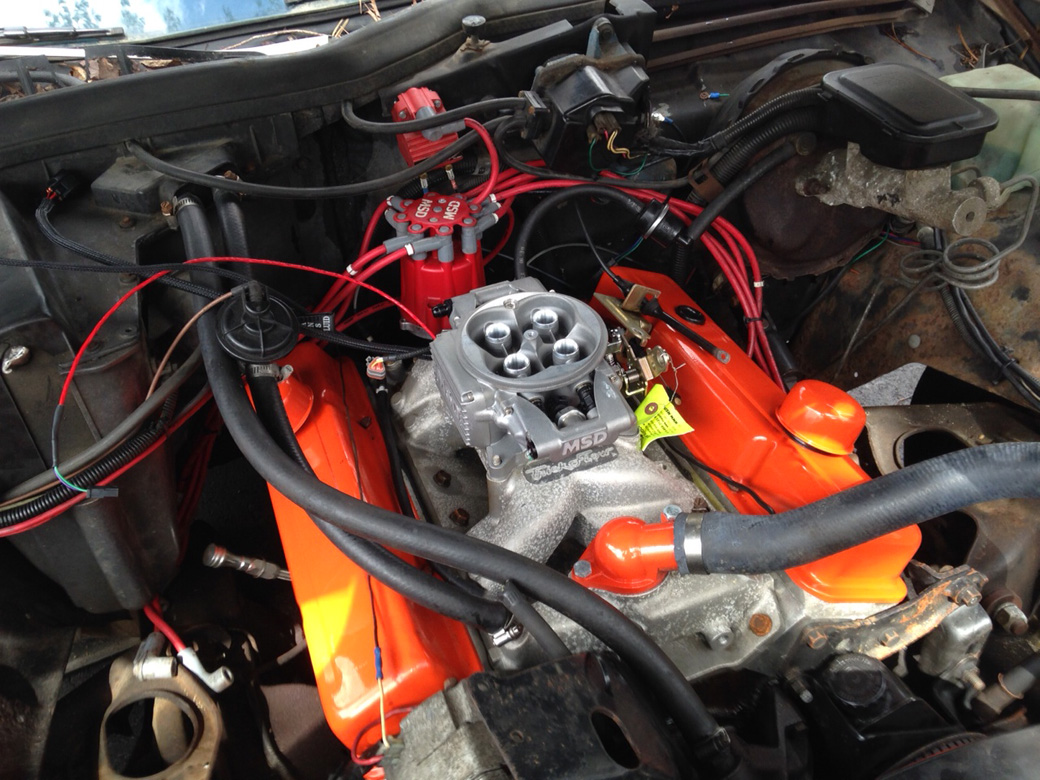
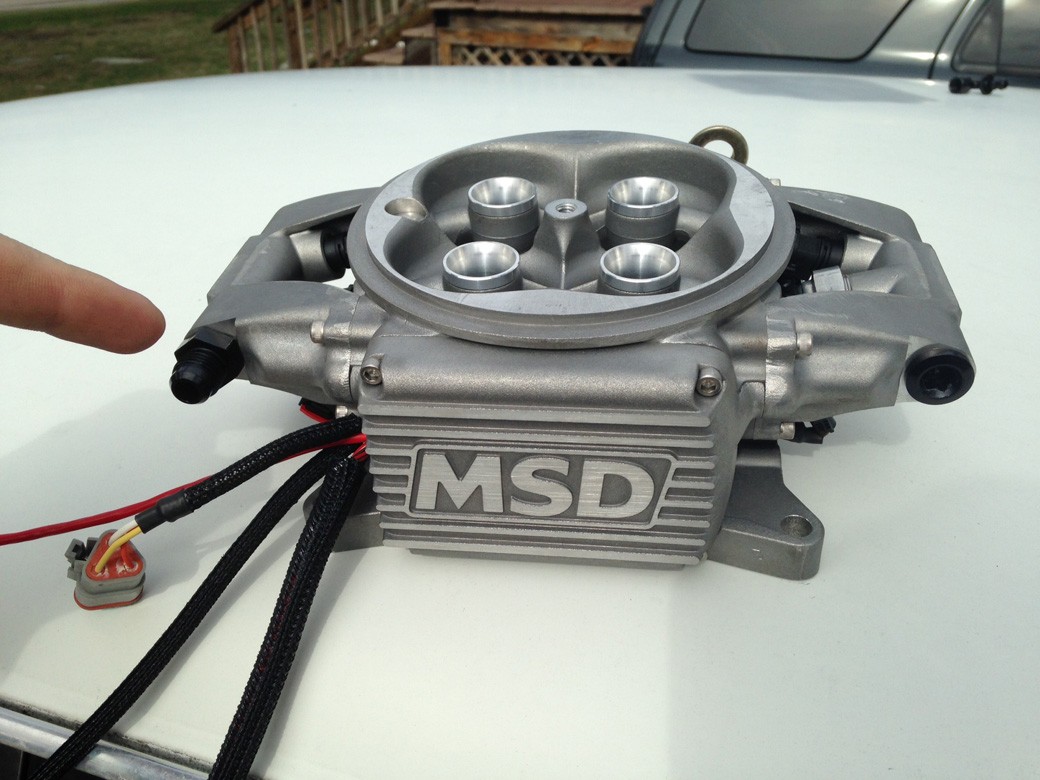
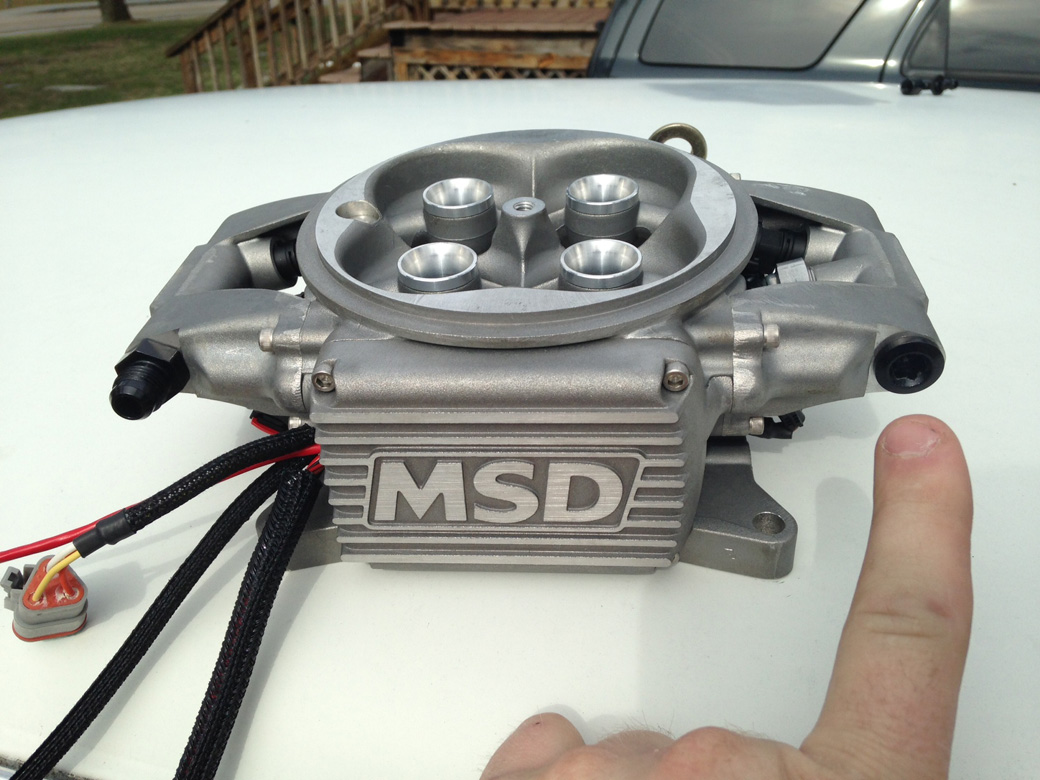
The install begins simply enough by plopping the new MSD Atomic TBI unit down in place of the carb. I did this and surveyed for stuff I thought may be an issue. Some of the small things I noted were changes in the location of where the brake booster vacuum hose would go, the need to install a vacuum fitting in the front of the unit, and the need to change the end of the TBI that the fuel inlet was on for this application.

I decided that I’d be able to use the same throttle and TV cable bracket that I used with the carb by making a minor alteration to it and there were no clearance or other issues with the unit as it sat on the Trick Flow Street Burner intake manifold.

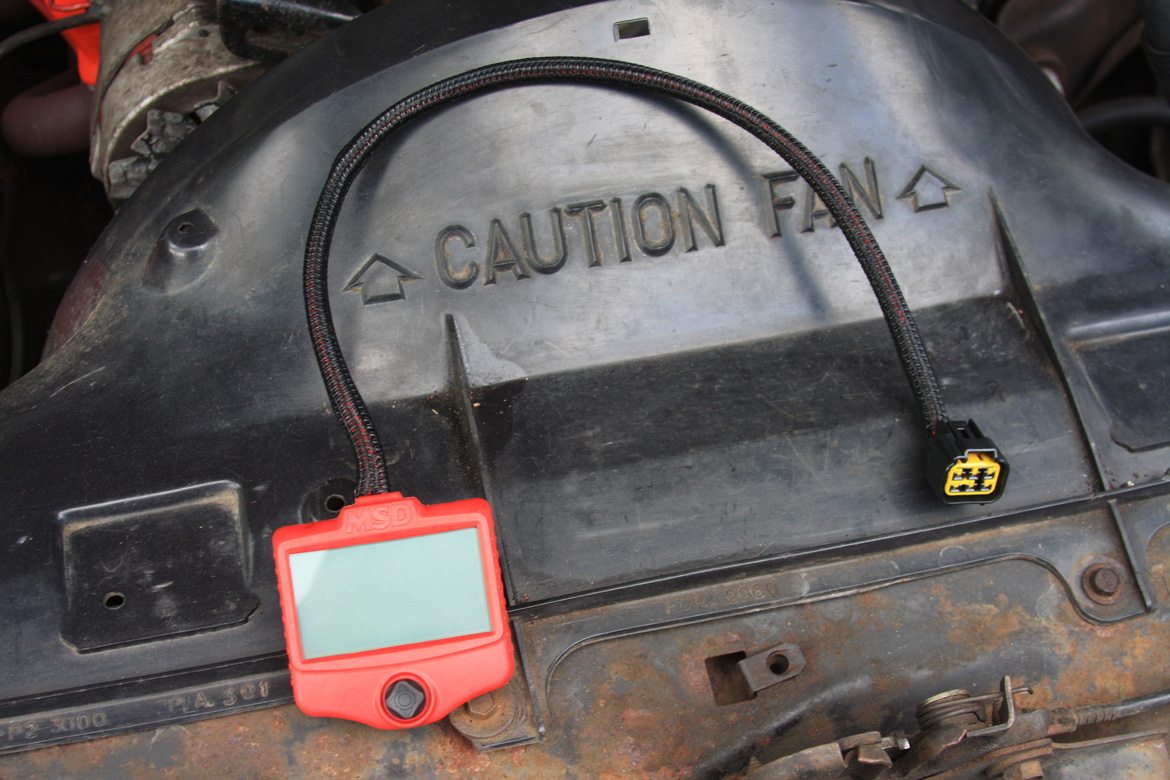
As you can see, the firewall is pretty much a mess in this thing with stuff everywhere. I have contemplated removing all the AC stuff and just putting a flat panel, but didn’t do that yet. I needed to find a place to mount the Atomic’s control unit somewhere.
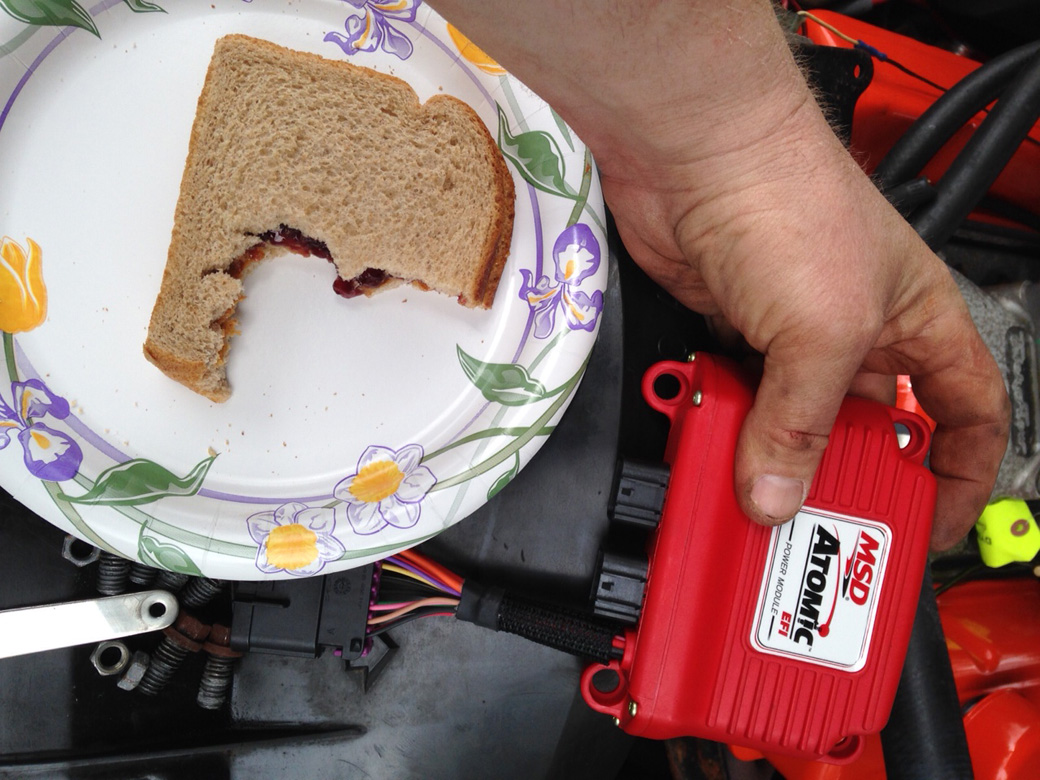
Over a PB&J sandwich I sought the most practical place to stick the Atomic EFI’s power module and that ended up being a flat panel on the inner fender the unit is not big, but you need to consider that there’s a port you’ll have to access to plug in the hand held tuner and there’s also the need to keep it within a reasonable distance for wiring reasons. This was a good solution for me, but I have seen them mounted on the firewall, hidden in the car, etc. You can get creative with this for sure.

This location afforded me good access to the plug in port for the hand held and was well within the distance I had with the supplied wiring that came with the kit.
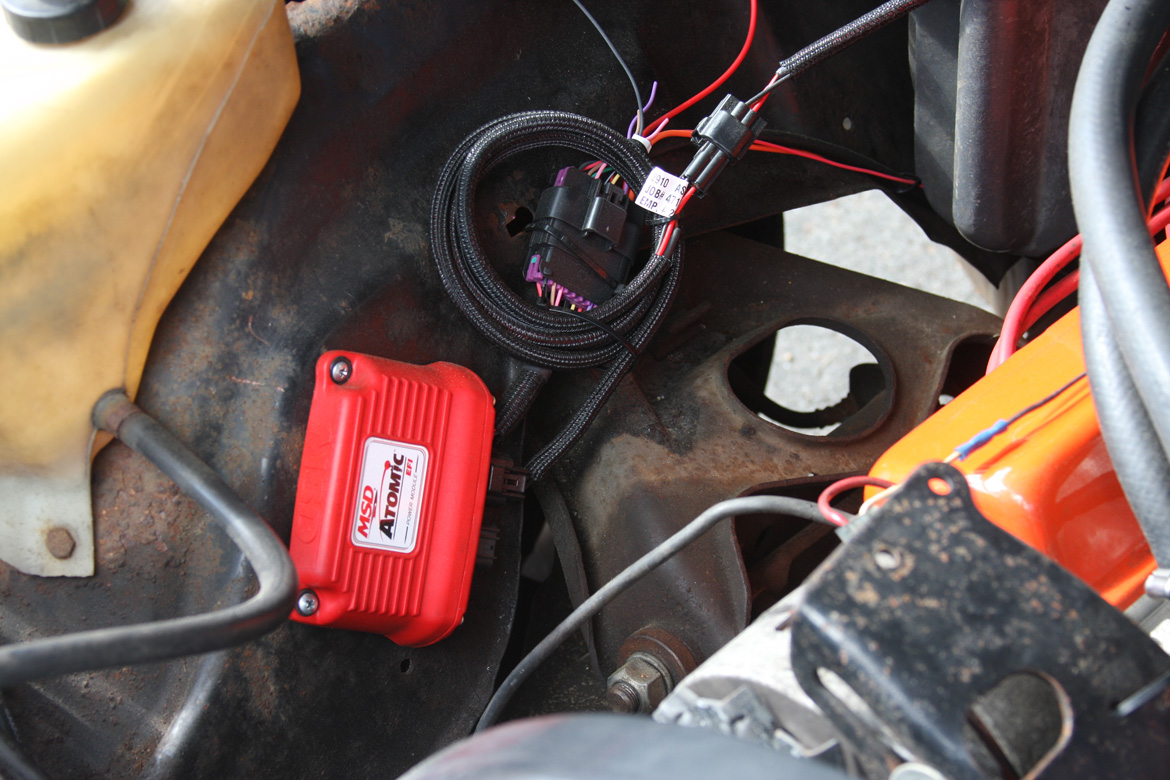
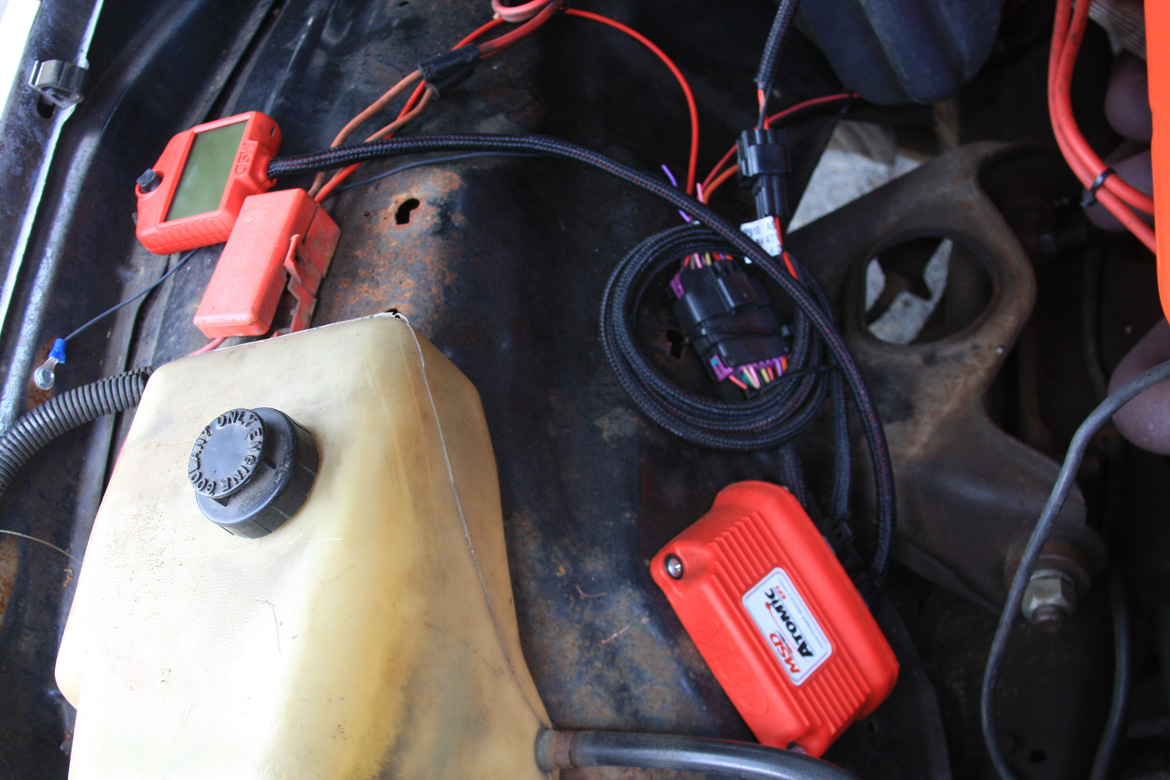
I then plugged in the main harness and began to lay it out across the engine bay to make sure I was going to be able to reach the sensors and the other points that needed power going to them. The wiring of this thing is insanely simple. Less than to actual wires, stuff is all labeled, the diagrams provided are great, and even I who fears wiring worse than killer clowns, did not struggle here.

I then sought a proper location for the pulse width modulated fuel pump. I installed the system as a returnless unit so there is a single line coming from the tank to the front of the car to feed the Atomic. The pump varies the pressure on the needs of the engine. It is vital that the pump be installed lower than the bottom of the tank. The location I used was on a boxed section of the frame ahead of o the rear axle. The mounting clams have rubber isolator bands in them to keep vibration issues down and the pump has a power wire and a ground to hook up.
With the pump installed, it was time to route the fuel line. MSD supplies about half a mile of the stuff to us…ok, over 20ft. My Caprice is large and lovely and I had line left over. Now, being that my car was already equipped with 3/8ths fuel line from the factory, I was able to cut one of the lines leaving the tank, add the large pre-filter, and then plumb the pump in. If your car is not equipped with 3/8th lines, you’ll need to make sure your feed line from the tank is 3/8th before moving forward or vapor lock may cause you issues per the instructions.
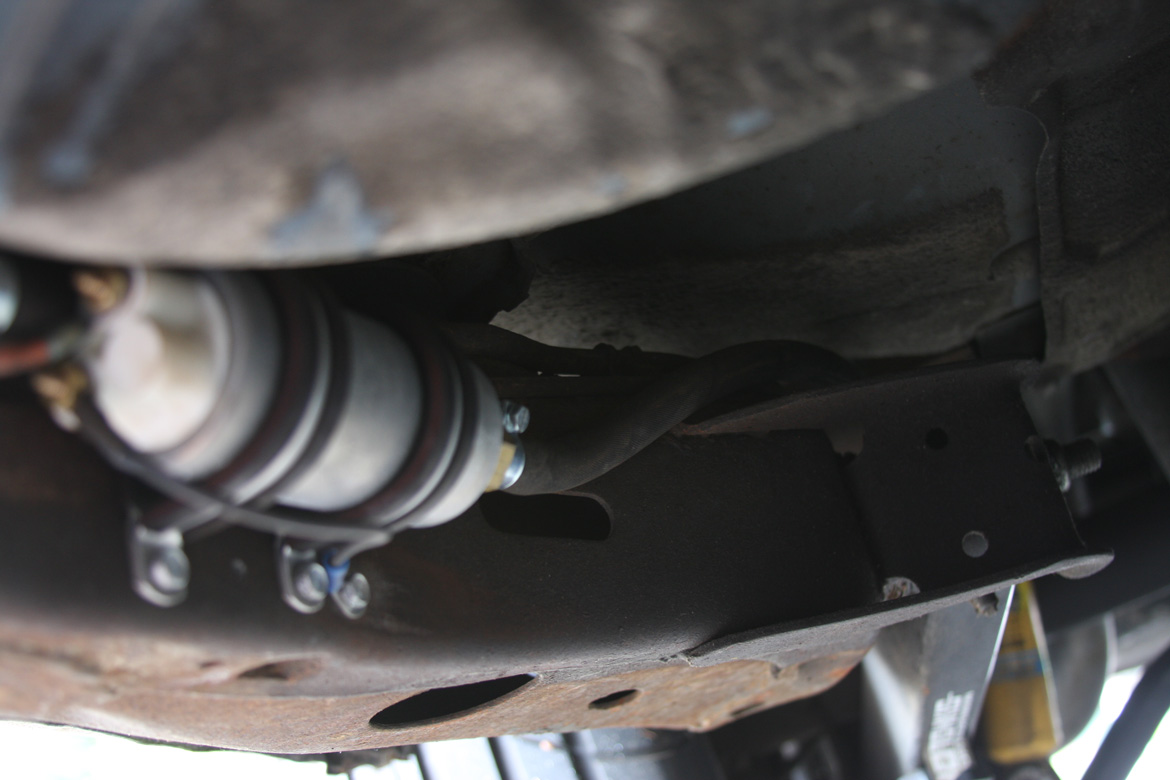
Running the fuel line from the tank to the pump wasn’t much work and my mounting location gave me room to follow the route of the factor lines that fun into and then over the frame.
I was able to run the new line through the exact route that the factory lines take, including through the frame and into the engine bay. This made me happy. There is a second fuel filter in the system as well, ahead of the pump on the pressure side. Both filters are supplied in the kit.
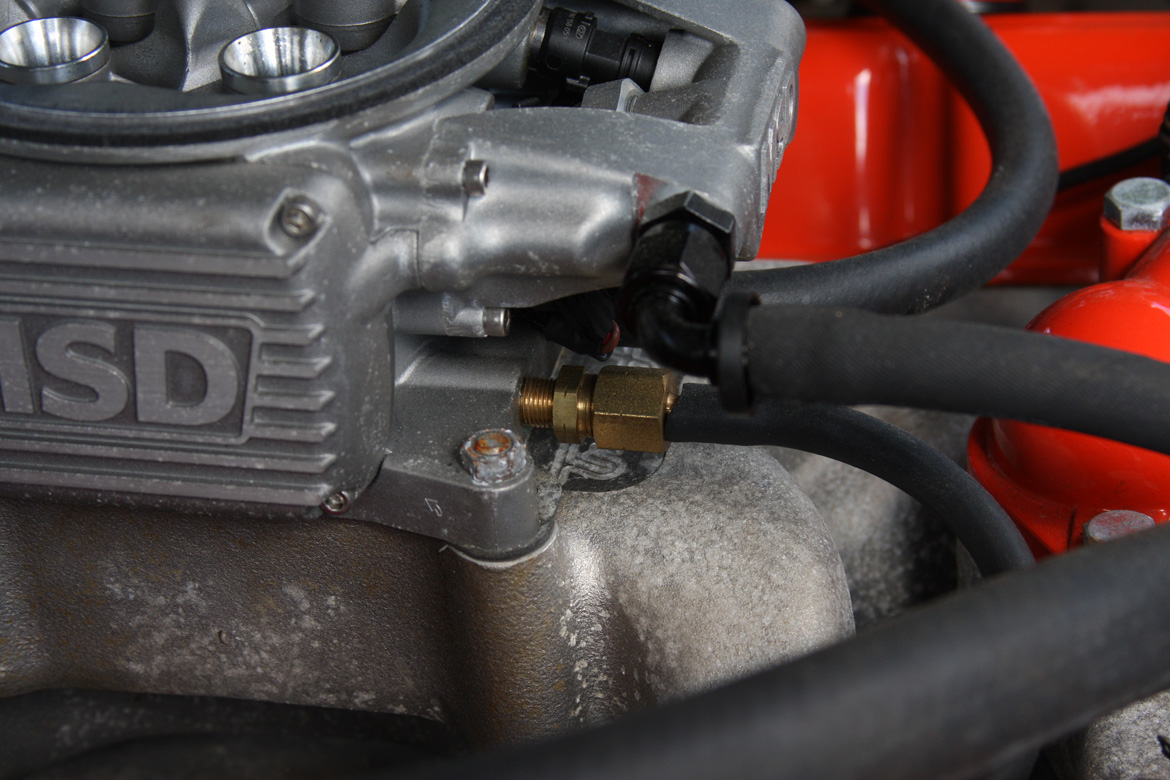
As I mentioned before, one of the things I wanted/needed to change on the Atomic unit itself was where the fuel actually entered the thing. The good news is that it really doesn’t care which end it is coming from and in order to may my life even easier on this install, I needed to swap this fitting in the back…..
For this plug in the front….

Which took about 30 seconds, and apparently made my bleed somehow. Either that or I had grape jelly on my finger from the sandwich. Anyone that has seen me eat is going with the grape jelly theory. It really was a simply as swapping one end for the other.
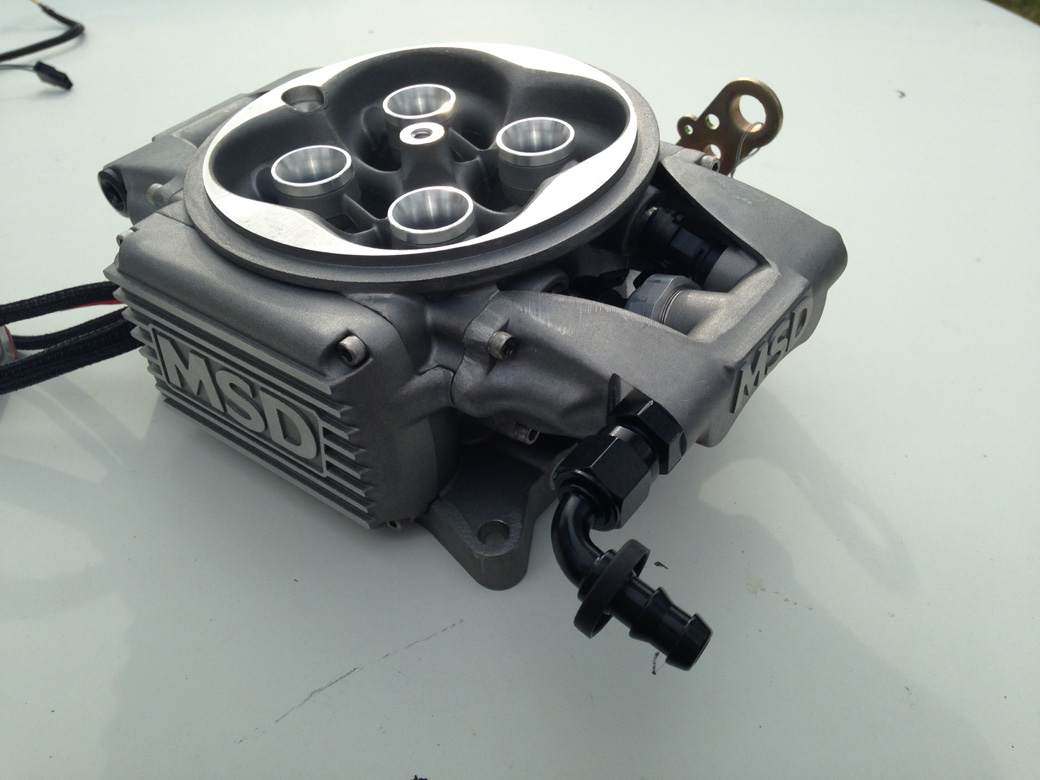
Lastly, I added the push lock style end. There’s no clamp used on the Atomic unit itself, simply push the hose over this barbed fitting and you are done as far as that goes.
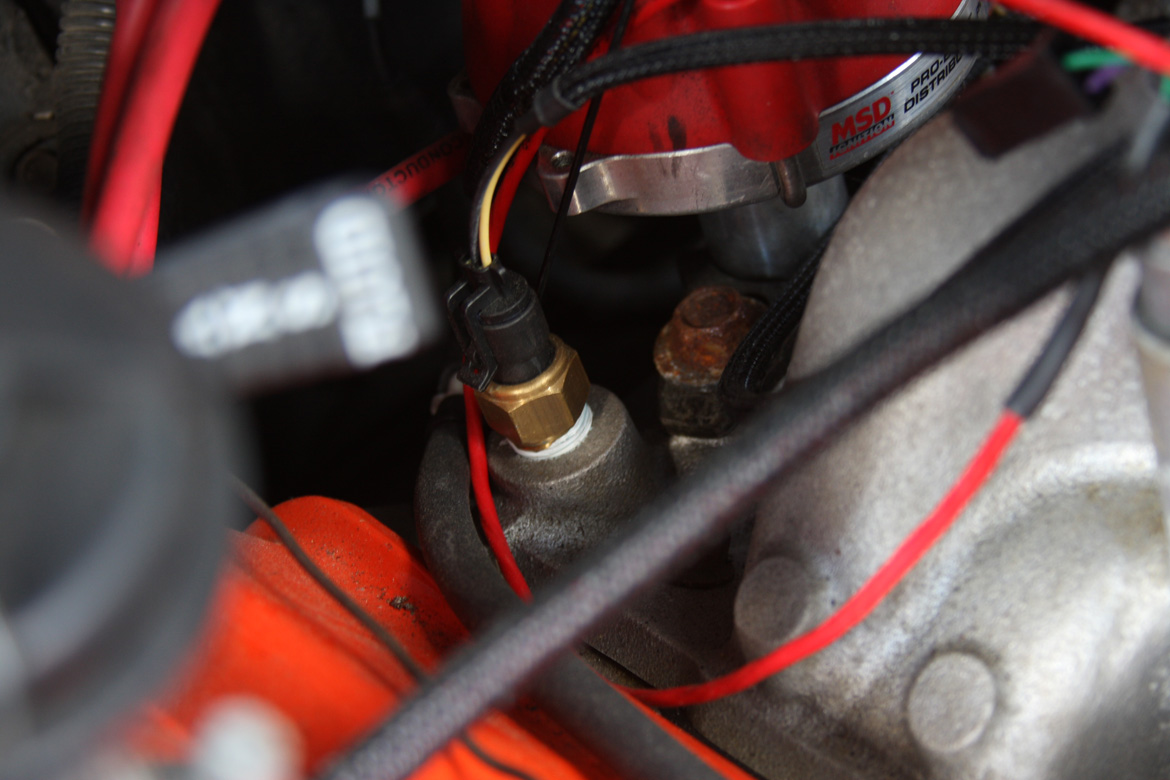
While the unit was out, I added the coolant temp sensor to a port I had at the back of the intake.
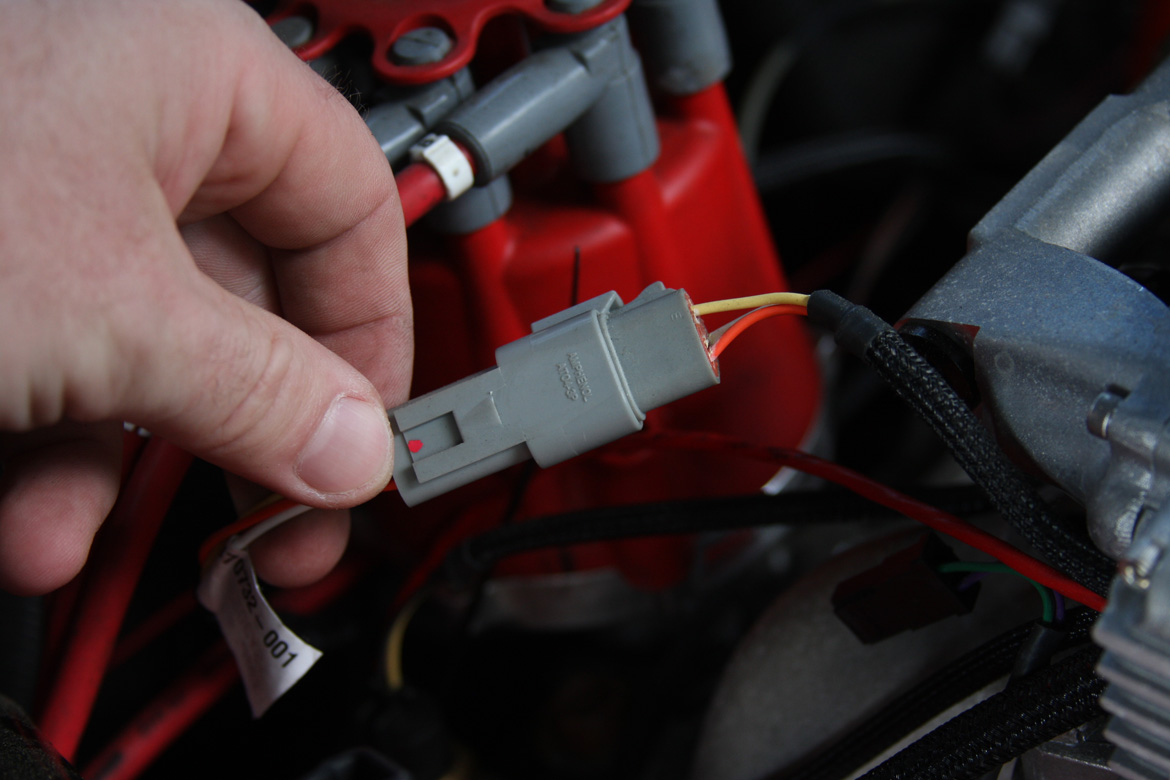
The connectors that are already on the wiring harness are OEM grade and really nice. I can’t stress enough how easy this thing was to put in. It took some time to make sure stuff was right and where I wanted it, but the actual “hook up” of stuff was nothing you should be nervous about at all.
One of the things I needed to do while the unit was out was to remove one of the plugs in the front of the throttle body to install a barbed hose fitting for a vacuum line. I needed this for the transmission as the TCI 700R4 has a vacuum switch on it. I also installed a fitting for the brake booster hose.
There’s a front look at the scene. Note that there is another plug there on the right, which I did not need to remove. If I ever had the need for more vacuum stuff, I can add it there.

Here’s a look at the new vacuum hose routing to the front of the throttle body. I liked it kind of hidden in the back with the carb, but I lost zero sleep over rerouting it.

The last thing I needed to do under the car (outside of checking for leaks when the system pressurized) was to screw in the oxygen sensor and plug it into the harness.
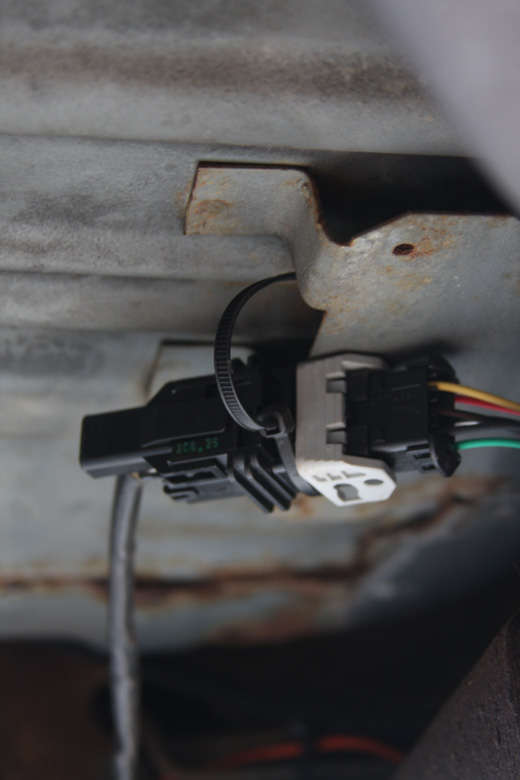
I secured the connection with a zip tie to keep it from flopping around under the car.

After that was done, I set about hooking up the throttle linkage. I transferred the ball stud on the bottom part of the linkage for the TV cable from the carb and used the supplied Atomic EFI kit parts for the rest. The throttle/tv cable bracket is the same that I used on the carb and with a minor visit to the grinder, it bolted on and has been doing a fine job of keeping things aligned.

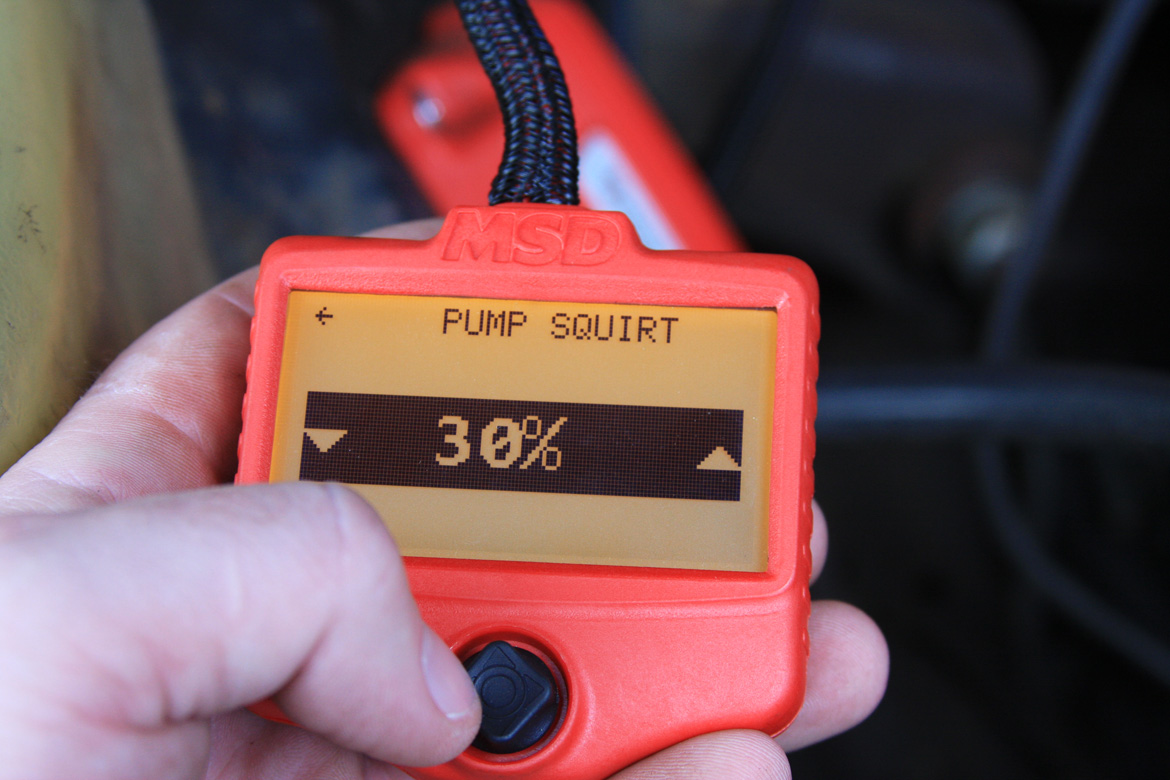
There are some adjustment screws that I ended up using to dial my Atomic in. Because of the wacky cam in this engine, the throttle blades needed to be adjusted to optimize idle quality, etc. Most of the Atomic users won’t really mess with those screws unless you are running a rumpity cam like me. The adjustment was actually pretty fun to make and we’ll talk about that in a minute.
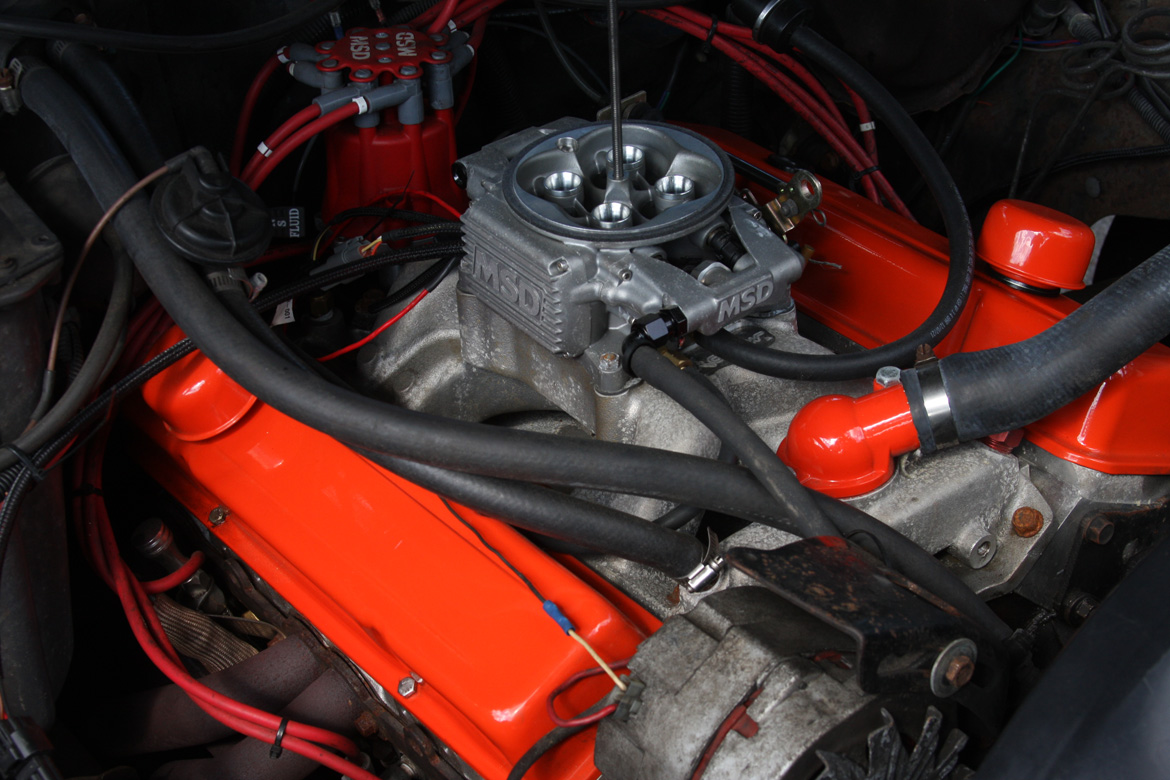
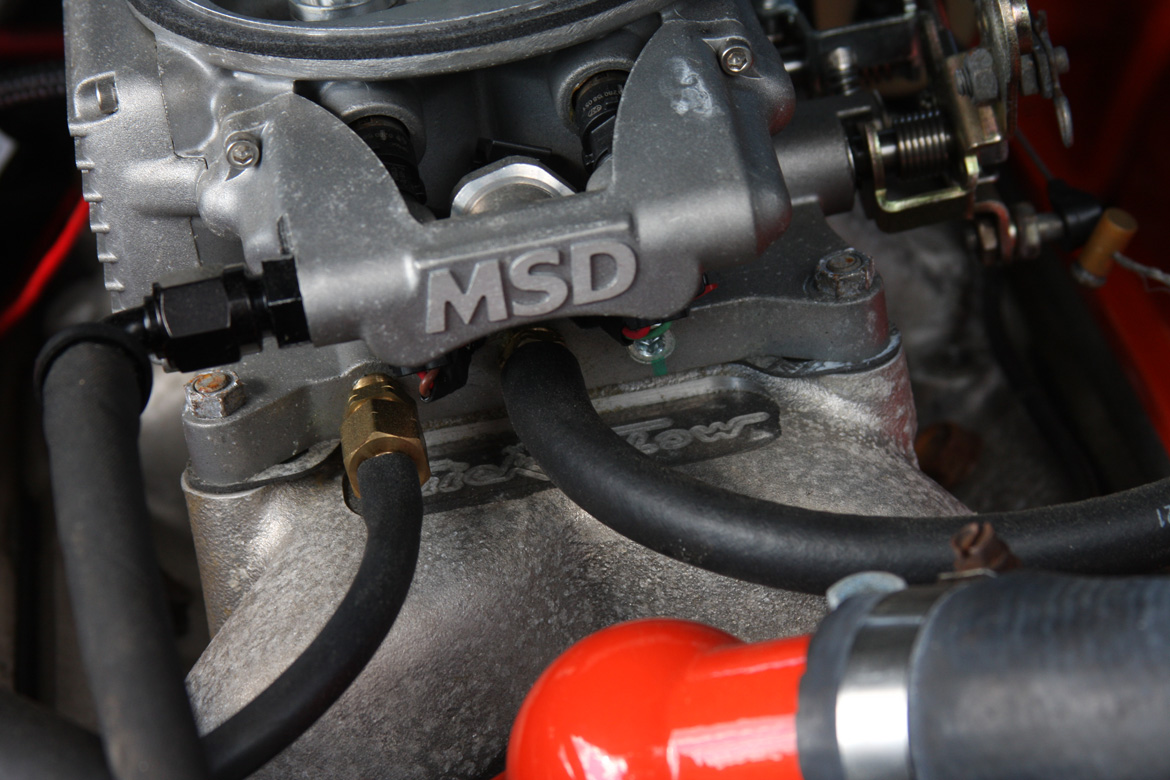
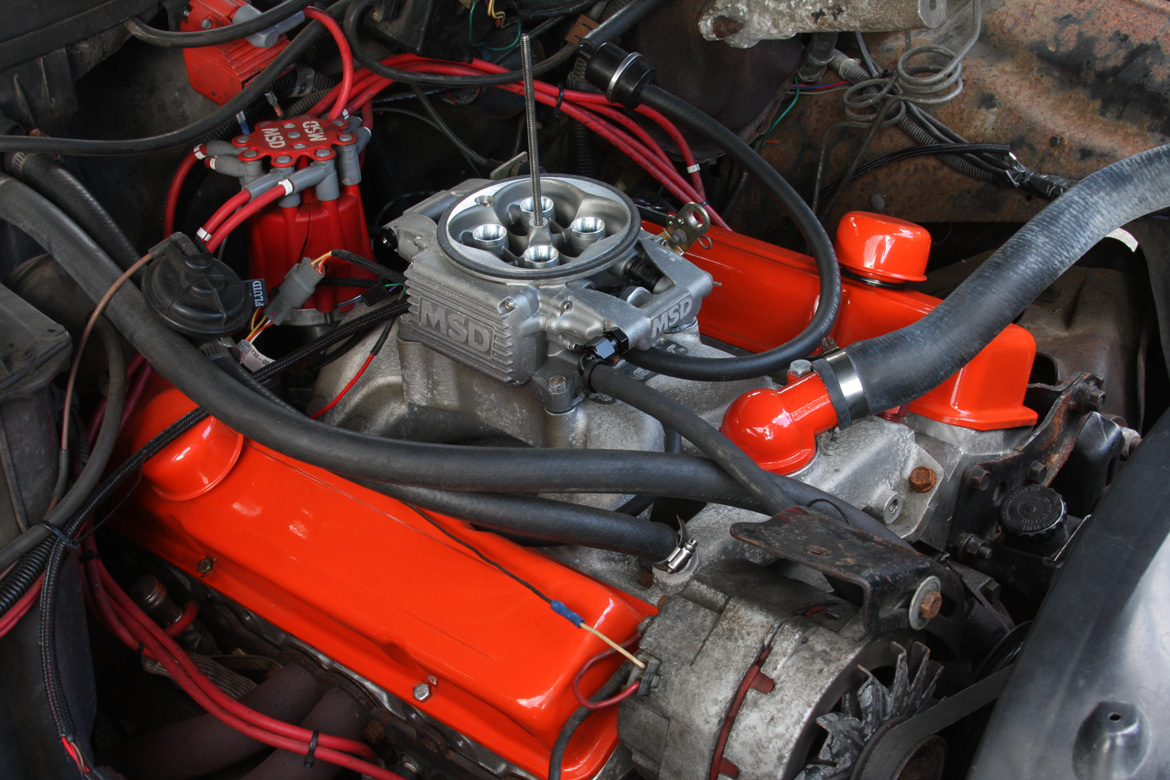
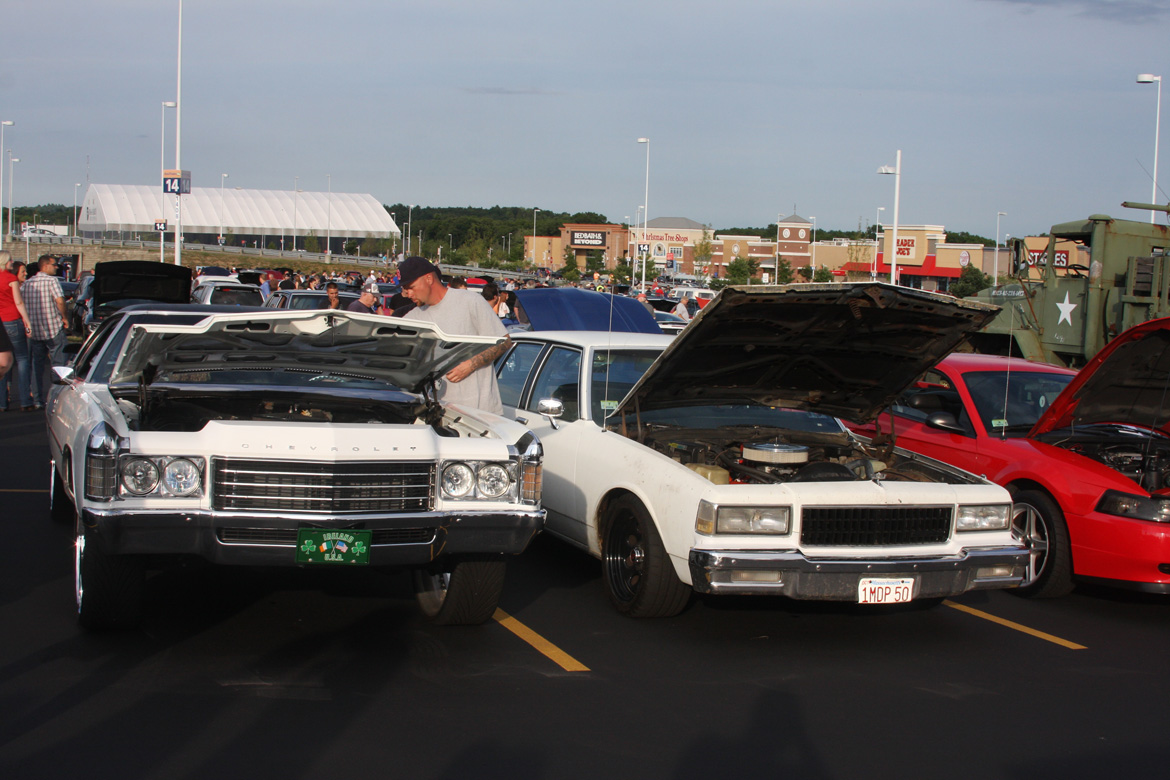
That is what the final product looks like. We find it to be really clean and pretty cool looking. People get all geeked when they see the MSD logo on the side or the front of the piece peeking out from under the air cleaner.
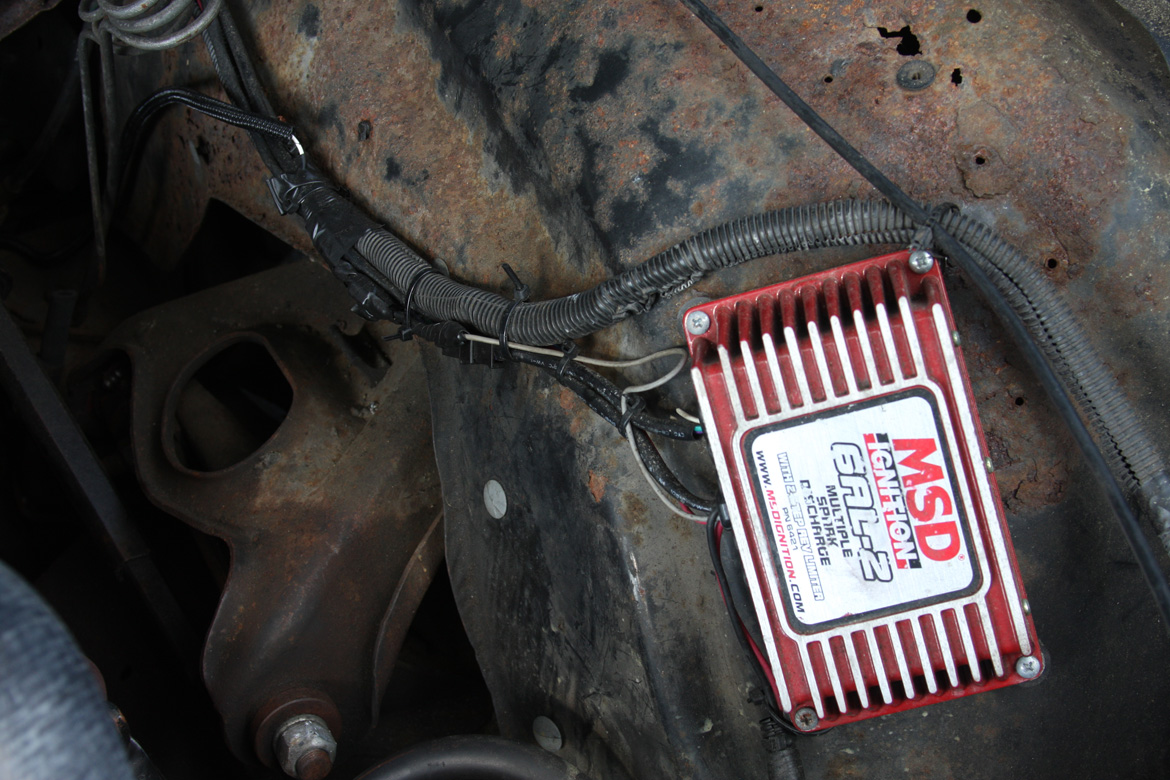
Adding that one white wire is the only thing we had to do on the other side of the engine bay where my 6AL-2 is located. I made an error and hooked this up to the wrong wire and the car would not start at first. A quick check of my work revealed I was tapped into an in put wire instead of an output and the Atomic was not seeing any RPM so it would prime, start, and then shut off. Two minute later, I hit the key and it lit off on the first try (with the correct wiring).
So with the engine idling, the computer learning and me laughing like a maniac, I can around looking for leaks or other issues. I found none. Now for the fun part!
The fun part was plugging in the handheld controller and getting into the Atomic to set it up and see what kind of stuff I could play with. At this point I was literally shocked that it fired up and ran just as easily as it did. I did this in the early spring and it was not warm outside. Here’s the handheld that plugs into one of the ports on the power module.
There’s about a two foot cord on the thing and it was plenty to rest it on my fender while I ran around to click the key to the on position to power up the unit. Before starting I inputted the displacement of the engine and some other basic facts to give the Atomic an idea of what it was feeding and then it fired right off.
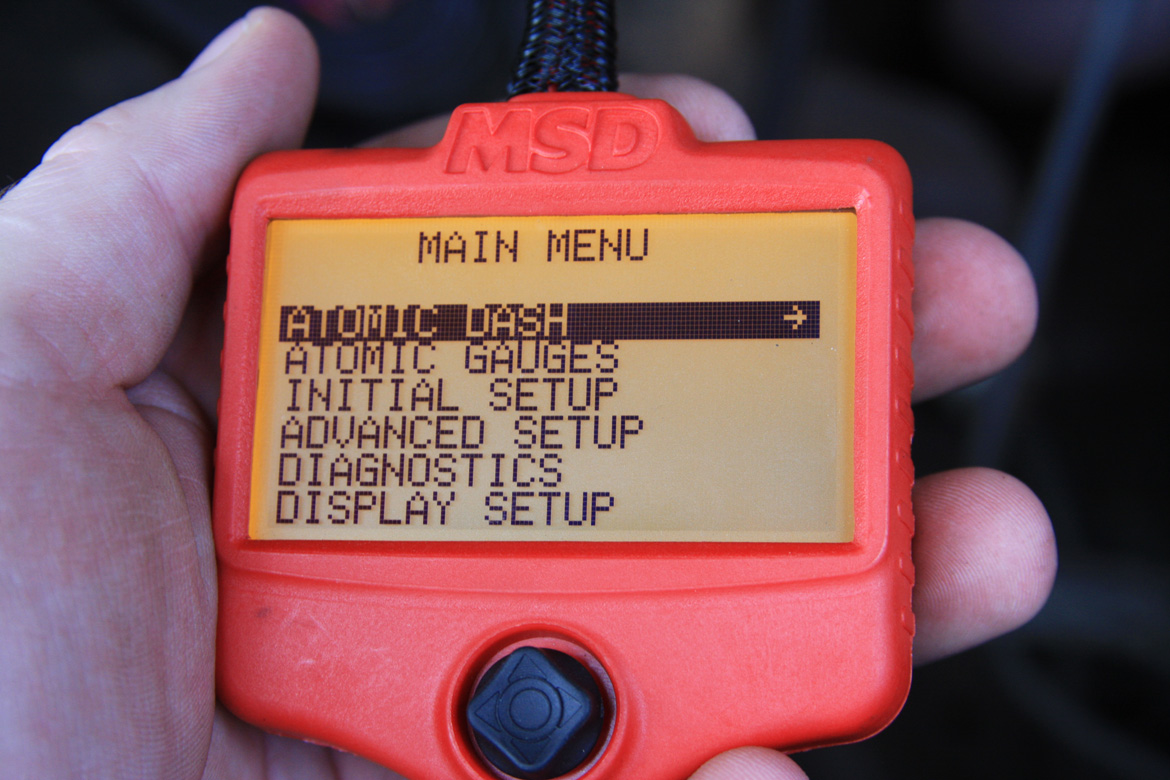
I’ll take you through a few of the screens that the handheld has and my experience on setup. The Atomic Dash gives you a look at exactly what the Atomic itself is doing.

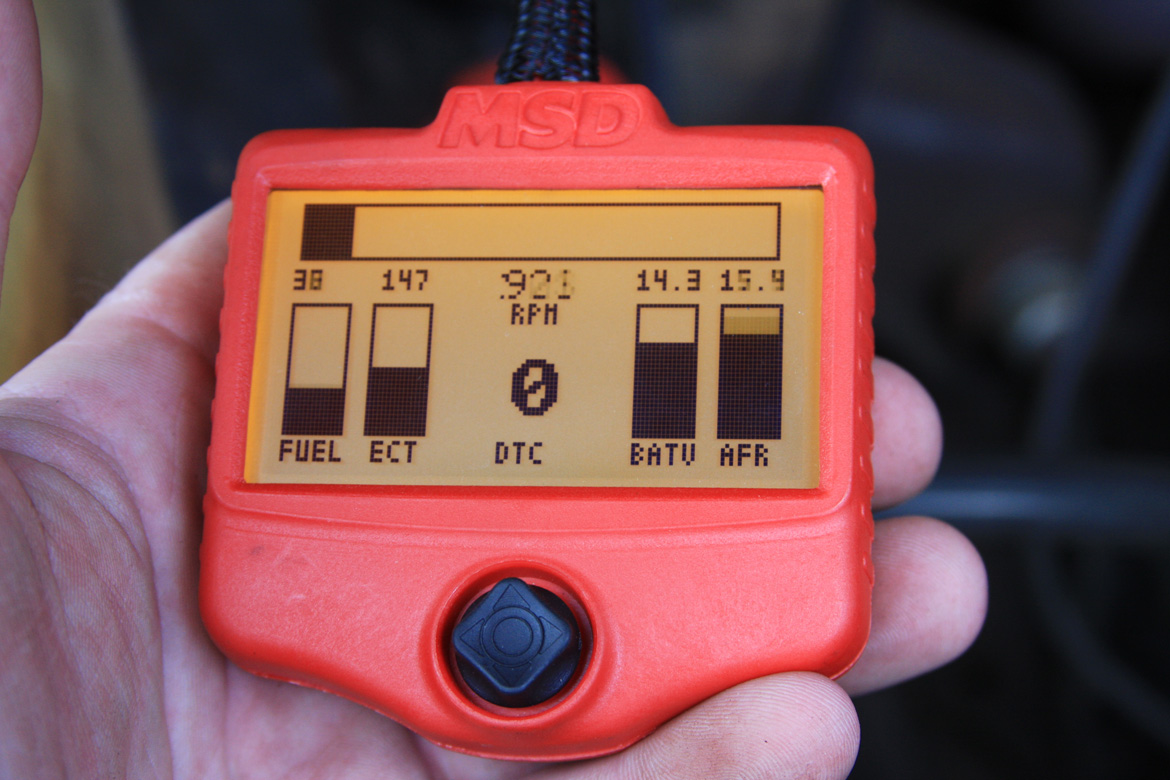
You get to see all the stuff going on here. TPS position, RPM, voltage, etc. Apparently the alternator was recharging the battery here.

Scrolling down on the same screen gives you injector duty and the air fuel ratio. This was minutes after the car started and the computer was in learning mode, trying to figure out exactly what was going on.
Here’s the screen with the Atomic gauges. Again, the basics here. RPM, voltage, fuel pressure., air/fuel ratio.

There is functionality here that I am not using yet. Electric fans can be programmed to fire up at certain temps.
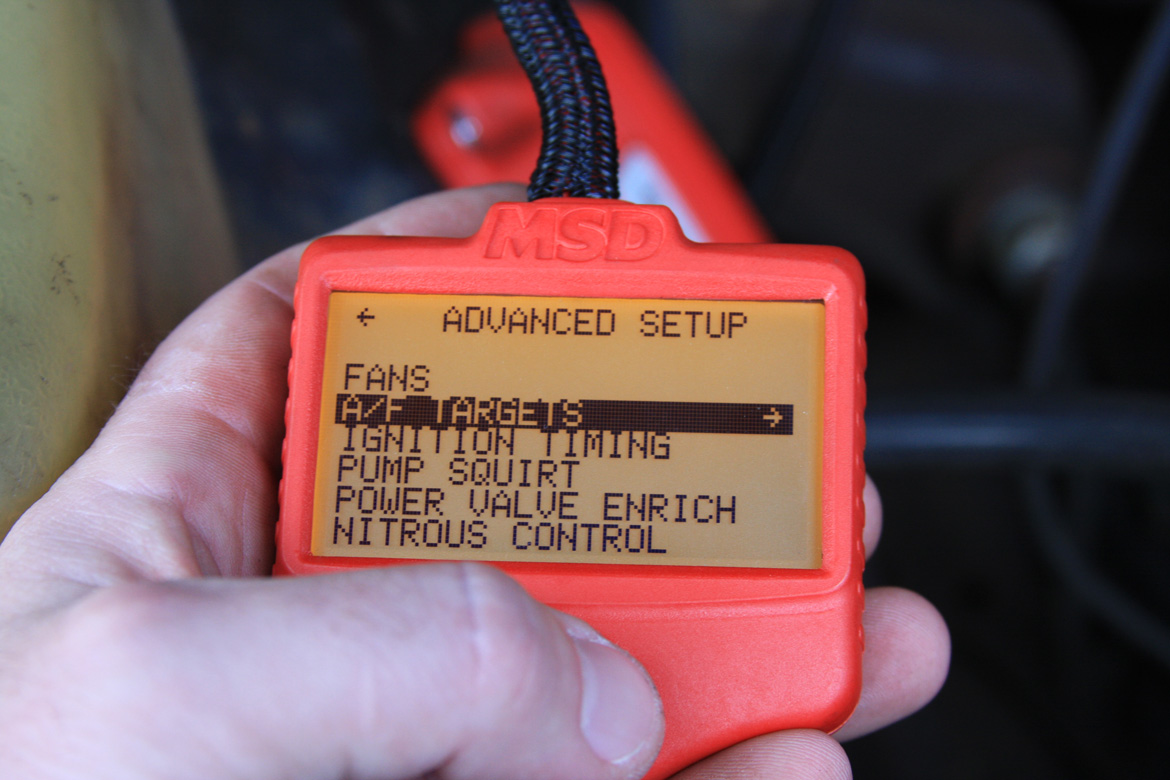
The advanced setup allows you to really tweak for your application by setting AFR targets, tweaking ignition timing through the unit (if you would like to), adjusting the “accelerator pump” squirt, nitrous control, etc.
It was pretty fun making changes and going to drive the car to see how things changed. I am still playing with stuff now and again but for the most part, I have let the Atomic do its thing. This is a great “gateway” drug into the world of EFI and I say that because once I broke through my own fears of getting on the road, I find myself envious of the guys who can really get in and mess with every aspect of the program.

The self-diagnostics function is great because it will tell you if there is an issue with the system in any aspect that is preventing the car from running or from running right.
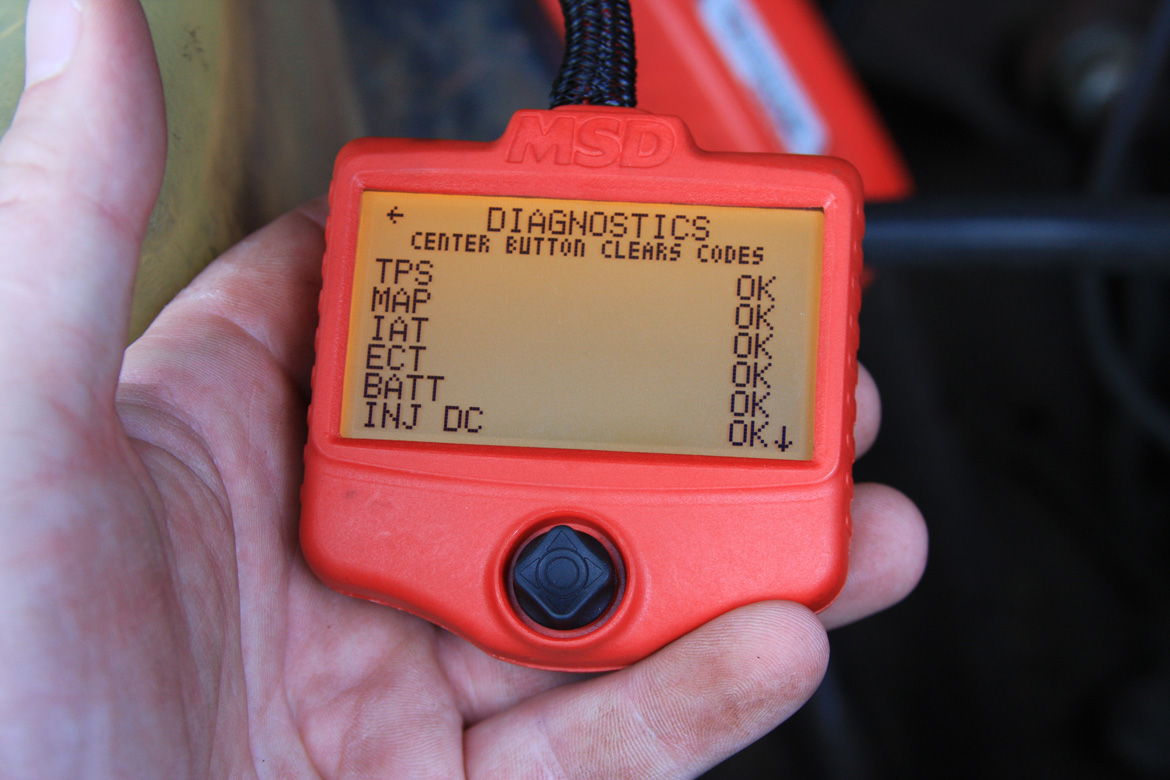
If any of these things do not say OK you know that there’s some work to do somewhere. All systems were go and have been go since the first say I hit the key. I estimate I have driven about 1-2,000 miles on the Atomic this summer in city and highway driving. Never had one hiccup.
Bottom line? I really, really like the system. It has helped to make the car a little faster, more fun to drive, and a lot more fuel efficient. The price for the system installed on Buford would be right around $2200 retail. That’s not cheap, but for the ease of install, the fun of using it, and the way it has performed I would have no trouble telling anyone on the fence about making the switch to do it. It has been great fun this summer beating on the car and the Atomic has certainly taken its licks and kept on ticking.

Jack Lohnes approved! So what’s next for Buford? Well the short block is finally getting tired. It has begun to eat a bunch of oil and there are some really gnarly banging noises coming from the bottom end when it is cold. I think it may be time for a new bullet in the front of the car. Chad and I have a plan….that’s a scary thought, right?


Awesome writeup, and nice job!!
I’ll be back in twelve months, I hope the next installment is up by then…
Why so soon?
AWESOME!! Does seems crazy sometimes to spend as much on parts as the car is worth….been there…STILL doing that!!
Will this system supply enough fuel for the new bullet….?
Can it work with forced induction…?
Are you currently running your ignition through it?
Can it be used to add more fuel AND/OR retard the timing for a N2O shot?
Andy, this will feed a bunch more power than I have now and will probably have with the new engine. Forced induction up to a point (low boost I believe) but nitrous it is all set up for. You can program all of your nitrous stuff in it and it will handle your needs.
Currently I am not running ignition through it but plan to change that pretty soon.
What happens if you lose total battery power? Are your parameters saved or does the unit have to start from scratch again?
Alex, I believe parameters are saved because I had the battery go completely dead on me over the summer and with some juice it lit right off and I went cruising with no issues.
great system but … the 2 grand plus price tag has got to go
they need to get the price on this down under a thousand if they ever want to get people to switch away from carburetors
$2k is cheap for an EFI system, at least it is good quality and a brand you know will support you. I think developmental costs and amortization across the low volume of sales is to blame for some of the pricing. I want aftermarket multiport EFI but not quite enough to spend $3k.
one could start with a 6530 ignition, and keep the carb… just that seeing 25% fuel mileage gained gets all spent back. This all comes back when an AFR is attempted…not to mention cold start wait states nearly done away with, it goes on and on..no drawbacks that I have found are worth a quibble.
Nice setup brian, I hope they make a 300cfm for the rest of the planet.
Nice write up. Did the fuel pump come with the kit? I used what appears to be the same exact fuel pump and mounts on my Thunderbird’s TBI. It’s off an early 90’s GM truck with 454 TBI iirc, though I thought they only went up to 20 or so psi. I’d be a little more nervous about 40psi running through a hosed clamped connection on the stock steel line. I guess if it doesn’t hold, add a second clamp! And 15 volts! =P
Sounds good, I’ve mentioned to my Step-Dad about getting one of these for his ’71 Mustang.
Fuel pump was supplied with the kit. The line is good stuff and the clamps they supply are nice. They are a center bolt style clamp and happy to report and no leaks since installing the system.
That was the pump supplied with the kit. They they have two different pumps depending on how serious you plan on getting with the power.
Nice looking caprice. What year is it? Just wondering if it’s an 87-88 as it was carbureted.. or if it’s a 89-90 and you hated the tbi setup.
Luc, it is an 87 – Had a QuadraJet on it before I started screwing with the engine.
Great read, knew you had it in you. Answered a lot of questions I had.
Awesome Brian ! I love your write up. I want to get one to replace the Tbilisi on my k5 blazer. I think for the price if it is like you say it is worth every penny. Time is money- joe
Brian,
What are the upper recommended cam specs for these systems that you mentioned? Is this a vacuum thing based on cubic inch and cam specs or just a hard line no matter what ci?
“and it is delivered fuel economy gains of nearly 30% on the highway over the double pumper that was on the car before. ”
So, what are the numbers or do you work for the government…
Yes it seems like a lot of money up front, but you have to think of all the things you not only get with the kit, but moreover the things you don’t have to do. You don’t need to cover to a EFI lower intake or have injector bungs welded in the intake and custom make a fuel rail and mount system. You don’t have to plumb a return line or add a regular because of the PWM of the pump. In one tight package you get a throttle body, tps, IAT, fuel rail, injectors, MAP and more.
Where does one buy some of those “mounting clams” mentioned in the story LOL?