


(Words and photos by Joe Grippo) – When I took delivery of my 2015 F250 Super Duty a few years ago and immediately put it into service as a tow vehicle for my race car, the first thing I noticed was how much the rear end of the truck squatted when hitched to my 24’ Vintage box trailer. My previous ’03 F150 didn’t squat at all and the car was in the same spot in the trailer using the same tongue weight. The Super Duty towed great and handled fine and I got used to how it looked but it was at night that it became apparent that it was going to have to be addressed.
The rear drop of the truck would point the already spotlight-like headlights straight into the eyes of oncoming traffic resulting in constant flashing lights back from the blinded drivers trying to tell me my high beams were on, when they weren’t. An additional short coming of the truck was the potentially dangerous tendency of the big dumb Super Duty to upset itself while hitting a bumps in turns (just driving, not towing). While I love the truck overall and its capabilities, I figured could live with this stuff but it became more annoying as the miles rolled on.
So while poking around Bangshift, as I‘m apt to do, I notice the banner ad for Ridetech and was curious, so I clicked on over. See, advertising does work! Turns out Ridetech has a product called the Level Tow Advanced Towing Solution that looked like it could be exactly what I needed to cure my truck’s ills. I pulled the trigger and I am glad I did. Bottom line, Level Tow is essentially an airbag helper spring system and when paired with the Ridetech Fox Shocks, they greatly improved the towing and ride quality of my truck.
The installation of the Level Tow components can easily be done in your home garage or driveway but for ease of documenting the process and the fact that it was cold out, I sought help. Help with a lift and a warm shop. Rob’s Rod Shop in Downingtown, PA was up for the challenge, thankfully. Rob and Erin McCall have been in business since 2004 and have built a solid reputation for quality work and very fair prices. Rob’s Rod Shop is an old school speed shop with an extensive line of performance goodies, they can install all the parts sell and they have an in house Dynapack chassis dyno in their clean, large well equipped shop. While Rob, Erin and their #1 guy Jim Keesey primarily focus on vintage muscle cars and hot rods, they eagerly shuffled the shops busy schedule to get me and my big truck in for the Ridetech Level Tow installation.
Let’s see how it all went down….and up, thanks to Ridetech!
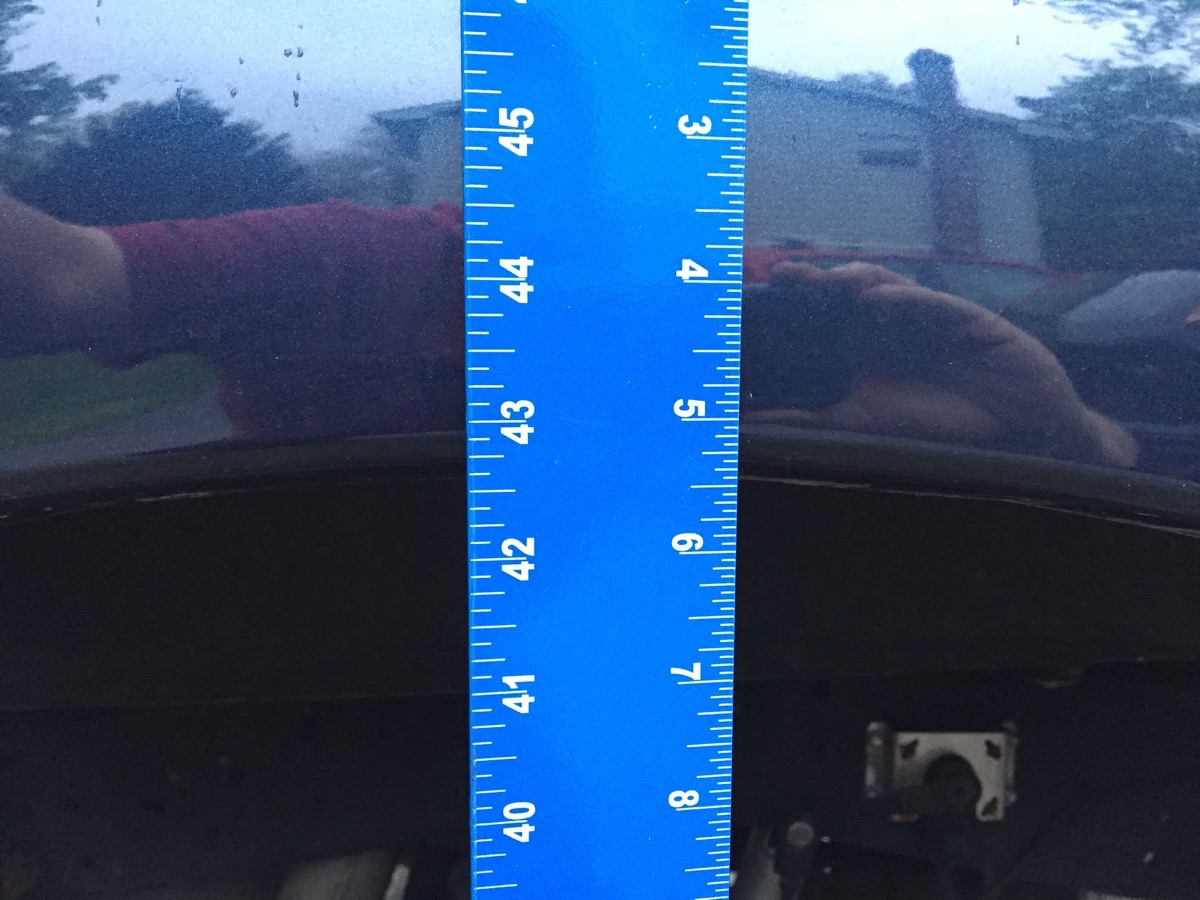
Here we see the truck and trailer hitched up and ready to go prior to installation of the Level Tow System. Note the droop, sag, squat or whatever of the rear of the truck with normal tongue weight of the trailer. We took some measurements to compare the before and after, it was 42 ¾” from the wheel lip to the ground without the trailer hitched up and the same measurement with the trailer hitched was 41 ¼”. The truck dropped 1 ½”. That may not seem like much but it is very noticeable when driving. We will contrast and compare these lengths after we install the Level Tow System.
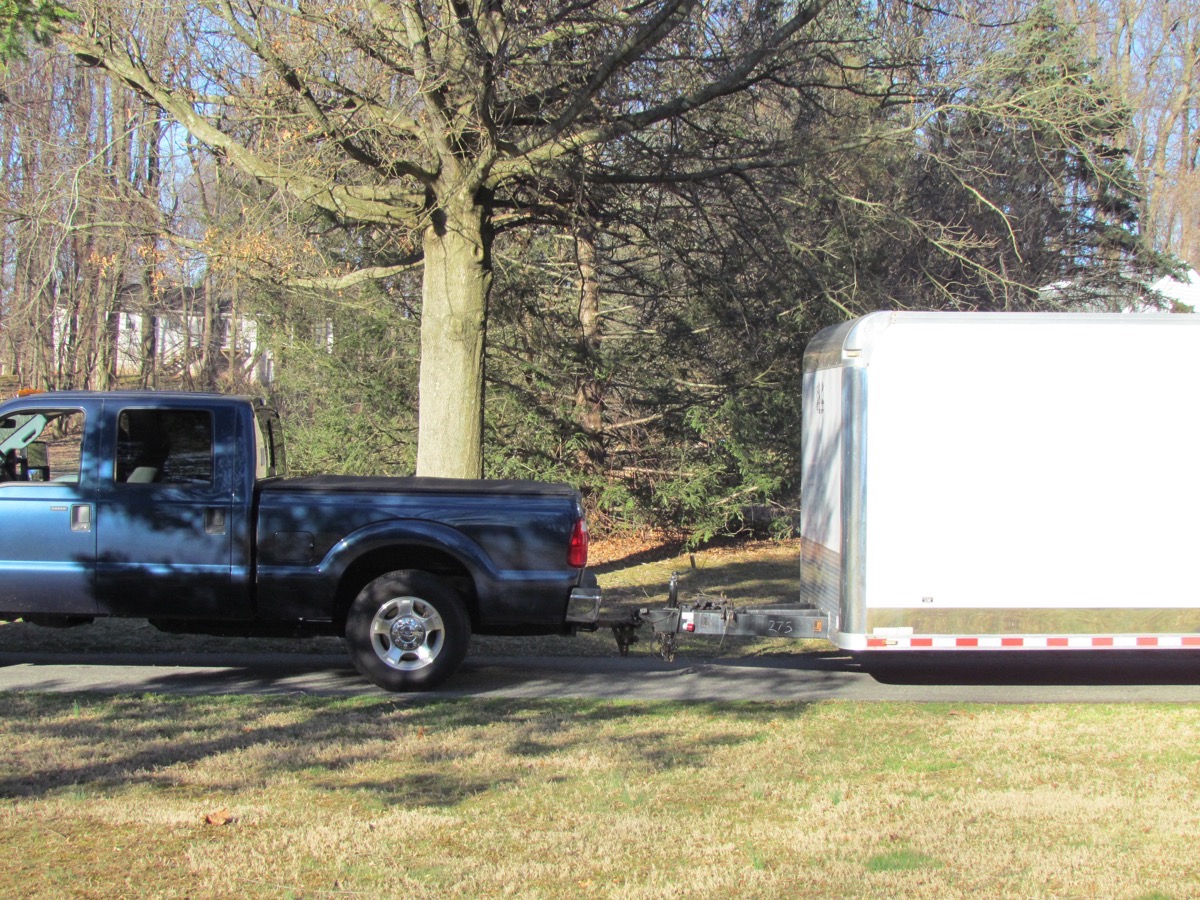

Loaded up and off to Rob’s Rod Shop…

We started by getting the truck safely situated on the lift and up in the air. We now have the distinction of being the largest vehicle ever on Rob’s lift, it was tight but it fit!

Now the fun begins! We cracked open the boxes and laid out all the goodies on the shop floor, organizing and doing an inventory while checking everything against the parts list supplied by Ridetech. The first thing that struck us was the quality of the components and hardware. Firestone airbags and air lines, a plug and play wiring harness with weather tight connectors, all the brackets were black powder coated, Grade 8 bolts were included and Ridetech even provided wire ties and heat shrink. Everything was accounted for, so we started at step 1 in the instruction manual.

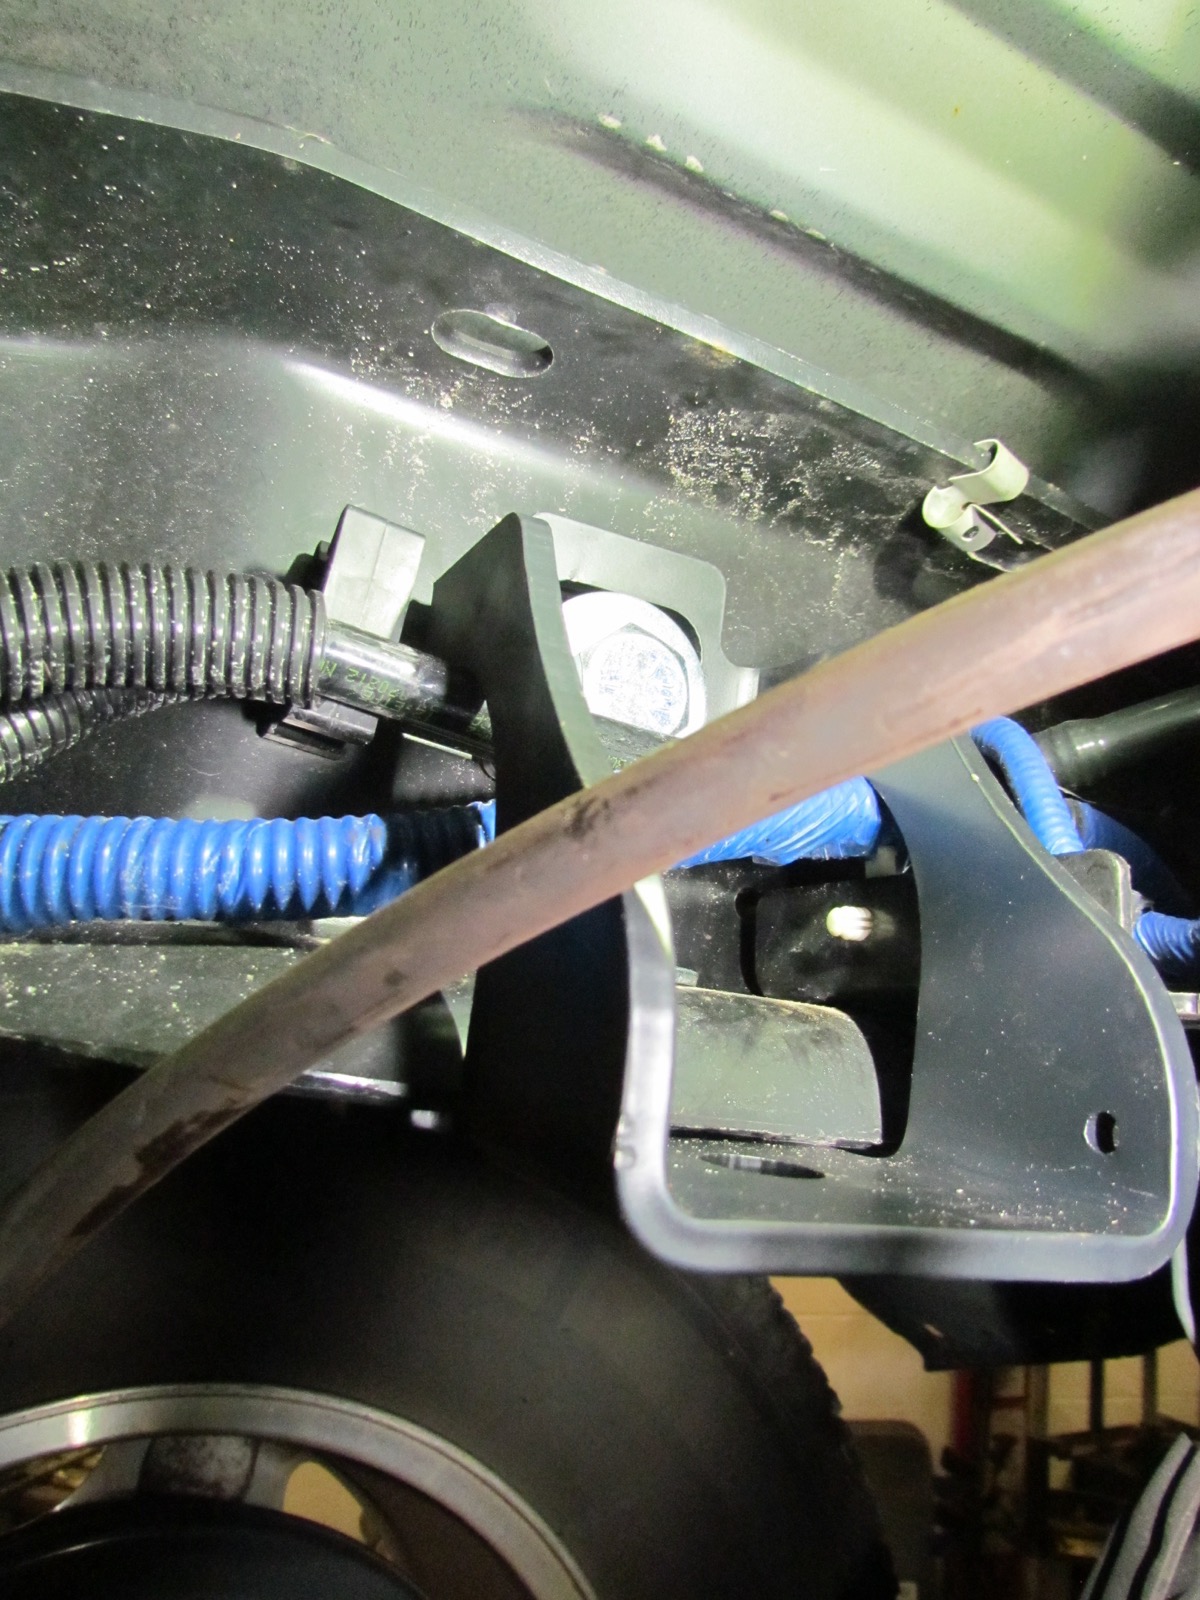
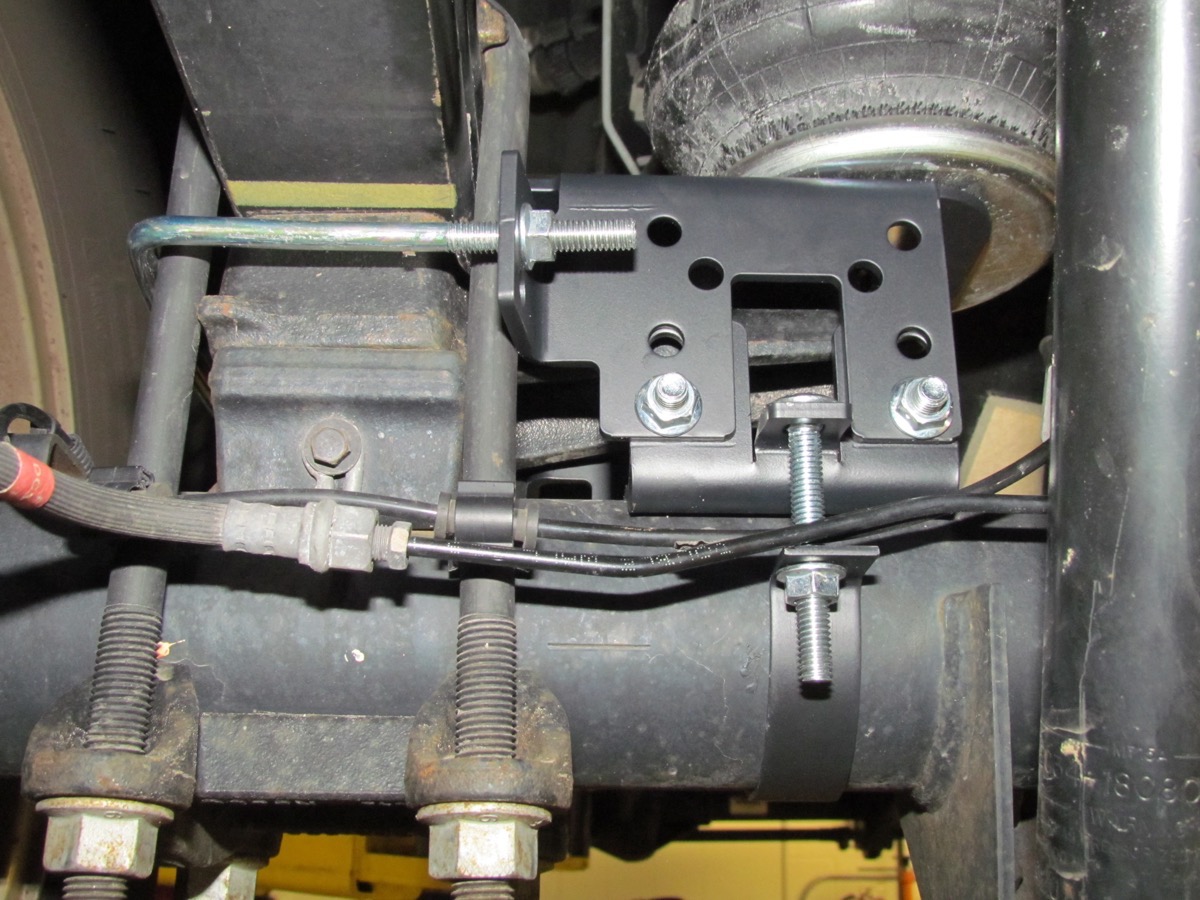
We started on the left side by removing the factory bump stop and installing the upper bracket. We noted that the instructions had different procedures for older model trucks and vehicles equipped with dual tanks and/or fifth wheel hitches, this didn’t apply to us. After dislodging a section of the factory wiring harness and rerouting the ABS line through the bracket it aligned perfectly with the factory frame holes, the aforementioned ABS line and harness was tight fit but the bracket was well engineered and using the supplied spacer the fit was spot on.


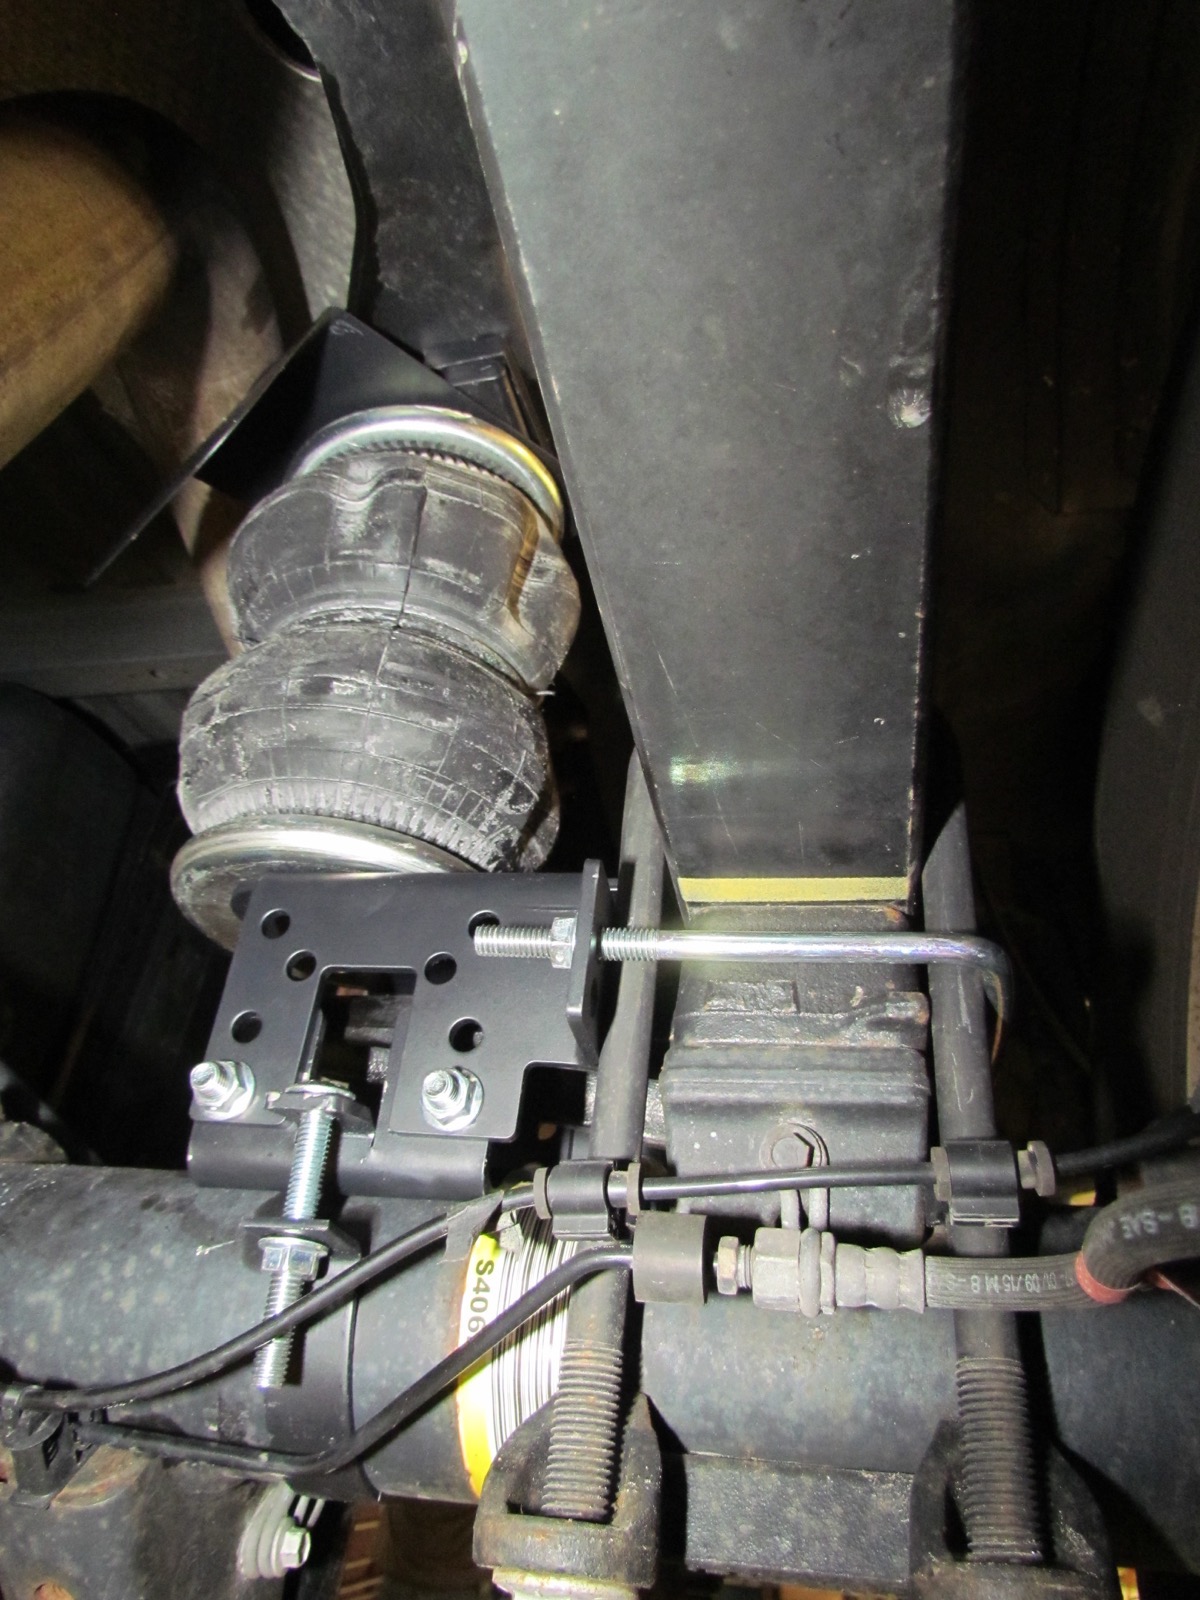
Next in was the airbag which threaded into the upper bracket. Then the lower bracket assembly is attached to the axle tube with two supplied clamps. There are a few mounting positions for the lower bracket assembly but the preferred position is the lowest point. This was where ours lined up. This assembly is placed against the leaf spring stack and secured with a supplied u-bolt, an additional round clamp is fixed around the axle tube and bolted down. The airbag requires at least ½” of clearance to function properly, we had plenty. The bottom of the bag is then attached to the lower bracket.

The passenger (right) side was a duplicate install with two small differences: no wires or lines to reroute and the addition of a supplied heat shield to protect the right side airbag from the exhaust. Ridetech thought of everything!
Now it’s time for the brains of the Level Tow System, the smart sensor and compressor mounting. Jim began by identifying each wire by color and function, quality instructions and exacting diagrams made this a piece of cake –

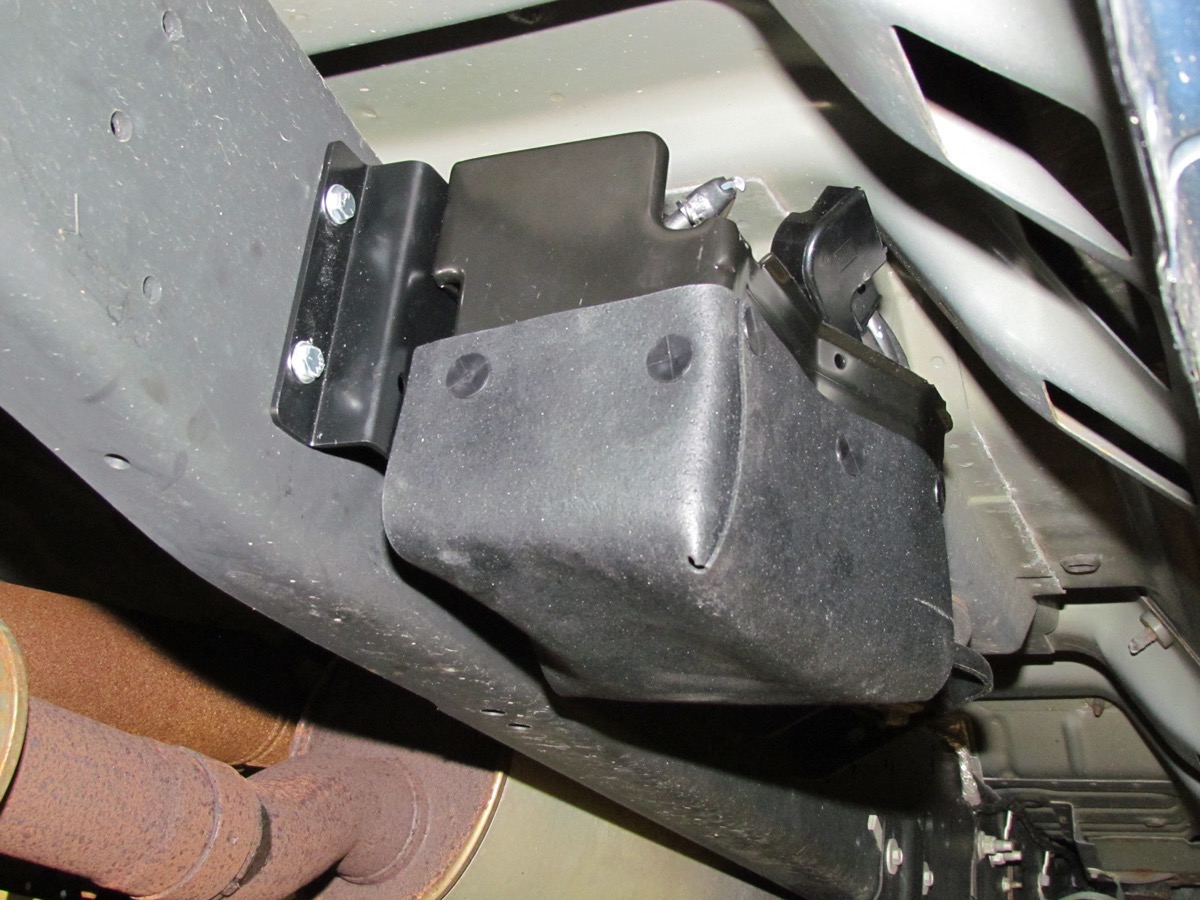
After attaching the mounting bracket to the compressor, we scouted the frame for possible spots to mount the air compressor, a suitable location was found about in the middle of the truck, underneath the rear portion of the crew cab. Here is where we had to do some fabricating, when hanging the compressor we had to drill three holes in the frame and used one factory hole. It tucked up nice under the cab, not even visible when it’s on the ground. The compressor is nicely sealed from the elements, wrapped in a thick rubber pouch and mounted on rubber isolators on the bracket.


Next up was mounting the air filter. Ridetech recommended keeping it up high and out of the way of possible direct tire spray, so we placed it on the inside on the frame rail with the drain oriented downward. Supplied in the kit was a bracket that, if needed, would relocate a fuel line. We repurposed it to hang the air filter and utilized another existing hole to bolt it up. Perfect.
Then we ate a scrumptious Sicilian pizza for lunch. No photos ’cause it wasn’t around long enough.
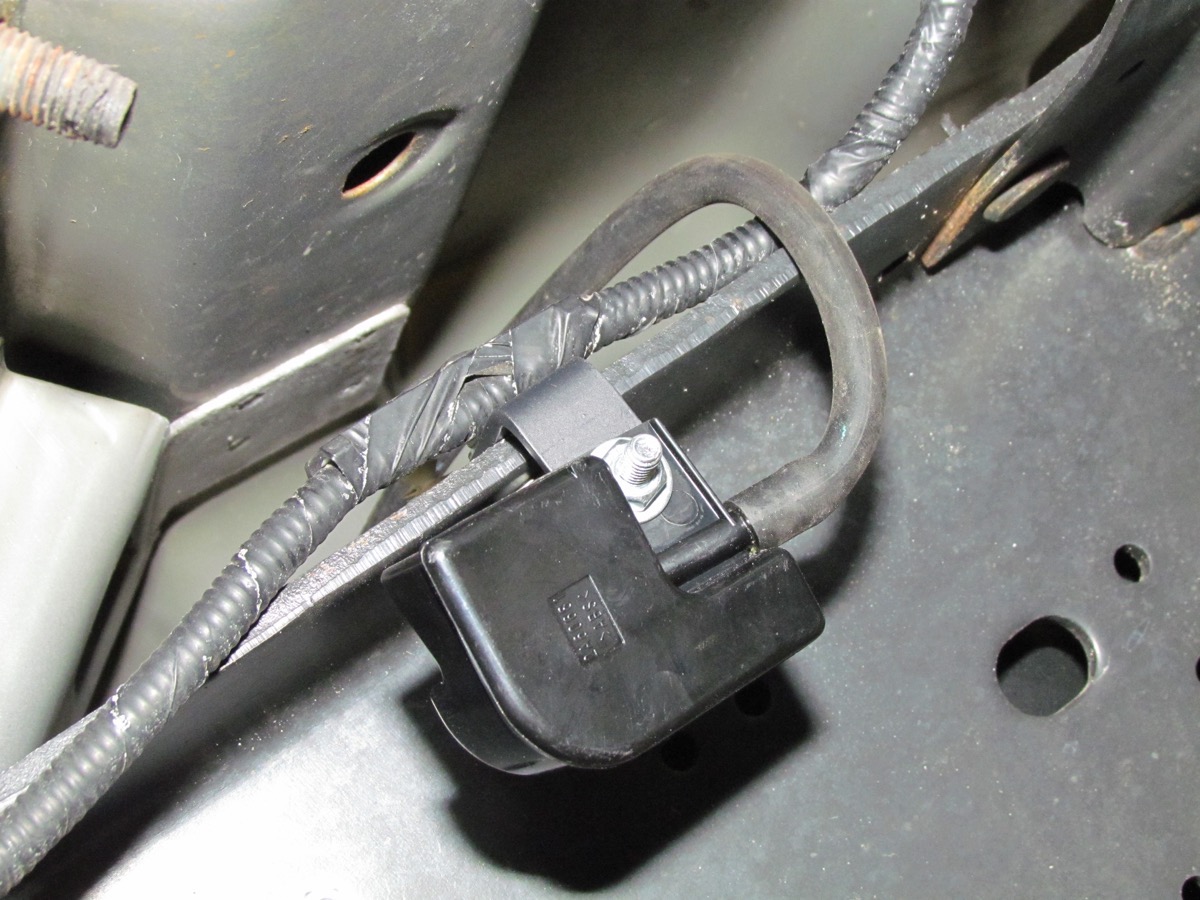
After our Pizza coma subsided, we started back at it by locating the Axle Bracket on the axle tube, with a simple band clamp. Then came the brains of the outfit, the Smart Sensor, which was mounted above the axle bracket on the frame rail. Out came the drill again to knock out some mounting holes. We took precautions to wrap the airbag in foil to protect it from any errant metal shavings. The Smart Sensor needs to be centered in its travel at ride height with the plug side pointed toward the ground and it can be adjusted with four mounting screws and then clocked into position. The linkage rod can also be cut to length. These adjustments will be done when the truck is on the ground.


An important note about the Smart Sensor, the arm needs to be able to swing upward to be activated when the suspension is compressed, so be mindful of any spatial concerns.

Now here comes the fun part, the wiring. We started by mounting the supplied 20amp fuse to the left of the compressor and then ran the red wire under the hood to the battery. The pre-fabbed harness is of excellent quality and truly a plug and play deal. All connections are weather tight, multi-pin plugs and simple routing followed….Gray 4-pin to the compressor, black 10-pin to the Sensor, the black 3-pin, white 4-pin and yellow wire made their way into the cab through a rubber grommet in the passenger foot well and up under the dash. The yellow wire is keyed power, (power when key is on).


When it came time to mount the switch panel the obvious choice was a useless cubby hole Ford provided on the lower left center of the dash. The switch panel is a sweet, stainless steel bracket housing only two switches, an activation switch that illuminates blue when on and a manual inflate and deflate rocker style switch. A quick hole knocked in the back of the cubby allowed the wires to poke through to the back of the switches. The instruction booklet has detailed wiring diagrams and wire color code descriptions making it clear and concise. A quick aside… I mentioned the Ridetech system also includes a manual control function allowing you to raise the rear of the truck by pressing the rocker switch up to inflate the bags or down to deflate them. The main activation switch needs to be off (not illuminated) for this to work. Don’t ask me how I found this out and it’s why you should thoroughly read the instructions. Turning the activation switch back on will readjust the height back to set level position.


For the routing of the air tubing we started at the airbag furthest from the compressor, per the Ridetech instruction booklet. Using a new razor blade we trimmed the air line clean and square and inserted it into the bag fitting and routed the line along the bed support rail to the other bag. After slicing the middle of that line and inserting the tee fitting we ran the last air line over to the compressor for the final connection. Ridetech even supplied zip ties and tubing shielding, which we used generously.


SHOCKING –
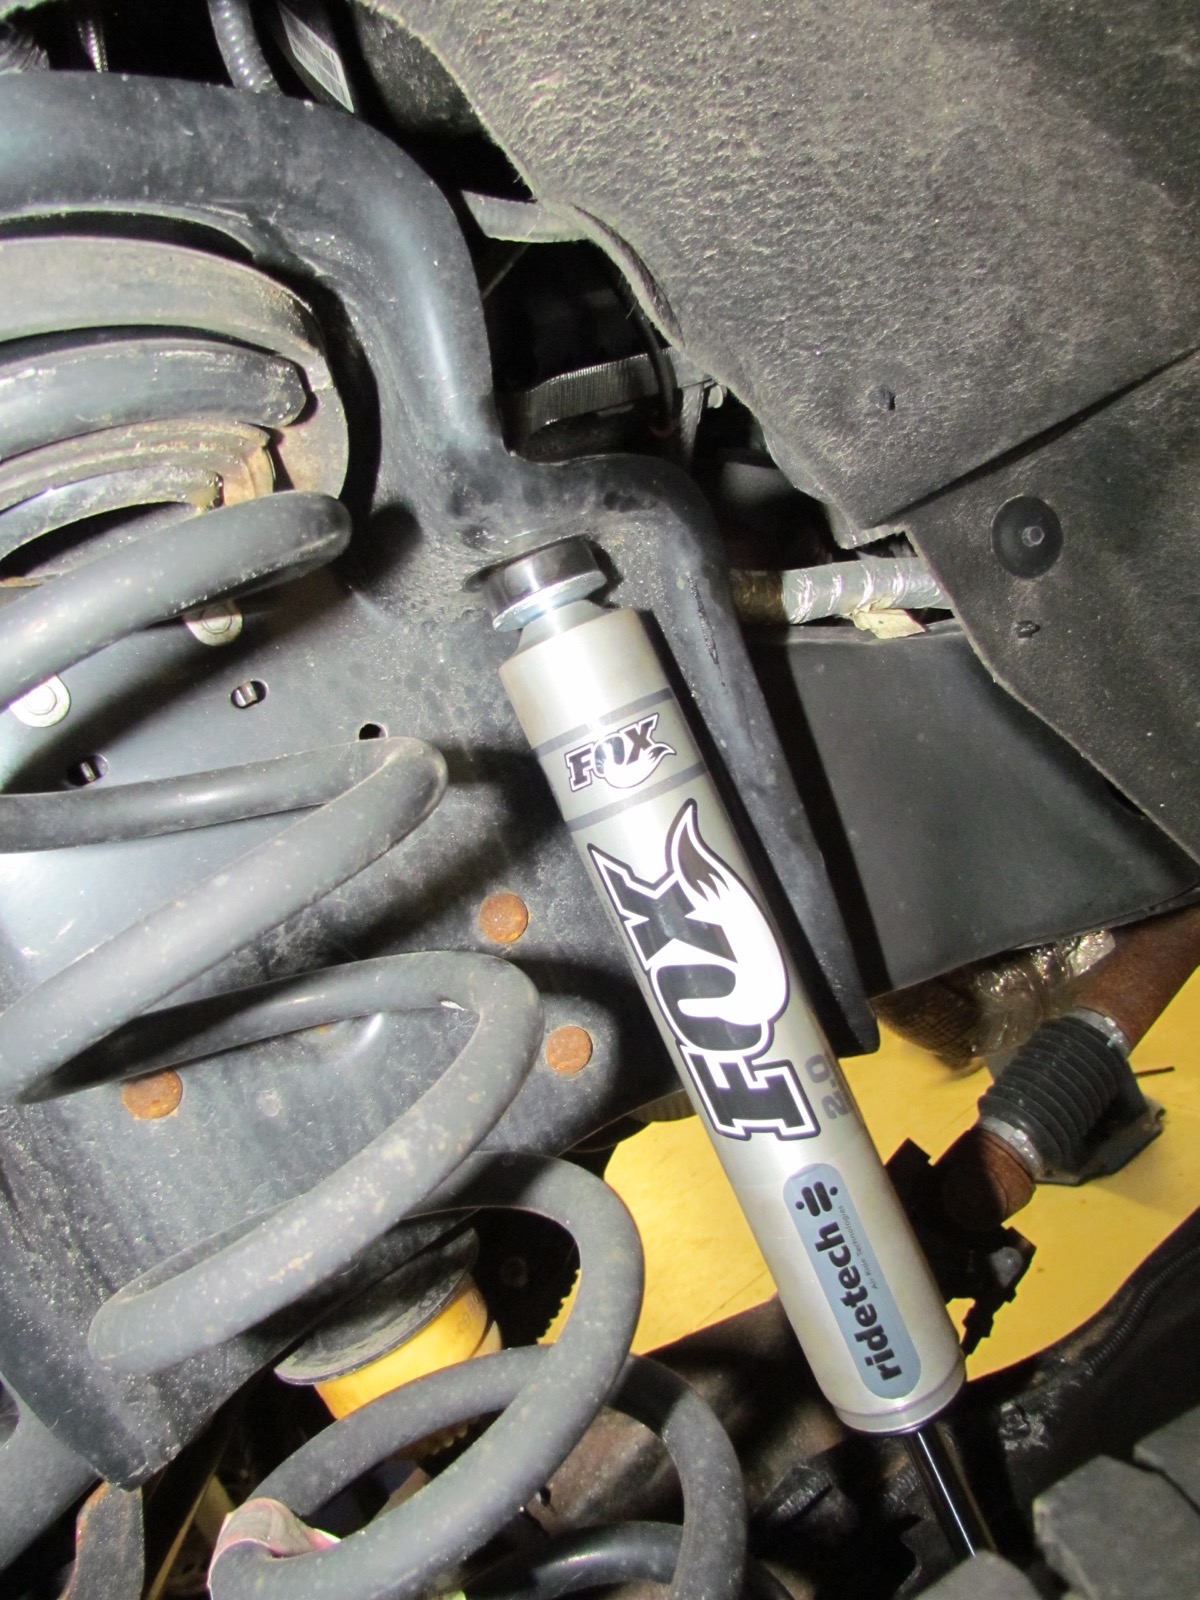
Ridetech partnered with Fox Racing on their shocks and what killer pieces they are! Beefy hardened shafts, billet eyelet ends, hardcoat anodized mono tubes and even Teflon piston wipers, who doesn’t like their pistons wiped with Teflon! But seriously, these shocks made a huge difference in the ride quality of the truck by taking away much of the bounce and unsettling bump action. And this is without the trailer hitched up, just normal driving. Bonus! Shock installation was fairly straight forward. The only hiccup was realizing we almost installed the rear shocks upside down as our first inclination was to have the shaft to the top and the body on the bottom. Wrong. Shaft goes on the bottom. This was obvious after realizing the cool Ridetech and Fox logos were upside down! Different size bushing on either end of the shock was another tell. Once we got past that, it was easy and straight forward. One side note, these are some stiff, non-adjustable mofo’s so some real effort was needed to collapse them for the install. Whew!

TESTING –
With everything installed it was time to test out the system and make any necessary adjustment. I hitched up my loaded trailer and pulled down into the driveway where I had taken the original measurements and I hit the activation button. Like magic the compressor kick on and the rear of the truck raised very slightly, maybe 3/8ths of an inch.
Loosening the four mounting screws on the sensor and giving a slight counter-clockwise twist and also trimming the linkage rod by an inch and readjusting the bottom axle bracket gave the required travel. Reactivating the switch picked the truck back up very close to its unhitched non non-sagging ride height of 42 ¾”. The Level Tow raised the truck 1 ½” back to just about level!
More tweaking of the linkage and smart sensor would yield more lift but we are going to run it this way for a while and see how it goes. Road testing the new set up there was an obvious difference in the feel of the whole rig. The front end didn’t feel light like before, it is very stable and reassuring. Bumps and potholes are taken in stride with no drama. And the tongue weight of the loaded trailer didn’t change at all, the car in the trailer did not have to be moved back or forward, that little bit of lift from the Level Tow made an already very capable tow rig even better. You should get one if you tow a heavy trailer or load your truck to the max, it makes a difference.
I have included a crappy but riveting iPhone video showing the range of motion when the Level Tow is activated…
GRIPPO – RIDETECH LEVELTOW DEMO VIDEO
Many thanks to Ridetech for a well designed and engineered product.
Check them out at – http://www.ridetech.com/
Many thanks to Rob’s Rod Shop for the help with the install.
Check them out at – http://robsrodshop.com/
And of course, they are both on Facebook!


