


When word hit the streets about MSD’s new PowerGrid ignition system we were excited like every other gearhead in the known universe. After learning how much time, sweat, and effort the men and women at MSD poured into this product we couldn’t wait to get our grubby hands on one and install it on a bad ass car to test out. We’re happy to report we’ve done just that and the PowerGrid has lived up to all the hype.
To start with, we’ll introduce our test subject.
This small-tire 1963 Nova is campaigned by Jon Sandahl on drag strips around New England. Primarily it runs in an 8.50 index class at New England Dragway in Epping, NH. The car sports a 555ci big block Chevy engine on spray. It has carried Jon to a championship or two in its day and for that reason it makes this the perfect vehicle to test the PowerGrid out on. Why? Simply because the car is a known quantity in this equation, performance differences can be attributed to the performance of the motor, vis a vis the ignition.


We were interested to see just how easy this system is to install and how user friendly it is once it was ready to use. Running an index class, like he does, Jon needs to be able to tweak and tune the car between rounds in order to keep himself tight to the number. Previously the car had an MSD 7531 box with an MSD Pro Mag controller piggy backed to it. While this combo worked, the PowerGrid was supposed to blow it out of the water with respect to speed, ease of use, and tuneability.
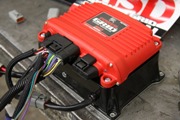
The two major parts of the PowerGrid system are (PN 7720) the Ignition Control Box (black box on the bottom) and (PN 7730) the PowerGrid system controller. We’ve seen both of these pieces retailing for a total of about 800 bucks at all the major outlets.
For compact mounting, the sysetm controller screws directly onto the ignition control box. It should be noted that the system controller will worth with all MSD legacy ignitions! You do not need to buy both pieces if you alreay have a box in your car.
Jon made up a simple mount for the passenger side footwell. This is where the PowerGrid unit would eventually be mounted. You’ll want to place the unit in an area you can access with some level of ease because you’ll need to plug in your USB cable to tune the car. Although, with the unit’s ability to save data to a micro SD card, you could just stick it anywhere so long as you could stick your micro SD card into it. That’s a nifty feature!
Here’s Jon’s mount. Note the rubber isolators on the corners.

Wth the mount…errr…mounted, we set to mounting the controller on the ignition box and soldering some pins on the provided lead wires so we could hook up our plugs from the various ignition pieces on the car. If we told you that soldering the pins on the wires was the hardest part of this whole job, you’d think we were lying, but we’re not.
MSD provides great instructions with respect to the wiring of the PowerGrid. The instructions tell what each wire on every plug powers or monitors, as well as walking the user through the programming and use of each of the many functions that this system provides.
Here’s what the PowerGrid looks like on the bench with the finish soldering still underway.


With a few minutes of soldering behind us, we moved to mount the PowerGrid into the car. This was a complicated as tightening four screws down. It took about 30 seconds. Due to Jon’s careful planning, the physical wiring of the unit was a piece of cake, and about 20 minutes after we had gotten zee Grid into the car, we were just about ready to fire this mother up.


With the physical install done, it was now time to snap the connectors together for the car’s individual systems. Again, the guidelines and direction given in the install instructions are great and include a chart to diagnose what color wires belong where.
A little contortionist act is usually required to access the under dash wiring.


Becuase the PowerGrid is compatible with CAN-Bus wiring, you can further ease the installation by using single wire CAN-bus style plugs that simply plug into a central hub strip. This negates the need for any soldering of pins and compatible plugs. If you go the CAN-bus route, your install will be even quicker than ours, which came in at right about an hour.
So, with the physical installation out of the way, it was now time for the fun, playing with the PowerGrid! The system uses the MSD developed “MSD View” software, which struck Jon as a huge advance from previous versions.
Jon had previously loaded the software onto his laptop, and in addition he loaded the parameters of his normal tune up in as well. With that in mind, when it came time for electronic tomfoolery, all we had to do was connect the USB cable from the computer to the PowerGrid, and press a single button to load all the ignition parameters into the PowerGrid. There was ZERO delay, meaning that when we clicked the button to send the info into the ignition it happened as quickly as we could push the button. No delay, nothing. It was so quick that Jon inadvertantly blurted out, “Holy f#$k!” Why is that a big deal? If you have ever thrashed to the last second in the pits at the drags, you know why it is a big deal. Every second counts.
The true tale of the tape came when Jon climbed into the driver’s seat and hit the starter button. The car fired right off. We checked the timing and everything was exactly where it should have been. At that point we turned into 10 year old kids and started playing with the buttons and features of the PowerGrid!
In these first two photos, you can see a couple of the first screens we used. The first to connect to the PowerGrid and the second to send the tune up into the ignition. We almost wish this stuff were more complicated to make ourselves feel smarter, but MSD really did a good job by making it easy for dummies like us.


Here’s an example of the tabs available to the user. Each of these tabs controls a different part of the PowerGrid’s funcationality. This screen also shows one of the neat functions, which is the ability to control individual cylinder timing. We tested this out by knocking number one back to 30 degrees with the rest of the holes at 36. It worked instantly, which was neat to watch behind the timing light.

For a guy like Jon who races on a small tire, getting the car off the starting line without roasting the tires is super important. Being able to control timing as a function of time, as opposed to RPM is the best way to do this. The PowerGrid allows the user to make these tweaks easily.
Changes can be made by moving dots around on a large grid on the screen. The parameters selected are displayed in an easy to read table on the screen. Here’s how Jon set his car up to leave.


So, as you can see, he pulls five degrees of timing out at five hundredths of a second and slowly feeds it back in until he is all in at 1.09 seconds. This takes some edge off the hit of the throttle and helps plant the tires instead of blowing them off the rims.
One of the coolest functions of the PowerGrid is known as the “safe run” function. This is something that could potentially save someone’s life. Essentially, it is a rev limiter that triggers after a certain amount of time. For example, Jon’s car runs 8.50s so he set the “safe run” at 9.0 seconds. If the throttle hung open, after nine seconds, the car will idle down to 2,000 RPM and no more. This prevents a runaway car and in the event Jon were ever knocked out, it would basically shut the car down at the top end of the track. You’ll also note the other rev limiters available for different parts of the run (burnout, etc).

We could spend hours going over the hundreds of things that the MSD PowerGrid ignition is capable of doing. We hit a few of the highlights, but there are lot of tuning options available at the tips of your fingers with this setup.
Finally, the golden question. Did it work on the track? Hell yes it did!
The very first run of the year with this car, new ignition and all, was an 8.48! That was straight off the trailer with the tune up he loaded up the day we were messing around with the car in front of his shop.
If you are a serious racer (NHRA and ADRL wins have already been recorded by PowerGrid equipped vehicles) or a street car guy who likes to really get into their motor, we can’t recommend the PowerGrid enough. The ability to get down and dirty to tweak your junk is cool as hell.
We’re going to follow up with Jon on an upcoming race weekend to see how the PowerGrid functions in the heat of battle and how Jon uses it through a typical race day.
All in all, we were really impressed with the PowerGrid and we’d have absolutely no reservations about buying one for ourselves or recommending others to do the same.


Neat. Being able to adjust timing on individual cylinders I can imagine would help get that last drop of HP if you balance them from compression testing or such.
How does it know what mode it’s in? (Burn Out, Start of Run, 9 seconds from what reference?)