


Welcome back to our coverage of Project Power Laggin’! Follow along as we take a tired 1979 Dodge W150 Power Wagon we found in Central Maine and transform it from a derelict roadside attraction to a dependable, powerful weekend workhorse that lives up to it’s given name! In this installment, we continue to make improvements to the truck, finally fix a nagging problem, and almost burn it to the ground!
It’s been a while since the ol’ Power Laggin project series got an update. Since the last installment, we celebrated two years of cool old truck ownership, but we still have a long way to go with bringing it back to its former glory. Last we left it, it was looking better, running quieter, but consuming an ungodly amount of fuel and not always running well. Also, it was getting driven more, so improvements to driveability and efficiency were at the top of the list.

Speaking of driving it more, It made its first foray into the snow this winter. Look at this majestic thing! It loves the snow! And that Fluid Film I applied did its job very well.
As far as the fixes go, let’s start with an easy one: door weatherstripping.

To replace the weatherstripping, you need the following: the weatherstripping (duh!), a knife, a screw gun or screwdriver, and your beverage of choice. It was cold out and early in the AM when I did the job, so strong coffee was prescribed for the job.

The stuff on the truck has been flapping in the breeze since I dragged it home, and I’ve more than once tripped myself up getting in and out of the truck. No more of that!

First order of business is to remove the sill plate. Yes, the carpet and truck are gross. It was the dead of winter when I did the job. Trust me, it’s not much better when it’s clean! Anyway, get your screw removal tool of choice and get that thing outta there.

Let’s check on the floors… EWWWWW… let’s pretend we didn’t see that. We’ll tackle these in a later installment.

Basically, you just rip the old garbage out, clean the pinch where the rubber resides, and press the new stuff in there. They give you a little extra, so you cut it to fit. Then, you reinstall the sill plate and check to see if the door shuts. If it’s having trouble shutting, you can tweak the seal until it fits better. The doors might take a little more effort to shut, but the seals will break in over time.

The passenger side was even worse. Most of the remaining rubber was dry and brittle, and required some wire wheel action to clean up the pinch.
With that done, it is slightly quieter while rumbling down the road. The window sweeps still need to be replaced, along with the vent window seals, but it’s an improvement!
Next up was to figure out what was going on with the heat. In the colder weather, I noticed the heater was acting weird. No matter what the dash settings were, it was like having a wood burning stove in the cab. Not only that, I would catch a whiff of coolant every once in a while, so I got down to business to examine the issue.

Well, there’s our coolant smell. The upper heater hose had a pinhole. That made for an easy fix. The bottom hose, where the heater control valve resides, wasn’t looking much better.

The heater control valve on these trucks is the definition of simple. It consists of a cable that goes to the dash which controls a valve that resides in-line with the hose. No electronic trickery here. And the problem? The cable fell out of the retainer. Heat was stuck on full blast.

That’s better. Hoses replaced, valve cable in its guide, and everything works as it should.
What else would make the truck more enjoyable to drive? How about some working, dependable brakes? Yeah, the brakes. They have been mushy since I replaced the rear lines last year, and I was never able to get a good bleed out of them. After doing some research, and watching a friend go through the same ordeal with his vintage Mopar, I turned my attention here:

The truck was still sporting its original 40+ year old master cylinder. Old master cylinders can have dried up seals, causing all sorts of downstream impacts and causing many of the issues I’ve been having. I could have gone rebuild-it-myself route, but new units are cheap enough, so I ordered up a replacement.

Only difference between the two was the cap design. It was slightly different, but the cylinder itself was identical. Before we could get this bolted on, it needed to be bench-bled.

Easiest way to bench bleed is to pick up a kit like this, clamp the cylinder into a vise, and push the cylinder in with a screwdriver until you get bubble-free flow through the lines. And an editor’s note: Dorman sells this kit which has the clips and the fittings needed to fit many different master cylinders. But why in the Car Gods’ names does this kit come with solid colored tubing? How are you supposed to see if the air bubbles are gone? For shame, Dorman.

Luckily, I keep a roll of clear tubing around for bleeding purposes, so I cut some up and used that instead.

Look, no bubbles! There are all sorts of ways to bench bleed, and everyone has a favorite, but the tried-and-true method of pumping the piston with a screwdriver always works for me. With the air out of the lines, which you can actually see with clear tubing (seriously Dorman, include clear tubing with these kits!) this was ready to install.
Luckily, someone that wasn’t the Wire Nut Bandit replaced the lines at the master cylinder at some point, so not only did they come out easily, they had actual, real flares! And remember to clean up and regrease the pushrod. This old grease was extra chunky with all sorts of debris and gunk mixed in, so it was cleaned off and replaced with fresh stuff.
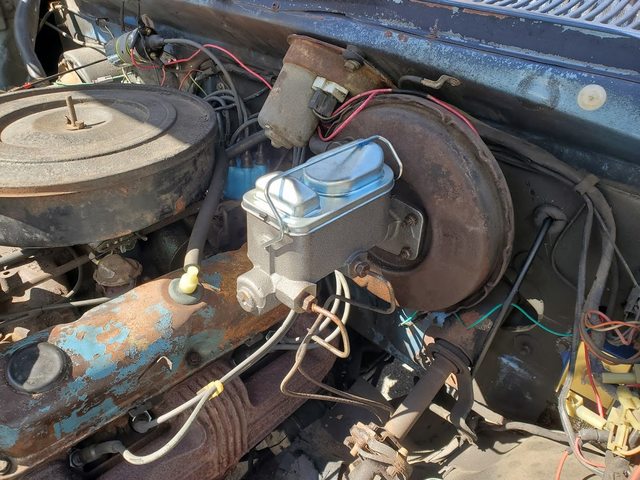
Not only does this look better, but it functions so much better than the old, leaky master cylinder. It’s nice to know that this 5000lb hunk of steel will actually stop when you hit the brakes.
So, it’s quieter and more comfortable on the inside, it stops, but there was a glaring problem still on the list: why was it so hard to get started, and why was I getting just 5mpg? I had replaced the fuel pump last summer after the original Carter pump failed from a case split after about 40 years of service. Was the new pump bad?
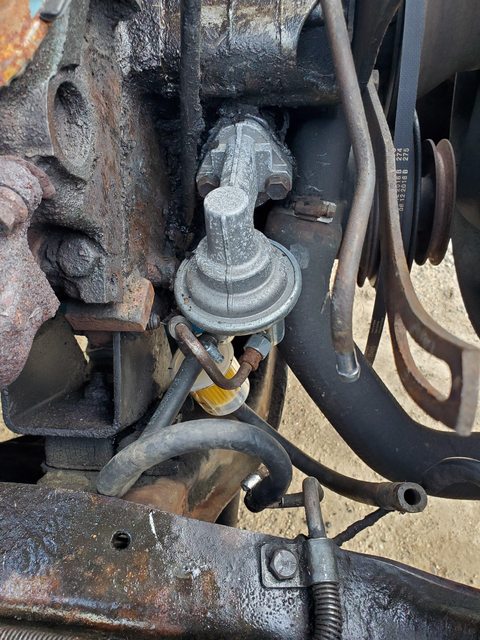
Here’s that pump that I replaced last year. At first, sitting for a week or so would cause the system to lose its prime. Then that shortened to a few days, which then shortened to overnight. Eventually, it wouldn’t start at all without a few squirts of starting fluid. I then installed a clear Wix filter to see if I was getting fuel, and nope, bone dry. So then I did the smart thing: I loaded it up with starting fluid until it lean backfired so loud that the neighbors came out of their houses thinking someone had been shot with a Howitzer. After checking to see if any parts came out for air (and checking my pants), I tried priming the pump directly with some fuel. No change. This thing was toast.

I ordered up a new Carter replacement pump. If the old one lasted 40 years, then a new one should surely work!

New pump installed, and with a turn of the key, it fired right back up. And after a few tanks of fuel, I am back up to 9mpg, and it’s creeping up higher toward double digits every time. And it runs so much better!
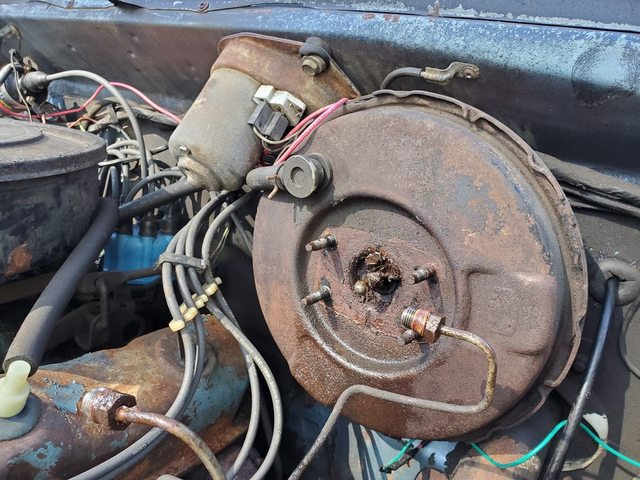
With it running much better, I drove the truck more and more. One night, my wife asked me to run an errand with her, grabbing a very large item for her work that wouldn’t fit in her car. We drove all around and even took it on the highway! Ol’ Power Laggin’ didn’t complain and got the job done and ran great! Then, on the way home, we both turned to each other and said, “I smell burning plastic”. We chalked it up to a plastic bag getting wedged under the heater box, since the smell went away when she moved the bag. The next day, I had to run an errand, and went out to the truck. I twisted the key and CLACKCKCKCKCKCKCKCKCK. Nothing. So I popped the hood to investigate, and I see this:

This….

Is….
BAD. So, that plastic bag was not the source of that burning smell after all. But what are all these wires, and what do they do? They go from near the bulkhead connector to the passenger side of the intake manifold. And why is this impacting the truck starting? Time to crack open the service manual.

After looking at the manual, I traced the harness and where it went. It first goes to the now-absent EGR timer that failed long ago. This is where I started. This gets power from a barrel connector near the bulkhead, which is tied to the ignition system.
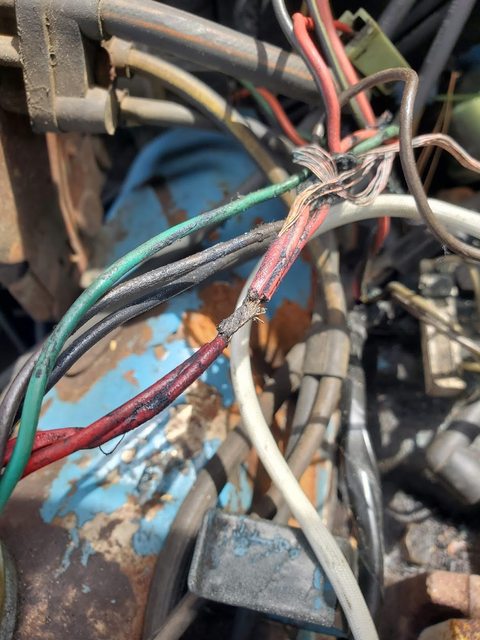
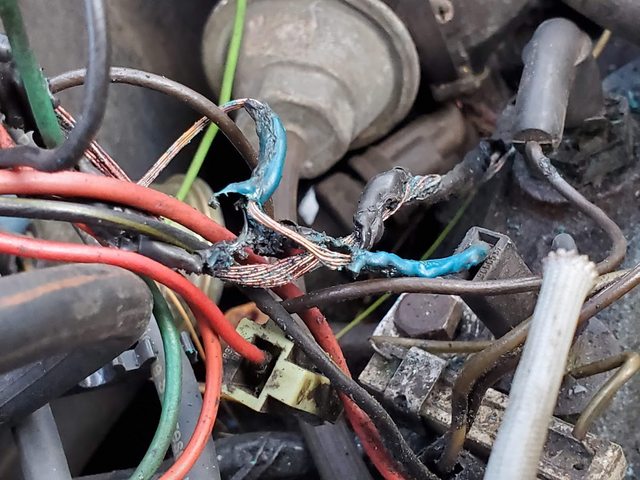
That ignition power then runs to this welded splice on the passenger side, which provides power to the oil light sending unit and the choke thermostat range switch, as well as the vacuum amplifier. The key here is that choke thermostat range switch.

I was able to disconnect and pull that entire section of harness for inspection. This is the aforementioned choke thermostat range switch assembly. There are two components: a resistor and a two-prong switch. The switch gets power from that blue wire and sends it through the wire off of the choke thermostat to ensure that the thermostat does its thing in cold weather with ignition-on power. Something somewhere went bad and back-fed the power through the power wire, causing the meltdown. But why wasn’t it starting? According to the service manual, damage to the power wire will interrupt ignition power. The solution? Removing that harness and throwing it in the trash. After doing that, the truck started just fine. And the best part: the choke somehow works BETTER now than when it was all hooked up properly! It’s still a thermostatically controlled choke, and engine heat in the choke stove will power the coil. And after the truck self-deleted that bad wiring harness, mileage and driveability has gone up a tick as well. Bonus!
So, where does that leave us now? There’s a huge list of future projects slated for the truck, with three of the biggest ones being the following:
-The front leaf springs that we bought nearly two years ago need to be installed
-The ammeter still needs to be bypassed and replaced with a more dependable voltmeter
-The floors and interior could use some help
That said, we thought it was high time to focus on the “Power” part of the truck’s name while reducing the “Laggin’”. With it driving much better than it ever has, we can finally turn our attention to some of the fun stuff. Our next few installments are going to be a blast, so stay tuned for more!


I just did the ammeter bypass in my older (1970) Dodge truck. A local speedo shop did some trickery by replacing the ammeter with a low-amp gauge and a HUGE resistor across it. Sets up a parallel circuit with most of the voltage drop (and associated current potential) being lost across the resistor. The gauge needle moves across a new graphic panel. Pretty snappy. Ain’t cheap, though. This was a factory HD gauge setup so I wanted it all to match
That’s certainly one way to fix it! We will be installing a modified voltmeter that looks “close enough” right into the cluster to replace the ammeter once we bypass it. Look for details on this in a future installment!