


We’ve been piling up the miles on Buford T Justice, our 1987 Chevy Caprice project recently. Having completed the suspension upgrade and installed the new wheels and tires, the thing is a riot to heave into the corners and scare the kids, passengers, and passers by with. That being said, there was still a nagging issue that we couldn’t get a handle on. Despite our best efforts at adjusting the steering box, having the car properly aligned, and being on top of every nut and bolt, there was still a bunch of play in the steering wheel.
After searching high and low we made the discovery that tt was coming from the one place we hadn’t looked at, the rag joint. Unlike older models, the rag joint cannot be replaced on its own in B-Body and G-Body General Motors cars from the 1980s. Instead, the rag joint needs to be replaced along with the entire collapsible steering shaft. We saw these shafts going for hundreds of dollars from most popular sources we looked at. The good news is that there’s an alternative to buying a big bucks replacement. That alternative is (of all things) a Jeep Cherokee lower steering shaft that can be had from many locations for under $100 bucks and under $50 bucks if you want to score one from the local junkyard. The install is very straight forward and so long as you have some basic tools and don’t mind getting greasy, you can knock it out in an hour or so. (BTW…if you mind getting greasy, please don’t let the door hit you in the ass on the way out).
The Jeep shaft eliminates the rag joint and uses universal joints on both ends. This was an instant win for us. The slop was immediately gone from the steering and the job requires minimal work. We will have to make a slight toe correction to get our steering wheel centered up again but having the slop totally eliminated makes that small potatoes! The other side benefit of this swap is additional room for headers. More on that tomorrow!
We’re telling you the story and showing you the job with the photos and captions below! Scroll down!

So here's an illustration of our issue. At rest, all appears good with the steering, but there's loads of slop.

Enlisting my tiny handed assistant, the wheel would move this far to the left before actually moving the front tires. Not Good.

It was even worse to the right. As cool as the car was to drive, this was making us nuts because it just felt wrong and frankly, it wasn't safe.

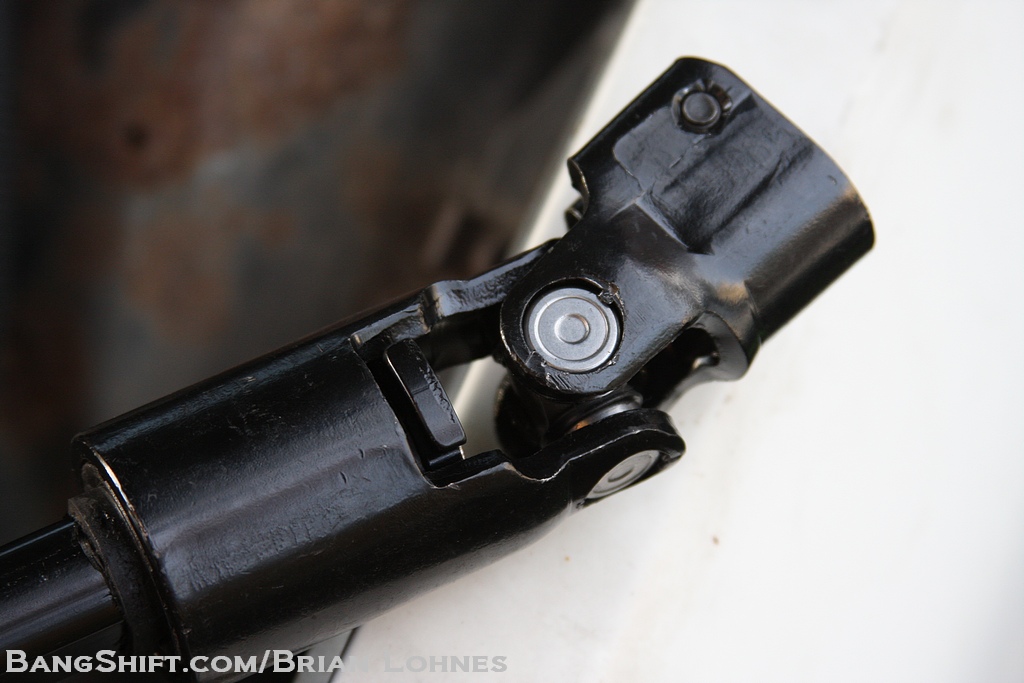
Here is the worn out, sloppy, junk steering shaft in the car. 196,000 miles of hard cop car life have not been kind to it.

Here's the source of all our troubles. This rag joint was cooked.

While the rag joint was all floppy and sad, the universal type joint at the top had been living in a world exposed to the elements due to a broken boot for what appears to have been years. This thing was pretty junked up, too.

Removing the steering shaft from the car is as easy as removing two bolts, one at the base by the steering box and one up by the firewall end of the shaft. On our Caprice, these were 13mm bolts. We used a pry bar to get behind the splined end of the shaft and compressed it enough to slide it off the steering box and then off the upper D-shaped end. You'll need to put a little muscle into it, but again, not rocket science. Both bolts need to be fully removed for the shaft to come off. Here's a shot of the wrecked rag joint.

Here is the replacement shaft that we're going to use. Some important points here. Firstly, you need to spec a shaft from a 1994 or down Jeep Cherokee. Production changes post 1994 will not allow you to use those steering shafts. Secondly, you'll need to make a very basic modification to the steering column shaft that comes through the firewall to make this all fit and we'll cover that in a minute. We initially attempted to grab a Cherokee shaft from the local junkyard. When we were there, we found a couple acceptable Jeeps but the shafts were all crusty and rusty making it virtually impossible for us to compress them for removal without beating them to smithereens and then we were questioning the wisdom of using a tired old piece on a brand new steering system. We went for option B and drove over to Crown Automotive in Canton, Massachusetts. Crown is one of the leading Jeep parts suppliers in the world and they had a shaft on the shelf. We walked out of the store with a brand new part for 80 bucks. Yes, the one from the 'yard would have probably been $25-30, but we were happy with having a brand new piece in our hands.

We're not sure who figured this deal out, but they were genius level. The splined end of the shaft is a perfect match for the Saginaw box on the Caprice and Monte Carlo.

The upper end of the shaft is a perfect match in terms of shape and size for the steering column but the one issue is that the placement of the pinch bolt. The D-shaped steering column shaft has a slight crown that won't allow the bolt to pass cleanly through to the threaded side of the clamping area, but there is a quick fix for this.

That quick fix is a little bit of a nose job to the top of that D-shaped shaft. We've seen guys use Dremel tools to do this. We used our grinder and lightly ground, test fitting until the bolt passed straight through and was able to be tightened up.

Quick tip. We used a small piece of steel and the pinch bolts at either end to spread said ends, allowing them to slide on easily. Simplyrun the pinch bolt into the threaded side of the hole and slide the small piece of steel over the hole that the bolt would be received in on the other side. Tighten the bolt down a couple of turns onto the steel place and it will force the end open a hair and allow for an easier install.

As for actually installing the shaft, its very straightforward. In getting the shaft to compress, we didn't want to smash it with hammers too hard or too many times, so we applied some heat to the area where the large and small shafts engage each other. Once we got it hot enough, some of the plastic that binds the pieces together began to ooze out and we had a far easier time of working with the shaft, using light taps to compress it.

We slid the splined end onto the steering box shaft first and secured that 12mm bolt. Then, using light taps we extended the shaft onto the D-shaped stub up by the firewall and secured that pinch bolt. It really was that easy. Our steering wheel is a little off kilter, so we'll make a couple quick tweaks to get that squared away. As we said above, the benefits of the job were felt immediately. The slop was gone and we had instant response when the wheel was moved. There's no vibration or other weirdness with the lack of a rag joint. For less than 100 bucks, this is an upgrade you can afford to do!


Wrangler YJ steering shafts work too, you just have to cut more off. I’m using a Wrangler YJ shaft in my V8 S-10 project for better exhaust manifold clearance.
Thanks for tip about spreading the spline apart. I’ve been in the biss for 40+ years and thats a new one for me. It would also work to get an old off.
Are you going to announce at the hot rod reunion at NED?
Saw this on the Monte Carlo SS site a few yrs back. Plan on putting one in my 95 Caprice with manual steering.
I did this to my Monte a few months back. I drilled a hole through the big end and through-bolted through the stub shaft of the steering column.
It’s also been on the Malibu Racing site for several years.
would this work on a 79 camaro?