(Photos by Bob Chiluk + Hot Rod Chassis and Cycle) – In our last Project Violent Valiant update we showed you the Moser rear end that was going into the car along with the Hot Rod Chassis and Cycle’s modifications to the housing and custom mounting brackets for suspension components. In this update we’re going to put all that good stuff to work as we show you the axle being mounted under the car using control arms from Hotchkis and triple adjustable coil overs from RideTech. Before we get to that though, there’s something we have to talk about first and that’s the frame rails that all of this good stuff is going to be tied to.
Kevin Tully at Hot Rod Chassis and Cycle made these rails and according to Kevin they are basically a standard style frame rail that would be used on a car being back halfed or having big time rear suspension surgery of some kind. Using a big MittlerBrothers bender, the time to form the rails was only a few hours. We’d have thought there was a ton of time into crafting nice pieces like this but Kevin said that he has done lots of them over the years. The ultra important part of this process is actually making sure that everything is straight and measured out correctly. Minor mistakes with straightness or sloppy measuring will lead to disastrous results on the street and track. Ask any chassis builder and they will tell you stories of customers bringing cars in to be gone over and thing will be out of square or worse and the cars simply don’t work right. That’s the truth on a straightliner or a pro touring machine like the Valiant.
Using CAD modeling on the computer, Kevin calculated where the suspension pickup points needed to be placed to maximize grip and acceleration out of the corners as well as to provide great grip while in those corners. This isn’t a “stab it in there” kind of deal. The science and math is being done to make sure that the Valiant is right the first time. This will be the fourth generation of HRCC suspension. Kevin is calling it the MK IV design and there are some neat improvements over the MK III system he had employed in the past.
The rear end is attached to the chassis using Hochkis GM A-Body lower control arms and modified Hotchkis Fox-body Mustang upper A-Arms. Those pieces are holding things square while a set of RideTech triple adjustable coil over shocks with remote reservoirs and HyperCo springs provide the proverbial “brains” of the operation and manage the axle movement. Tully will soon be fabricating the rear sway bar, but you won’t see it in these photos. That’ll be coming soon.
So now that we have laid out the plan, let’s take a look to see how it all turned out. We’ll be telling the rest of the story through photos and captions!
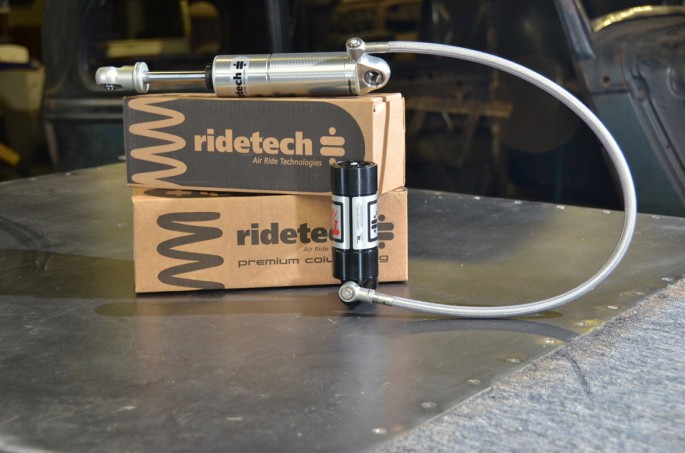
We’ll start with the “brains” of the handling operation. This is one of RideTech’s killer TQ (Track Quality) triple adjustable coil-over shocks. There will obviously be a pair of them controlling the movement of the rear axle. What makes them “triple adjustable” and why is that cool? Like all things, the most control and tunability a racer has, the better he can make his car work. These shocks feature a single rebound adjustment and two compressions adjustments. Both high and low speed compression can be tweaked which is important because they represent different situations that the car will encounter on the track. Note the remote reservoir and the 30″ braided line which allows for lots of flexibility in mounting the unit to the car. Kevin said that he considers these babies to be the best in the business and he’s excited to get on the autocross and track to use them.

With brains we need brawn and that’s coming from the peep at Hotchkis. Tully decided to use the company’s upper and lower control arms and they’re normal applications may surprise you. These are actually intended for a Fox-body Ford Mustang. Now, as you will see in photos down the page, Tully modified them from this stock configuration but the major anchoring points are the same and that’s what make these guys so good…and the adjustability.
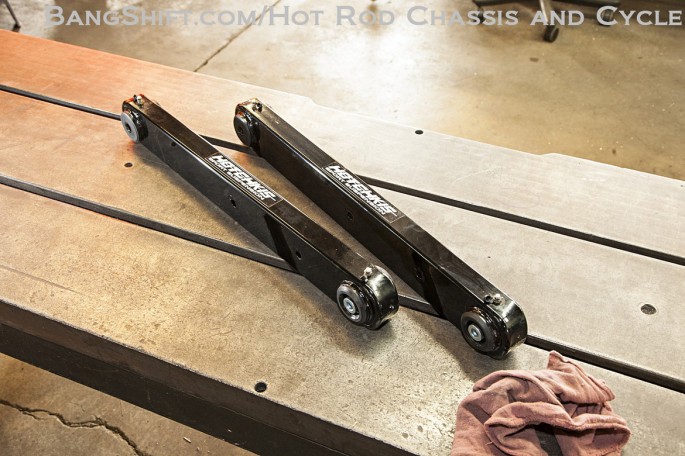
The lower control arms are also from an interesting application, A-Body GM cars like Chevelles are where these things would normally be found. As you’ll see they are perfect for the dimensions of this build and their quality is unassailable. Kevin modified the upper arms as to have equal length control arms top and bottom.

Making sure the rear end was 100% centered in the wheel well before going ahead, Kevin took his measurements and set forth on getting this axle attached to the car.
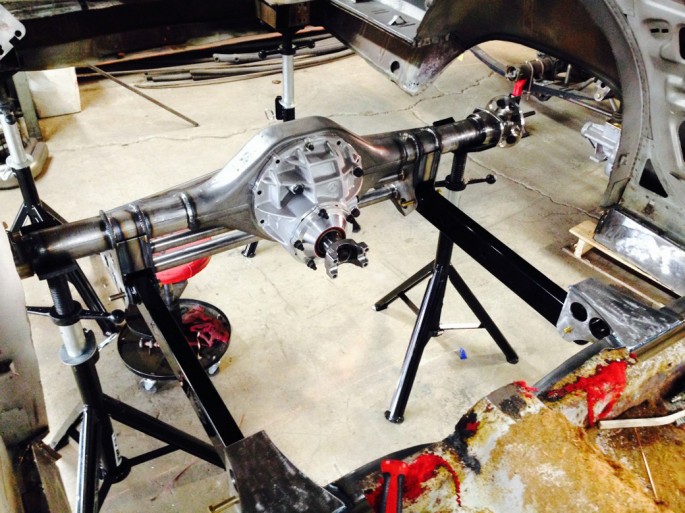
In this photo you can see the Hotchkis lower control arms attached to the new mounts on the car and the bottom of the rear axle.

In this photo you can see one of the frame rails that HRCC made for the back of the car. Dig the lightened up fuel cell mounting bar in the background.
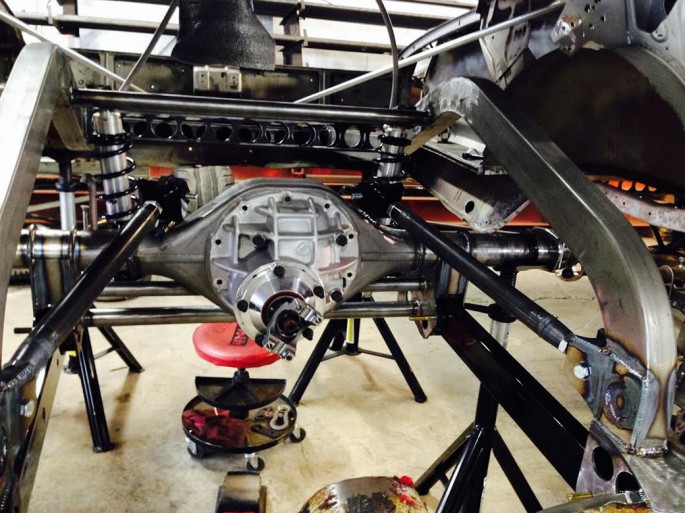
In this photo you can see the modified Hotchkis upper control arms and their mounting point on the frame rails. The pickup points were calculated using CAD programming and this is the 4th generation of the HRCC suspension…the best yet. You can also see the RideTech shocks. We asked Tully about the spring rate and he explained to us that the springs on there now may not be the ones that the car ends up using. Once completed the car will be scaled and the math will be done to dial in the correct spring rate. That process in addition to driving the snot out of it will best determine what springs are on it.
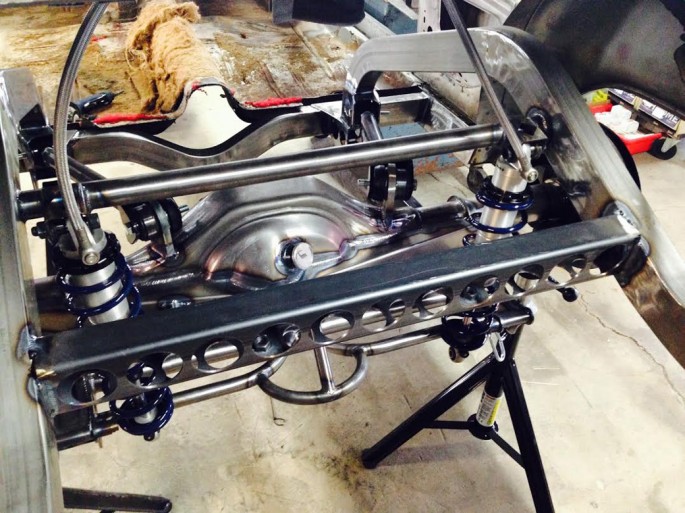
Here’s a peek from the rear of the whole setup. Pretty cool that everything outside of the shocks, center section, axle tubes, and lower control arms was fabricated in house at HRCC.

That is it for now and we’ll be back soon with another update. There’s obviously a ton of work to do and Kevin is flying through lots of it. Stay tuned…this thing is starting to turn into a car!


So the only part of this car that is a Valient is the part that carries the paint? I thought this was going to be cool. It’s not.
“So the only part of this car that is a Valient is the part that carries the paint? ”
That’s probably a good thing. What do you want, a 7-1/4″ rear, 3 on the tree and a slant 6?
impressive. This subject applies to many machines, rally cars may even be more tortured repscting oem parts. Nice stuff. I like following this one. The measuring is actually the hardest part.
Looking forward to seeing it in person.
I LIKE IT ! KEEP IT UP GUYS! YOU Doing everything RIGHT ! ” Dont let anyone influence you, if that’s what you gota do then do it !” R . Denaro , Ragging Bull
I wish they’d do this to my 66 Dart. They could call it the “Dangerous Dart”!
Give us a call Charlie A.!!!
Badass.!! We have a 66 vali! Been a Long term project. Love seeing these A bodies get attention.
wow you back halfed it and used GM parts I am sure the frontend will be gm too maybe you should just run a lsx you will make better reliable power lol
At least it’s not sitting in a field rusting. LS is definitely reliably SLOW. But better than a slant 6 – don’t b a dick. DICK.
GM parts? You mean the lower control arms? Yep. And the uppers are Ford, and the Axle is Ford, and the MOTOR is MoPar all aluminum stroked 440. Perhaps you’d prefer I use a 318 Poly? The brakes are 2010 Dodge Charger Police Pursuit brakes, etc. etc.
Awesome build – HotRodChassis – I can’t wait to see the next set of pics – my ’88 S10 looked like that for long enough, When my project was at that point, I couldn’t wait to get the next shipment of parts to get her on all 4’s – I bet the owner is ready to see how she sits on the tires!
You should use GM spindles up front that would complete this build nicely
As I commented earlier – one killer build ! Love it. We are an all MOPAR family !! So many postings seem hung up on “GM this ” “Ford that” ! You were evidently afflicted with a serious case of SMALCOX when you were young! . Stop your bitching and go build something cool ! Like this build. More pix soon please!