


Sometimes it’s the little things can be intimidating when building your hot rod, and window seals and weather stripping seem to be one of those projects that people dread. The truth is they are pretty easy, and a perfect Quick Tech project for you to concour on a Saturday morning. In this BangShift Quick Tech story, BangShift.com Contributor, Scott Liggett installs a set of window seals in his 1970 Caprice and gives you the scoop on how to make it a quick, and painless, installation that will make your muscle car more enjoyable to drive. Door and trunk weatherstripping installation is just as quick and easy so don’t let them slow you down either.
Just to clarify, window seals are the ones that follow around the A pillar, roof and B pillar of your car, and some people call them roof rail weatherstrips. They are also the seals that deteriorate faster than the others around your windows and doors simply because they are in direct sunlight. We are also surprised to hear that so many bangshifters out there are skittish about tackling this project. So we are hoping to show you how easy it is, and that you can get this project done in less than a couple of hours. No special tools are needed for this one either. Just a screw driver, a small wire brush, and some black silicone sealer. They are available for many makes and models through such suppliers as Soff Seal, Steel Rubber Products, Year One, OPG, Classic Industries, and many more. We got our seals for the Caprice from a local vendor at the Long Beach Swap Meet.
The window seals on our Caprice were rock hard, cracking and literally falling apart in chunks. A new piece would fall out every time we slammed the door and the windows leaked badly and whistled at speed.

A slight tug and most of the old, hard seal came out. The good news is GM didn’t use very much sealant on these so there isn’t a ton of goop scraping involved. On the roof of the car you can see all the tools we used on this project. We went crazy and bought a new caulking gun to go with our tube of sealant. You can buy a simple, small tube and be just fine as well. Tech Tip: Llay the new seal out in the sun to warm it up as this will help straighten it out and make installation easier.

This close up of the seal channel shows what needs to be cleaned out, especially in the grooves on both sides of the channel and in the corners. This is critical in order to get the best adhesion. This is where the small wire brush and screw driver come in handy. Don’t worry, it won’t take long to clean them.

The front of the seal is held in by two of these plastic push type clips. The new seal came with them. Also, the white stuff is old sealant that needs to get cleaned off.

On the Caprice, there is a separate seal that goes up the B pillar window channel. On many other cars, the seal follows down to the waste line of the car. Check this out before you start ripping out your seals.

After cleaning the seal channel, we grabbed the silicone sealer.

Apply a thin bead of sealant in the channel. Don’t go overboard on the sealant because all it will do is make a mess. The two grooves in the channel are what actually hold the seal in place. The sealer just helps it stick and ensures it is water tight. Start at the front with the two push pins, then start working the seal into the channel by pushing it into one groove first.

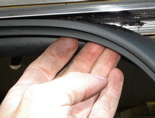
Next, you’ll have to work the front of the seal into the other groove. Be patient at this point and be careful so not to tear or cut the seal. We used our thumb, but if you are really careful you can use the flat edge of the screwdriver. Remember, the new seal will be super soft and easy to tear. Be careful and you’ll be fine.

If you do this right, you will have excess at the end that will need to be trimmed. Remember, you do not want to stretch the seal as you install it, or bunch it up. Either one will result in a seal that doesn’t want to stay put or that will shrink up and no longer seal on the end. Let the seal remain relaxed, it will go in smooth and fit just right.

This is what it will look like when you are all done. Roll up the windows and close the doors to make sure everything seals up nicely. If you are happy with the fit, leave the windows up because they will hold the seal in place while the sealant dries. Wipe off the excess sealant that squeezed out and vacuum up the mess you made from the old seal and your done. It’s a good idea to let the sealant dry for a few hours, so hit the showers, sit down and watch your favorite car shows, and then you’ll be ready to cruise to your local burger joint for cruise night.
Window seals are a simple, cheap and easy way to make your car more fun to drive so do yours this weekend!


Love the club on the steering wheel.