


(Words and Photos by Matt Graves) Hot Rodding, at it’s core, is basically upgrading old stuff with bigger and faster stuff. Sometimes this means embracing new technology with some of us kicking and screaming all the way down. That’s hot rodding. Some people are now connoisseurs of vintage hot rod engines and parts…which is great. They love traditional hot rodding engines such as vintage Hemis and Nailhead Buicks with multi carbs or some rare vintage intake. Much like the hipster retro tech such as vinyl records or old gaming consoles. The same thing is happening in our hobby. Online arguments break out over the use of “new” parts or period correct speed parts. No doubt those vintage engines and parts are super cool..But lets be honest some of these engines can benefit from new technology for power production and most importantly- safety.
One of these areas that has vastly improved in the world of hot rodding are fuel systems. Just a mere 6-7 years ago putting a fuel pump in an old gas tank was unheard of. The systems that were out there worked but some of them were down right crude. Modern EFI has changed the game exponentially, Now a full EFI kit is nearly under a grand and you can install it on Saturday morning and be at the car show that night. That’s IF you have a good fuel delivery system. On most of these systems the fuel pump is a small inline pump that works very hard to pull fuel out of the old tank. They have to be gravity fed from the original tank. Sometimes they work sometimes they don’t. We have all had those issues. However we are going to show you how easy these new fuel systems are to use. And we are going blow your mind that the system we are installing is not for EFI but for a vintage dual carb Hemi…..
Our victim is a 1966 Dodge D100. This truck was originally a California oval track pusher truck. My friend bought it in mind with keeping the vintage look and feel, but even the purchase wasn’t without drama. (READ HOW JON PURCHASED THIS TRUCK WHILE HIS WIFE WAS IN LABOR!!! THE STORY IS AT THE END OF THE TECH PORTION.) The truck had a slant 6 so that had to go. He had a 1959 Chrysler Marine 392 Hemi laying around and had it freshened up. But he wanted to keep it looking period correct. So he installed Edelbrock dual carbs and had the engine tuned up to run perfect with the carbs. One problem reared its head. The stock gas tank behind the seat could not keep the electric low pressure fuel pump fed with fuel. So the truck would cut out and die all the time. We swapped pumps but no luck. At that point we decided to ditch the giant load of flammable gas behind the seat in the cab to more modern tank in under the bed.
After some research we discovered the K5 Blazer tank was a popular swap on older trucks. The compact tank fit nicely under the bed and we could run the filler neck out to the step side fender. Now we needed a fuel pump solution. Most carburetor fuel systems are usually a mechanical pump or an inline style pump. Since carbs do not need high pressure most of these work but if your tank does not have a good gravity feed none of these will work right. So we found the perfect solution for it from Aeromotive.
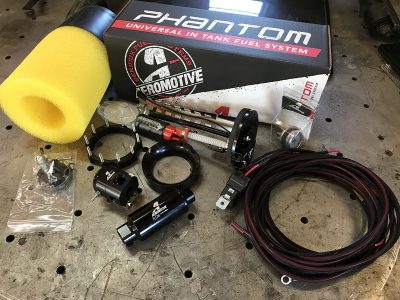
Aeromotive is well known for fuel delivery. Everything from carbs to EFI to hard core drag racing alcohol systems. Their Phantom Carbureted Fuel System is a complete in tank low pressure regulated fuel delivery kit. We went with the Phantom 200 Kit. They include all the main fuel system components required to build a proper carbureted fuel system, including the baffled fuel pump kit with 200 liter per hour pump. It comes with a proper lower pressure carbureted bypass fuel pressure regulator, high flow billet fuel filter, filter mounting bracket, plus all the required port fittings and o-rings, the deluxe wiring kit and fuel pressure gauge.
This kit is perfect for naturally aspirated and blown, carbureted engines producing from 300-900 plus flywheel horsepower. Our engine is probably around 400hp so its perfect. Follow along as we show you how to install it.
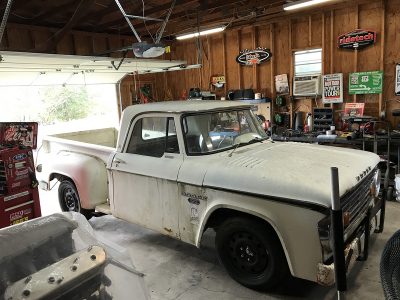
Our 1966 Dodge D100 with a cool vintage 392 Hemi that weighs a TON.
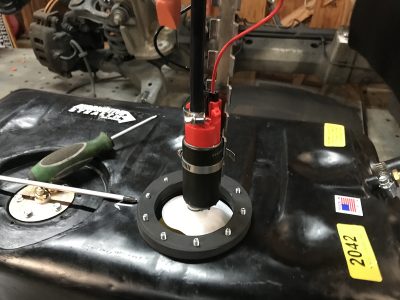
This full kit has the foam baffle insert which is critical for older un-baffled gas tanks. Later model cars have baffles in the tank to keep the in tank pumps submerged in fuel during cornering. This foam bladder encases the in tank pump assembly for constant fuel feed.

We picked up this new plastic K5 Blazer tank. Holds 15 gallons and is very compact. This is a popular swap on old trucks to replace the behind the seat tank.

The only special tool you may to buy or borrow is a 3.5” hole saw. Since our tank is plastic it will make quick work of it. If your tank is steel. Take your time. These big hole saws can take you for a ride.
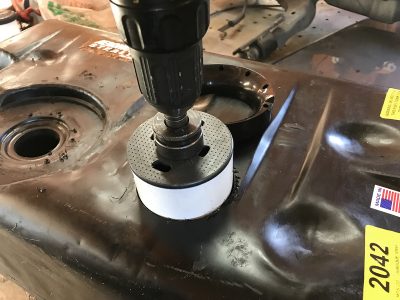
We found a good spot on the tank for the pump assembly to go. Still leaves plenty of room for he sending until for the fuel gauge. Make sure to check the clearances in the tank. Also shop vac the tank out for drill shavings. The big 3.5” hole makes that easy.
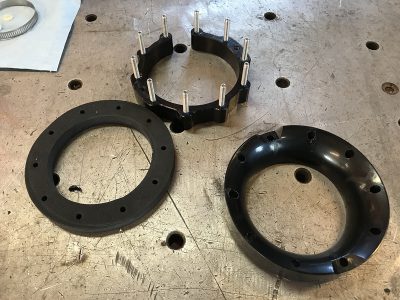
Here is the cool trick to this kit. This drill guide helps get all the holes for the studded flange perfectly lined up.
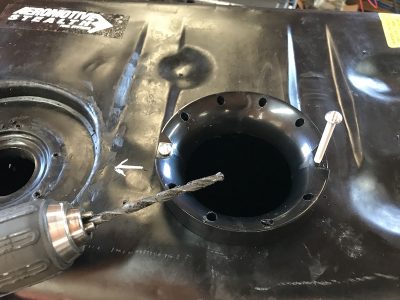
The drill guide sits in the new hole in the tank. Drill two holes across from each other with the correct size bit. Then using the supplied bolts in place to keep it lined up, drill out all the holes.
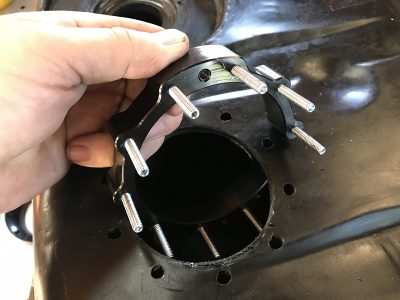

Fish the billet flange in the hole using the open end to get it in the tank. Once in pull it up through the holes.
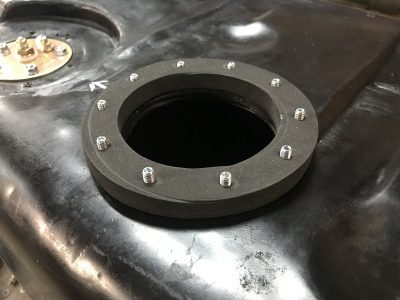
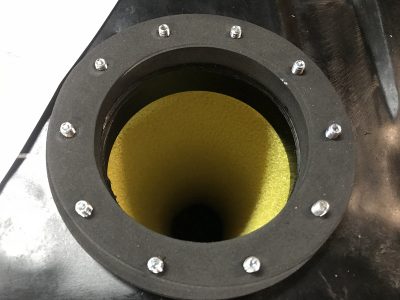
Now install the foam gasket and twist up the yellow foam baffle and stuff it into the hole. You have to make a measurement of the depth of the tank first then trim the baffle with a knife to the correct depth. A serrated kitchen knife works great for this. Remember this is the baffle for the pump so make sure all the depth measurements are right for the baffle and your pump assembly.

Assemble the pump assembly per the instructions. Its pretty straight forward but make sure you set your depth right. You will have to trim the plastic hose for the pump. Our pump bracket was the right depth but we had to move the pump up a little therefore requiring us to trim the black hose. Use a razor for this. Makes a clean cut. Clamp it all down and hook up the wiring.
Do not forget the pump screen!

Tight down the billet flange of the assembly and make sure you have the orientation for fuel lines where you want them. Remember this system has a regulator and a return line line much like an EFI fuel system.

We mounted our new tank under the bed floor (soon to be new wood floor) Running our filler neck out to the step side fender. We ran the new push lock AN lines to the supplied billet fuel filter up to the new billet regulator on the fire wall. Don’t forget the return line.

We mounted our new billet regulator to the fire wall to feed the distribution block for the dual carbs. This regulator has a vacuum port for boosted reference if running forced induction. It also has a gauge port.

Here is the completed regulator and fuel line plumbing. All we need to do now is upgrade the gauge with the supplied Aeromotive liquid filled pressure gauge. We should have no problem keeping this thing fed with fuel now and mostly importantly keeping it much safer.
Here’s the story of just how this truck came to be, and some of Jon’s adventures in getting it.
Nov 16, 2011, 9:41am
James,
My wife and I are at the hospital today, delivering our second child.
I am going to ask <a guy> from Philadelphia, TN if he will work
with you to transact the deal.
<Jon’s Guy>, the sale price is <sale price>. You can get the funds from me today and
transfer to James? Please ship vehicle to your shop. Funds are
available today.
Please ‘reply to all’ if this is Ok for both of you
Thanks,
Jon
Above is the actual (some aspects redacted) email where I agreed to buy the truck. I sent the email from the hospital room where… a few minutes later, I helped my wife deliver our son. I guess this email tells the tale of probably the first in a now never-ending series of “things I didn’t know” around having a baby, being a dad and a husband. The first thing I didn’t know is that I was supposed to help with the delivery. Had I known, you can bet I would not have been sending emails. Maybe this truck never would have happened? Other stuff I didn’t know: the seller didn’t have a title. That was fun.
Scrolling through the email chain, it shows the multiple discussion threads I had going about this vehicle. This was 2011-me, so I guess I had different ideas then. Things I didn’t know was that projects change and evolve (unless you are full-time on them). In that email thread, stuff like “metalflake” and “Kustom” popped up. 2011-me got renderings made. I was gonna have a Kustom grille made and stuff. My 2011 pals dished out some harsh commentary on the deal. This was by people who, let’s say…liked one of my earlier trucks better and didn’t think I should be getting a nearly identical version; one model year newer. My squad still was nursing some wounds. What I didn’t know is that they weren’t really wrong.
Why is this truck such a deep deal? It would be simple enough to say it’s based on the origins… the birthing room of my son, John. He’s an incredible kid and I got to find out that I’m not a horrible dad. That would be enough, but it didn’t stop there. What I didn’t know in 2011 is how great it is to build a truck with your friends. There’s been a bunch of mods made on this truck that happened just because people I trust deeply said “you should do it like this.” Part of me stopped making it just about what I wanted.
Most of this is virtual, FB IM-collaborations and LOLZ but… it is an excuse for me to journey down to TN and wrench with a garagefull of ‘em. When I was 19, this was no big deal but our hobby is about the people you meet.
Stuff I had to do to make this truck happen:
- Stumble around an abandoned body shop in Detroit. No electricity. No heat. Trying to liberate a vehicle which was sort of an ingredient in the material flow that would end up making labor happen on down the line. A totaled vehicle had parts that were still in demand. It had to be yanked then pushed (by my daily driver) across the ghetto to a waiting ramp truck. You can’t leave doors open and cars running while this is going on, otherwise stuff disappears. Where did the ramp truck come into the picture?
- Travel to remote reaches of Westernmost Washington State. Live in a barn. Remove dead rats and rat aroma from a godawful 1970 Dodge D300 car hauler. Piece the thing back together. Fight the roached-out steering box up and down mountain passes. Catch the leaking rainwater pouring down from holes in the roof of the cab. Be totally surprised by northern lights at 2am barreling across the Dakotas. Re-learn that pal Willy and his wife are among the finest humans still trodding sod. Eat fried chicken on the hood.
- Yesssssss….I drove a ratted-out car hauler across the country. Olympic Peninsula to the Mitten (SE Michigan). This is so I could move stuff back and forth to TN where the D100 was being built. Stuff that had been living, no…embedded, in the ghetto. Up-cycling.
- One of the trips with the ramp truck involved a 1952 Willys, all the heavy-ass pieces of a 1958 392 Hemi and a bunch of Slant Six speed parts. That thing could haul anything.
- Another TN trip, I hauled a Jeep Wagoneer through the hills and hollers of rural Kentucky where big trucks with drum brakes simply should not venture out of PARK.
- And, finally. I got to use the ramp truck to bring that D100 to Matt’s house.


Frigg’n Mopar ,Yeah baby!!!