


Nearly every automatic transmission has some kind of kick down apparatus and they are all different. TH350s use a cable connected to the carb linkage, 700R4’s use TV cable, Ford C’4’s have a rod, and Chrylser’s Torqueflite used a cable as well. But, GM’s TH400 uses a combination of vacuum line at low speeds and an electric switch at speeds above 30 mph. We are going to try to take some of the mystery and scariness out of fixing the kickdown switch on our 1970 Caprice with it’s 454 and TH400. We’ve had this car for nearly a decade and it’s never worked. We haven’t even had the switch connected most of that time.
Originally, our Caprice’s LS4 454 came with a Quadrajet carb and the kickdown switch was on a bracket on the driver’s side rear of the carb behind the linkage. There was a pad on the QJet’s linkage that hit a push button on the switch when you got the throttle wide open. This switch has a wire going down to the transmission to a detent solenoid inside the transmission that caused the transmission to drop down a gear below 70 mph. We took off the QJet carb almost immediately after we bought the car, replacing it with a Holley carb. We then tried bending the switches bracket in order to use it with the Holley carb, but turned out to be futile because the Holley’s linkage didn’t have the right pad on it, and the switch didn’t work anyways.


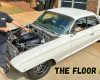
This is the kick down switch and it’s bracket that came on our Caprice when we bought the car. We dug out the original intake, Q Jet and switch with it’s bracket; then put them together again so you can see how they were on a stock big block.

If you are still running a Q Jet carb and have the original switch that functions, you’re in luck. You can skip down to wiring part of this article. If you have modified your engine, or your switch is not functioning, or just plain missing; you’ll need to get a switch kit from B&M, or Lokar. We used B&M’s part #20297 we ordered from Summit cost $46.50. We liked it’s small size and it’s ease of adjustability.

First thing you’ll need is a bracket to mount it. There you have several choices. B&M designed this kit for car owners who are replacing a TH350 with a TH400. The instructions say you should reuse the TH350 kickdown cable bracket. If you don’t have one’ you can get a universal kick down cable bracket from Holley, TransDapt, Spectre, and many others; or make your own. We found a TH350 kickdown bracket for a small block Chevy that was lying in our spare parts bin. We cut it in half because the two bolt set up wouldn’t fit our big block’s intake. Assemble the switch, spring, cable, and carb linkage as shown in the picture. We’ll get to the adjustment in a minute.

Wiring the switch is really simple. It’s just two wires. One wire needs to be hot when the ignition is in the on position. If you can’t find a wire to use under the hood, then you’ll need to run one from the fuse block is IGN terminal. We used this wire with a plug that was just dangling there unused. We even had a wire with the matching plug in our wiring supply box that plugged right in. The other end of that wire is connected to one terminal on the switch. It doesn’t matter which terminal.

The other wire is connected to the other terminal on the switch and run down to the driver’s side of the transmission. Some TH400’s have two terminals on the side of the trans, you need to use the vertical terminal only. Our car still had the original orange wire that was amazingly not melted to the exhaust pipe, so we reused it.

If you still have the original downshift switch on your engine like this one, you only need to wire up two of these terminals. You want the wire from an ignition hot source connected to the IGN terminal. The SOL terminal needs the wire which goes to the vertical spade on the side of the transmission. See, there are advantages of keeping your car stock.

Back to the B&M switch, you need to adjust the switch to activate at 90% throttle. Turn the ignition to the on position and pull open the throttle. The switch activates as soon as the pole is starts to pull out of the switch. The cable runs through the cable stop at the end of spring, and continues inside of the spring. Just loosen the small screw in the cable stop to move the cable in or out to the desired position. Use a test light to see that switch is activating at the desired throttle position. We adjusted ours to work when the Holley’s secondaries started to open.


At this point, we test drove the car check to see if our switch worked. The switch was working, but the trans still wasn’t downshifting. AT this point, we decided to seek advice from someone who has more knowledge than us in this area. We stopped by Culver City Transmission to see the owner, Rick, and asked his opinion. He’s a great guy and very helpful and told us that the detent solenoid was probably the culprit and needed to be replaced. You mean open up the transmission in the car, we asked? Rick said it was no problem and we’d have no problem changing it out. Many of us bang shifters are ok tearing apart engines, rebuilding suspensions, welding this and that; but when it comes to messing around inside an automatic transmission, we turn into jelly. We found out how easy this was.
First, we needed to get a new detent solenoid, so we headed down to ASTP Trans Parts in Los Angeles and they stocked a new one for $10 bucks. We also got five quarts of Dextron trans fluid. If you haven’t changed the filter or pan gasket in a million years, this is a good time to get those too. Their real cheap too.
Our TH400’s pan doesn’t have a drain plug, so in order to reduce the mess and hot tranny fluid in our hair and face, we remove 11 of the 13 bolts holding the pan on. The front two bolts were left in place, then with the drain pan under the trans slowly loosen the last two bolts and the fluid will drain off the rear lip of the pan in an orderly manner, reducing the mess.


After the pan is off, the first thing you see is the filter. Just one bolt holds it on. Be careful there is still plenty of red hot fluid in the filter to make a big mess. Also, be careful when pulling the filter off it’s feed tube.

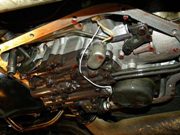
With the filter out of the way, you can see the two wires going from the side of the trans to two switches. The detent solenoid is the one that has a cover on it on the driver’s side of the transmission. The other wire goes to a pressure switch that according to our 1970 Chevrolet Factory Service Manual cuts off the vacuum advance in all but third gear. We aren’t going to bother with that. There are the two bolts that hold the detent solenoid. Be careful unplugging the wire from the plug inside of the trans. Also, do not lose the metal gasket under it as you will be reusing it.


Yes, there was a design change of the detent solenoid over the last forty years. The function hasn’t changed. In the foreground is the metal gasket that will be reused.

Once you have the new switch bolted in and the wire connected, turn the ignition to the on position and activate the switch on the linkage. The detent solenoid clicks loud enough to hear it. After you confirm everything is functioning correctly, replace the filter, the pan, and refill the transmission with fluid.

Now is the time for the fun part of the fix, the road test. Take the car up above 35 mph and cruise at that speed in third gear, then mash the gas pedal. The transmission should down shift and the car roars down the road. Success!! Double check the transmission fluid level and you’re finished. We take no responsibility for any tickets you get while testing this over and over.


Thanks. My 71 GMC yard waste hauler will benefit from this