


What’s an SMAV you ask? Well it’s the nickname BangShift Contributor Scott Liggett gave to Jim’s 1957 Suburban project. What does it mean? Soccer Mom Assault Vehicle. With 454 cubic inches of fuel sucking Big Block Chevy under the hood, this thing will scare the yoga pants off of every Grand Caravan driving soccer mom in town, and leave them shaking their fists and screaming something about the environment. COOL! Totally BangShift Approved.
IF YOU READ PART ONE OF THIS PROJECT CAR SPOTLIGHT, CLICK THIS LINK TO SKIP AHEAD TO PART 2. IF YOU DID NOT READ PART ONE, THEN KEEP READING.
PART I: THERE IS JUST SO MUCH SANDING TO DO
The story behind Jim, aka Squirrel on the BangShift.com Forums, and his 1957 Chevy Suburban project is that he bought this thing for $1000 in 1998 in Globe, Arizona. As is always the case when you get a new project, Jim started working on it hot and heavy starting with the chassis. He took another chassis he had lying around and clipped it with a 1972 Camaro subframe. He set it up to run a 454 and Turbo 400 combo along with a 9″ Ford rear that has been mounted on top of relocated stock leaf springs.
At the same time Jim took the entire body apart and blasted it before taking care of the sheetmetal in the floor and lower areas of the truck. He also handled a few sheetmetal issues on the roof, but excitement over the project started to fade. That’s when things slowed down a lot, and although Jim did some bodywork to the truck over the years it has mostly been stagnant.
Editor’s Note: We have used Jim’s words as much as possible to tell what he’s done to the Suburban. All of Jim’s words are in quotes as captions for the photos.

Note the look in November 2011. We’ll call this “before”.

Note the widened stock wheel tubs thanks to relocated springs out back.
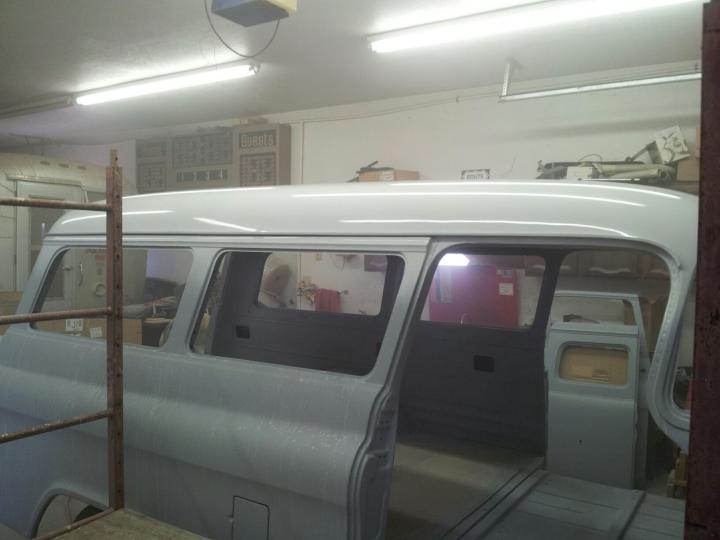
In November of 2011 Jim decided to get the old Sub out of mothballs and started making repairs to things like the door hing mounting plates, front sheetmetal mounting locations, and screwed up spot welds on the firewall and cowl. He was also contemplating the insane amount of sanding he had left on this big bastard, and he was only talking about the INSIDE! In fact at the time Jim wrote “Work on the wheel tubs is progressing. There’s a LOT of sanding still to do on this thing, the interior is like painting the whole outside of a normal car. The outside of this thing is huge, like the outside of two or three normal cars.”

Lots and lots to sand.
Hit PAUSE………..For 19 months… Not a word… No clue what is happening… I thought we were friends. Sniff, sniff.
June 23, 2013, exactly 19 months and 8 hours and 6 minutes after the last update Jim steps up and says “A few pictures….I’m getting ready to work on the front sheet metal, first I need to fix the slightly out of position frame horns, then finish sandblasting and sanding body parts and put some primer on them. I also need to prime the doors and hinges, and put them on.”

Has it even been moved? Looks exactly the same.

Thank god Jim lives in Arizona with 0% humidity or those bare steel doors would be RUUSSSSTTTTYY!

As Jim learned, frame horns are a pain on a clipped chassis. Tack, don’t weld, until the front sheetmetal is EXACTLY where you want it.

This part hasn’t seen the light of day in years.
Yeah Jim, that and a bunch of sanding remember? At this point Jim has also decided that the Sub is for sale. The price is $5000 he says, but as he works on it the price will go up. We aren’t sure what he’ll want for it when it’s painted, but you’ll know by the time this blog item is done.
“New” front sheetmetal was next on the list of things to do, so Jim grabbed some decent ’56 front fenders that he had and started working on hanging them and fixing any rust that was present.

“Now I’m working on the front end. I’m putting on some ’56 fenders I had off another parts truck. They’re decent fenders, one needs a lower rear corner, they both need some rust repair near the top rear retaining bolt (strange but common rust spot). The old fenders off the ’57 were mostly rust free, but were hammered really bad at the top front, so they’re not really usable except as patch panel donors. I got the front frame horns figured out, I’m mocking up the front end to make sure they’re right before welding them on this time.”
The driver’s side fender had rust at the bottom that required a significant patch that Jim handled like a pro. For a guy that doesn’t like to do bodywork, he’s pretty good at it.

“I did the rust repair on the driver side fender, so I could bolt it on. It fits okay.”

Oooohhhhh, pretty.
Uh oh…”The more I work on it, the more I don’t want to sell it….hmmmm….” says Jim. This is not a good sign.

“I got the inside of the doors ready for paint. Still need to do bodywork on the inside of the body, but not much, mostly just finish the passenger side wheel well (where I widened it) and a few misc dents and rust pits. Then sand the whole thing, mask off the floor, and prime it…then I can hang the doors, put some of the trim pieces back in, sand it all, and paint.”

“I spent the day sanding, mostly. Also threw on a little bit of filler. The inside is almost ready to prime…(There’s a lot of square feet inside a Suburban!) and most of it gets painted, not upholstered.”

Getting closer!

“Finally got done sanding. The only parts of the body shell I didn’t sand were the roof and the lower half of the left quarter, both of them have a decent coat of primer already that are ready for paint. I masked the floor, because the original linoleum is going to stay as-is, and I sort of masked off the firewall.”

“I ended up using over half a gallon of primer to put two coats on inside and out.”
After all this, Jim still didn’t know what colors he was going with, or which two tone treatment. As with every car and truck in ’57 there were multiple two tone treatments available for each body style. Some were only available on certain trim levels, but in a lot of cases even then there were multiple choices. Not like today where you only get one color and that is it. Getting body colored mirrors is considered an upgrade now. Screw that.

This truck offers up an example and inspiration. “I want to go back to the original colors inside and out, the Indian Turquoise and inside a light beige gray with charcoal for the floor and top of the dashboard, as well as the steering column and a few other parts. I’m also considering adding white to either the top of the roof, or around the side and rear windows, or both.”

Note how this one only has white on the roof, and not around the windows.
This is where you will start hating Jim. It’s okay, we like him and would still tell him that we hate him. You see, it’s been 7 days. Yep, 7 days since he started sanding and welding and body working and all that. And he’s already getting ready to shoot paint. In fact, he’s made a decision on the white portion at this point. Check it out.
“I decided to go with the white roof only, and divide it just below the drip rail. I sanded the top with 400 this morning, and shot it. We’ll see how it looks after it dries. A big bug landed right in the middle of the roof as soon as I started painting, but you need a scaffold to see the middle of the roof, so that’s not a big deal.”
“I got the doors all in primer, and did the first block sanding with the long board…they don’t look as good as I’d like, so I may spend some more time on them, the pass side door needs more filler in several places. I used a half a gallon of primer on them already just priming them twice yesterday. That stuff is expensive, too.”

“I also spent some time sandblasting, and got almost all the parts done. I still need to finish the pass front seat frame, and the underside of the hood. “

“Work work work. After painting the roof, I installed the front door hinges and test fit the doors. They fit ok, not perfect…the top frame is in in some places, out in others, and there isn’t enough clearance between the door and the jamb at the back for my liking. But that stuff is kind of hard to fix, so I’ll just leave them as is and see how it works. The fit will change when I install the weather stripping, too.”

“Today I sanded the front floor, and shot the charcoal paint there and on the upper dash and rear sill.”
Ahhh, wet sanding. This is the part of paint and bodywork that nobody likes to acknowledge exists. It’s the ugly side of making things pretty and it hurts.

“I spent yesterday sanding the rest of the inside, getting ready to paint it. My fingers are worn out, literally.”
Ooohhhhh paint on the inside! I think Jim might be right, there is at least as much paint inside this Suburban as there is on the outside of any Prius.

“I can’t wait to see how it looks with the masking off.”

“I uncovered it…and I’m happy with the paint inside.”

“There is a little bit of orange peel, and quite a few small defects showing through, and a few sags in one corner, but overall it looks nice.”

“And I started again on the doors, I blocked them with 180 and they are getting pretty straight. I’m satisfied with them, I’ll put more primer on then sand with 400 before painting them.”
So this takes us up to July 3rd. Can you believe that he took the 4th of July off? Come on you slacker. LOL So in 13 days he has gotten the big burb ready for paint. I can’t believe it. Wanna come stay at my house Squirrel? I have much smaller cars you can work on! We’ll show you what the body looks like with color on it below. Stay tuned for the next update on Jim’s big bad SMAV Suburban next week. There have been some changes to the plan, but it is running and driving as we speak. Stay tuned!
Here is a tease with what the body looked like right after being shot.

“I worked by fingers off again…sanded the outside yesterday and this morning, and masked it, then waited for the thunderstorm to go away and then I sprayed the turquoise on.”
PART 2: There are so many parts left that need paint!
At this point in the project Jim is most certainly happy with the progress and at the same time completely dejected by the seemingly never ending pile of other stuff that needs sanded, primed, and painted. He may not realize it at this moment, but in a week or two he’ll realize just how great it is.
You’ll remember from Part One that Jim started with a partly primed and not quite straight suburban shell that was sitting on a chassis, and nothing else, just two weeks ago. We pick up on July 5th.
We can’t decide whether to love him or hate him for this one.
Remember, we are going to quote Jim from his original BangShift.com Project Car Forum Thread whenever possible.

“Looking at the paint more after it has dried some, it looks like it will be ok. It’s not as smooth as it should be, and it could use color sanding and buffing…but I probably won’t feel up to doing that any time soon. There’s too much more work I need to do just to get the thing finished and on the road. And I have a sort of deadline in a few weeks, which might make me keep working on it till it’s done, but won’t allow me to spend too much time making things “just right”.”

“Sanded the inside of the doors this morning, and painted them and some of the garnish moldings. Tomorrow I hope to sand and paint the outside of the doors.”

“And I installed a tail light. I need to figure out all the parts to buy and place an order in the next day or two, I need some stuff to get the windows back in, and a firewall pad, etc.”

“I got the doors painted. The paint went on better than on the body…I guess being able to see what you’re doing, helps.”
One comment from Jim’s Project Thread that we thought was funny, was cantvalve16 who asked “Jim, how do you keep all the overspray off the rest of the garage? Your garage always looks so clean when you show your pics?” Jim’s response, “Actually, it’s a mess.”
We wish our messy garage looked as good as Jim’s messy garage.
Next up was to actually hang the doors, and even though it’s a two door Suburban, it has 4 doors when you count the barn doors out back. Getting all these parts to fit and latch and all that is no an easy job for one guy. Jim must have some secret elves he’s not telling us about.

“Got the doors hung. They sort of fit.”

Barn door Suburbans are our favorite, regardless of year.
When Jim went to get more primer, to complete the front end of the truck, the paint store was out of primer by the gallon. So, while waiting he decided to get some of the mechanical stuff going. You know, stuff like an engine and transmission. The cool thing is Jim is pretty good at this stuff, although he is quickly realizing that decades of Big Block building mean he doesn’t have much small block stuff laying around. He had enough though, and decided that the small block was going to get the call to duty this time around even though his original plan was for a big block to find it’s way into the Suburban.
For those of you who have forgotten, 1987 was the first year for 1 piece rear main seals, angled center intake manifold bolts, and centerbolt valvecovers from GM. Since Jim decided to use an ’87 350 out of another project, but without the throttle body injection, he had to modify one of his cast iron Quadrejet intake manifolds to fit the ’87 engine. This required some time in the vertical mill.

“I have a 1970 Qjet iron intake, so I had to do some mill work to make it fit. The mill head is set to 18 degrees off vertical.”

“After getting the bolts to fit, I sandblasted it.”
This may be our least favorite photo of the build because it looks so bad right here. That is one ugly engine.
“I installed the engine, and got some of the doodads installed on it. I’m still mocking up the accessory drive stuff up front. I got rid of almost all my small block stuff, I had two boxes of misc crap left, which fortunately contained most of the brackets I needed. The intake is causing problems…doesn’t have the mid 70s boss for the alternator brace, and the stupid threaded plug for the heater hose won’t come out, with repeated use of the torch.”

“And I have to do something to the valve covers, cleaning them in the solvent tank just made the dirt more noticeable.”
“I didn’t get much done yesterday. I installed the fuel pump and ran the lines, and started on the trans cooler lines, and got the fan belts. Today I’m working on the shifter, which is a modified Hydramatic shifter from a mid 50s truck. I also have an early 50s Powerglide car shifter to steal parts from. I had quite a bit of it set up several years ago, but never got around to shortening the main shaft, or messing with the gate. The early cars and trucks didn’t have Park, and Reverse was soemtimes at the right, instead of the left. The PG shifter I have at least has park, and I can modify it to work with the TH400 shift pattern. I got the parts all ready to go, I just need to paint them charcoal color. So, back to paint work for a while.”

At this point most people would go the easy route and either put in a late model column or throw a floor shifter at it. We’re glad Jim is not “most people”.

“I fibbed…after posting that about getting to work on paint, I got some boxes from the ups truck, and installed a bunch of other parts. Firewall pad, floor mat, gas pedal, headers, cowl seal, door weatherstrip, starter, speedo cable, etc.”

“I also dug out the shocks and sway bar, and I’ll see if I can get them on tonight, along with finishing up some other suspension work like making sure all the bolts are tight, installing cotter pins and zerks, and lubing it all.”

“Back to painting today. First I primed the rest of the “small” parts. All that’s left not primed are the fenders and hood.”
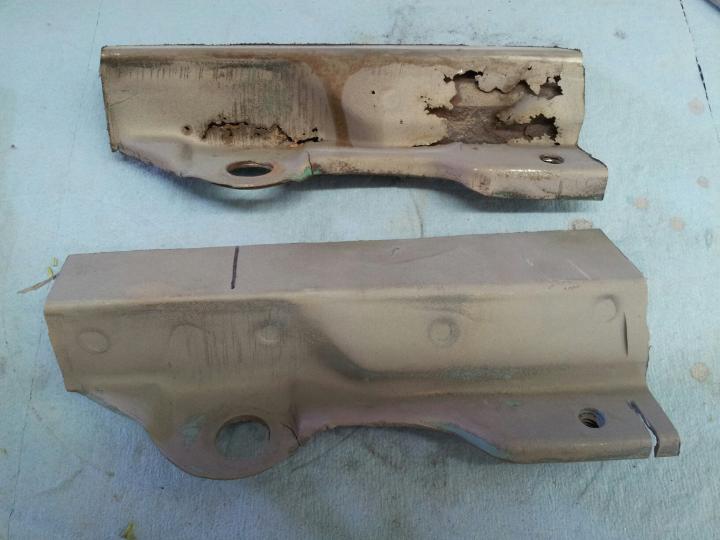
“Then I got to work on the driver side fender, I replaced the rusted part where the upper attaching bolt fits. I scavenged the “new” piece from the original Suburban fender, which was munched in front but still solid.”

“I tacked it in, then eyeballed it and decided I needed to move it a little, so I cut the ends loose and got it aligned just right.”

“Then I welded it in. The parts I could get to the back, I used the torch and hammer welded. The rest I stitched with the MIG.”

“Then I started on the bondo. “

“The weather cleared up, so I decided to catch up on more painting, and do the rest of the charcoal colored parts. Steering column stuff, seat mounts, etc. There sure are a lot of parts to this old truck. I still have a bunch of white and gray parts to paint, hopefully I’ll get most of that done tomorrow.”

“I put on most of the newly painted parts. The column and shifter kept me going for a while, but they seem to work well finally. I also installed the parking brake handle, and figured out how to connect the cable, which was made challenging by the subframe being in the way of stock linkage.”

“And I got the brakes bled, and the throttle linkage working. I need to work on painting the rest of the light gray parts, which include the seat frames….it’s almost drivable. Having something to support the radiator would be a big help, and maybe some wires.”

“I got the front seats installed, and the wiper motor, and a few other odds and ends. Hopefully a big parts order will show up tomorrow, with the wiring harness and some other vital parts.”

“I worked on the pattern for the middle side windows last night, I think it will work. I’ll go see about getting one of them cut today to try. I also need to make some spacers to put under the windows, to hold the gasket up, because there’s a deep pocket where the original sliding mechanism sat. “

“And I am in the middle of painting stuff white. I got a good run on the end of the bumper…oh well.”
“I put the bumper on the truck, and you can’t see the runs unless you really look. White hides very well.
I started on glass. I installed the little windows in the rear doors. It’s a pain…but eventually it gets done. I’ll see if I can get the windshield out of it’s hiding place tomorrow, and get Janet to help me install it. That will be fun.
I got more of the dash put together…wiper linkage is in, glovebox is done, started on the wiring. I replaced the door latchs on the drivers and rear doors, and they work better now. I still need to see if I can shim the rear doors, they are too far apart from each other at the top, so I need to shim the upper hinges to move the doors in a bit. Other than that, the rear end is done.”

“Oh…yeah…I needed to put the bumper on so I can see where the tailpipes will go, that’s another fun task. I’ll probably stop by a friend’s shop and see if he can do the exhaust later this week.”

“I got a few things done today…in spite of the weather. Finished the front bumper mounts. The subframe is kind of in the way of the bolt holes for the end braces, so I did some cutting and welding and put some bolts on to hold them.”

“I also got most of the wiring in, and finished up the dash, including installing the non-working original AM tube radio. It’s beautiful… And I put in the shoulder belts that I bought long ago. They seem to work ok, although they’re the only modern thing in the interior, so they do look a bit out of place. Janet likes them, so they’re staying.”

“Then I decided to install the windshield. What a pain…I’ve done a few of these, and they never seem to go right. This being no exception. It’s in, and it probably won’t leak too bad, but the gasket doesn’t look right at the top inside, and the wrap around ends of the glass don’t fit like they should. Oh well.”

Pretty…

“And I started stripping the hood, which like the rest of the front end parts has 3 layers of paint. And some neat lettering that is going away, sorry all you history buffs.”

“Not much work getting done here today…although I finished stripping the hood (until I ran out of stripper, not until all the paint was gone), and I got the truck running! It fired right up.”

Looking better already.
:I went for a drive, around the yard…it works! Ammeter works (discharge), oil gage works, temp gage seems to work (moves a little), dash lights work, transmission gets reverse and forward, brakes work, throttle works. Only a few dozen more things to get done and check out.”

“A little more progress tonight. I undercoated the rear, most of it at least, used up 4 cans. I got the rear lights and gas gauge sender wired and working. And I have the radiator in and mounted, full of water, and the trans cooler lines connected. I need to load the truck up on my trailer and haul it in for exhaust first thing in the morning. Then get to work on those fenders and hood. “

“Off to the exhaust shop. “

“I’ve been working on the fenders. First I had to add some pieces to the steel sawhorses to properly support the fenders, it makes life so much nicer. Cutting, welding, hammering, spreading plastic. It never seems to end.”

“…fixing another rust hole. I had a sort of replacement panel, it has the right contour for part of it, but not the area with the mounting hole, I had to make that shape. I did lots of hammering and bending and heating, and got it pretty close.”

“Then I made it fit where the rusty piece got cut out…”

“…and welded it in.”

“Most of the weld is with the torch, and hammering it with a dolly backup after each short bit of welding (about 3/4 inch at a time).”

“The areas where the brace is in the way, I used the MIG.”

“Then grind it and hammer it till it’s mostly straight, and fill with plastic. My tolerance for filler thickness is about 1/32″ in most areas, a few spots maybe 1/16”. “

“Finally got primer on the hood and fenders. “

“I also started test fitting fenders.”
At this point Jim is 27 days int this whole process and has a running and driving Suburban that is only partially primered. That makes him roughly 4 years ahead of most of us, and a couple colors behind. It looks good. It will look better.

“I’m trying to get it done to take it to SoCal this week, to a robot thing in San Diego that Kevin is competing, then maybe up to Carlsbad to see my sister, and maybe up to LA if anything interesting is going on.
I don’t know if I’ll get the front end painted by then, though.”
“I took a little drive into town, and it was working so well I decided to head over to Bisbee, which is about 25 miles away. The only big problem is the front springs, I finally got enough parts back on the truck that it added enough weight that the front sits a bit too low. So, I’ll see what springs are in it now, and order some a little stiffer. Other than that, it works great, just a couple rattles. Speedo is really nice, it’s a couple MPH slow at highway speed, but that’s no problem. I had it up to 80 and it drives just fine, no funny noises or vibrations, and the “eyeball” front end alignment I did is pretty good too, it doesn’t pull or anything.”

“Since the truck works, I decided I’d go ahead and try to get the front end painted and back together by Tuesday. I pulled it apart again, did some more bodywork on the driver side fender, and got to work sanding with 150 grit. The fenders and hood are ready to paint.”

“Fenders…”

“…and hood painted. “

“Got the springs in, got it aligned, got the glass, time for more work. And I got to try the wipers, they work.”
The date? July 23rd. Exactly one month from when he started on the sort of primed and stripped shell. Not a bad month’s work, although if he hadn’t slacked off on the 4th of July it would be farther ahead. Just saying. LOL
We want to be like Jim someday. First off he has more talent than we do in a couple areas, and that makes us envious. Second he has drive like none other to keep up with a project like this until it’s done and ready to hit the road. When he started this project it was for sale. Now? Not so much. Hell, he told us he’s got at least $25,000 worth of his own labor in it!
He drove the Suburban about 600 miles to meet up with Bill, Scott, Carl, Nick and I for Donut Derelicts on Saturday and said it was running fine. We like the look of this thing a lot. Great truck and a cool cruiser for sure. Here is a pic of it at Donut Derelicts in Huntington Beach.
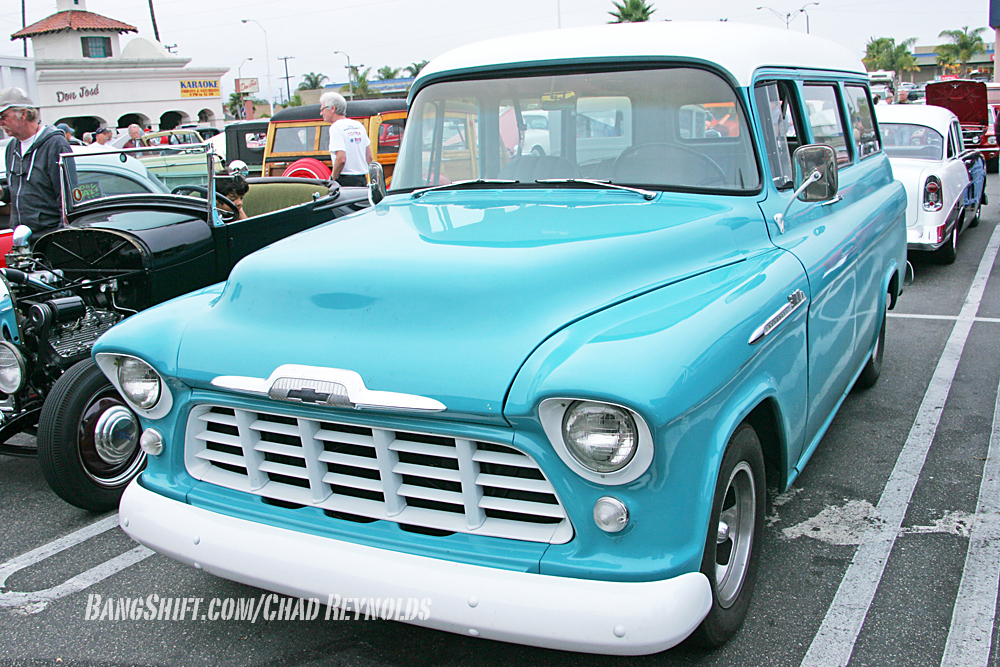
Live and in person in Huntington Beach only 34 days after the build started. Impressive and cool.”

“Suburban made it up to LA this morning, met up with some of the guys. “


That’s the smallest Big Block I’ve seen, it’s powered by a 350 small block.
tree’d!
As Chad says near the end of the story, “There have been some changes to the plan, but it is running and driving as we speak. Stay tuned!”
Yeah, what Squirrel said. Read.
So I read again and from the first paragraph
“With 454 cubic inches of fuel sucking Big Block Chevy under the hood”
yummy. Bring your spare parts and come bash on my 59!
Project “How To Make Everyone Else In Bangshift Land Look Like Lazy Bums”.
BTW, Soccer Mom Assault Vehicle is what I call Chad and Daphne’s fleet of Suburbans. Ha!
I hope those patch panels were welded solid on the outside cuz if not it will crack and rust.
The panels were welded solid. but on my 55 belair I just tacked the lower quarter on, then drove it in primer for 14 years and it never cracked or rusted. So it’s possible that my repairs will last 🙂
Inspirational!