When we last updated the Rough Start Fox 1989 Ford Mustang LX, I’d decided to take on the repair of the HVAC unit single-handedly. That’s not a small feat…in fact, from everything I’ve ever known, it’s a legendarily in-depth project that’s so bad that most people suggest bypassing the heater core when it takes a crap. Fifteen years of Chrysler ownership left me feeling a bit jaded, though…how hard could a Fox Mustang part be any worse than my beloved FJMs? So I yanked out the whole box for a go-through, with the plan of replacing the heater core, the air conditioning evaporator, and possibly the blower motor. I also planned to scrub the dog snot out of the whole box, not knowing what might be inside of the system. Bench-testing the blower motor showed promise, so we simply cleaned the squirrel cage and the housing and left it alone, but the cores had to be changed out. Follow along as we continue work on the car:

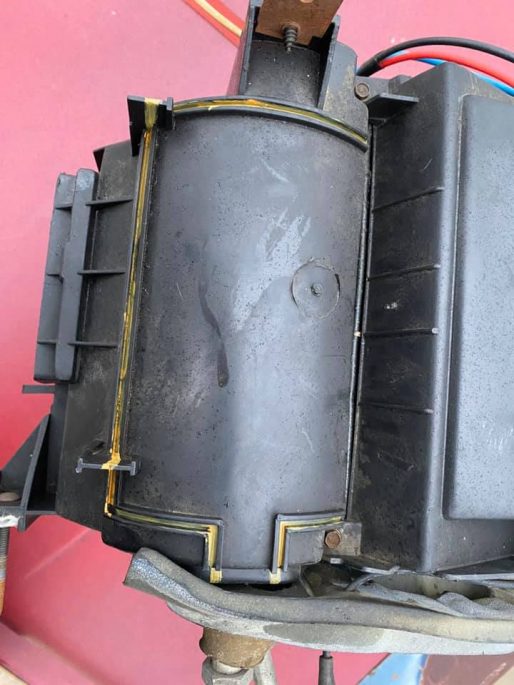
The heater core is easily accessed via four screws and a lift-off panel. The A/C core isn’t accessible without major surgery. You can split the entire case if you’d like, but instead I opted to open up the access port molded into the box. Note the perimeter outlined in orange…that all gets cut.

Once you open up the perimeter, you take a little bit of heat to get the “door” to move and the evaporator comes out. It does mean you’ll have to shut and seal the “door” later, but we have an answer for that, too.

With our order from LMR.com on-hand, we tore into the job. The heater core gets wrapped with the provided foam around the perimeter edge and gets laid back in place and boxed up.

The evaporator is essentially the same job, but there’s a hitch. Note that little, tiny square of foam on the edge…that’s all that was left after wrapping the heater core. There currently isn’t any foam for the evaporator on the market and LMR’s techs didn’t have an answer, so I used some foam-and-foil insulation tape in place. The other option would be to surgically remove the old foam and re-use it.

With everything installed, the last bit of work was to close the evaporator box back off. Self-tapping screws and galvanized strips were used to pin the “door” in place, then a thick bead of black RTV sealant was applied in the cut and allowed to cure properly. The kit is bolted back into place, but the dash is still not permanently mounted in the car yet.

On the right is the stock automatic pedal box. On the left, a freebie from Haley’s uncle, a manual-transmission pedal box. All that was required to make the conversion was to unbolt the brake pedal from the auto box and bolt it into the manual box.

…oh, and to make a notch for the box-to-dash stud to go through, since it was not going to go into that particular hole.

Another box delivered courtesy of the big brown truck was filled with take-off BBK shorty headers. They need a little cleaning, but compared to the brand-new cost, I’m quite fine with that.

Another free item was this 140-MPH gauge cluster. I hate white face gauges, but I love “free” and that was before I broke the 85 mph cluster a bit. I have to build a hybrid setup…this speedometer, tachometer and gauge faces into the original gauge pod with the perfect circuit board. You’ll see more of that soon.

Just for the hell of it, I decided to open up the 2.3L in the car to see what’s really going on. Being honest, I’d written this engine off at first sight. I’m all but proof-positive the engine was under water at some point. The timing chain cover was full of silt and the camshaft doesn’t look great, either. But then I pulled the head off, and…

…oh. Oh, no.

Yeah, that’s not useable.
Previous Rough Start budget left: $4,192.45
1989 140-mph speedometer cluster with white face gauges: NO COST
Fox Mustang manual transmission pedal box, bare: NO COST
Galvanized strips with screws: $8.00
BBK p/n 15120-style shorty headers (used): $110 with shipping
Remaining Rough Start budget: $4,074.45


