


At some point or another, we all have to take the next step in our skill set while working on our junk heaps. It’s either that, or we continue paying others to do certain repairs and upgrades for us. For us, the next step was learning how to weld. The reason was more for rust repair than performance mods at this point. That day came for us last week while driving our ’70 Caprice down the highway with it’s rear main leaking like crazy and burning it on the exhaust. We noticed smoke coming up through the floorboard on the passenger side, literally through the carpet and out from under the rubber floor mat. Until this point we thought our granny owned Caprice was rust free. We were wrong.
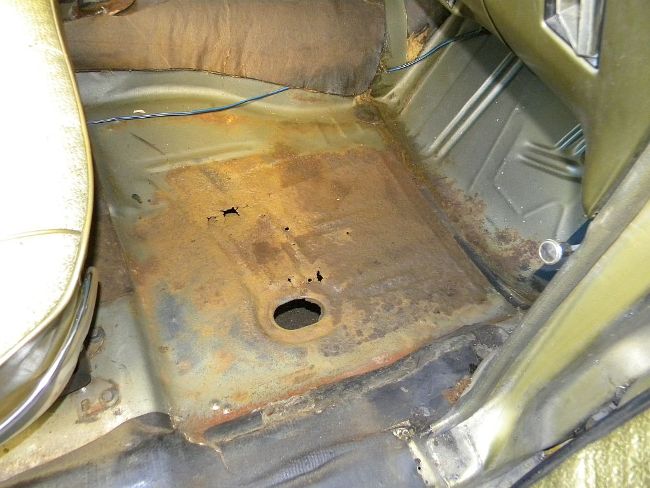
When bought this tank ten years ago, water drained right down the cowl onto the passenger floor board through the kick panel leaving a lake whenever it rained. Someone drilled a couple of drain holes in the floor board to drain it, but the factory jute backed sound deadener must have been working like a sponge. The floor that we thought was still solid had turned to flaky paper thin metal.
Lucky for us, the rust is very localized and there is plenty of good metal around it. Those from the rusty neighborhoods are probably laughing at such a small spot.

The first thing we did was wire brush the loose crap off, sweep it up, then use some two part exopy to fill in the holes until we could get it fixed right. That meant waiting for the opportune time to hit up our buddy, Yannick Sire of Sire Custom Performance, and try to bribe him into welding in a patch for us.


We only had to drive this gas guzzling land yacht over to his shop three times before we saw a moment to ask Yannick about it. We non-chalantly asked him to check out the damage. Yannick looked at it, then handed us tools and said fix it. Wait. We think we just got tossed in the deep end and told to swim. We were standing there with a grinder in hand wondering how our plan to get him to fix it backfired.
So, this is how we fumbled and bumbled our way through fixing our floorboard and in the process welding two pieces of metal together. We weren’t total left to sink or swim by Yannick. We were using his Millermatic 212 mig welder that he makes a living with, so we’re sure he was watching out of the corner of his eye to be sure we wouldn’t screw up too badly.
The first thing we did was take that 4 1/2 grinder he handed us and put on a cut off wheel. Then we marked the floor where we were going to cut. Make sure you well into the solid, non rusty metal. Now, this is the time you need to look very, very closely at both sides of the patch you plan on cutting out. The object of this is so you don’t cut out something you shouldn’t, you know like brake lines, tranny lines, floor braces, or your transmission cross member. That would be bad. Stop often and check your work, both sides of the floor. When your done cutting it should look like the next picture. We successfully got the rusty patch of metal out without cutting into a brace, the trans cross member or the

Next, we changed out the cut off wheel on the grinder to a flap style grinding disc and got to making more sparks. If you have looked our pictures at all, you may have noticed we chose not to remove our 200 pound power bench seat out of the car before doing all this cutting and grinding. Unless you like scorch marks where you park your Wranglers, we’d suggest you protect it somehow. We chose to use a towel that hadn’t been soaked in flammable automotive liquids yet. This didn’t help keep the jute carpet backing from smoldering several times during all this. A spray bottle with water should be kept within easy reach if you plan to do it the hard way like we did. Grind until you get a nice border of about one inch wide all around the new hole in the floor.

At this point we needed a piece of metal to replace what we just cut out. We had to retrieve that piece of metal out of the dumpster so we could use it as a templet for our new patch. Yannick had a giant sheet of 18 guage steel lying on the floor that we’ve been walking over for months. Perfect. Just cut the replacement patch 1/2 inch wider on all sides.

Now, the fun begins. Yannick handed over the keys to his Millermatic 212 mig welder to us. The instruction was short because it was getting late. He set power knob on 3 and the speed on 30 for us, gave us some tips on how to hold the gun, and told us not to stand on the cable. He tacked a few places and let us have at it. Basically, we were to make dozens of spot welds that connected the new metal to the old all around the patch panel. That’s was extent of the training we got.
We wish we could brag that we took to welding like a duck to water, but that wouldn’t be the case. At first, there was the apprehension everytime we pulled the trigger. The wire shoots out of the gun and arcs blindingly. We found ourselves closing our eyes even with the welding helmet on. But, after a few welds we became more comfortable with pulling the trigger and we were trying to improve our technique. There was a lot of mistakes along the way, but we felt we got spot welding down pretty good. One thing we learned is that welding metal that is rusty at all only causes holes. We blew through the metal a few times, but we eventually got good enough to fill in those little holes with weld. But one spot near the trans tunnel and tow board we blew a pretty good sized hole that was too big fill in with welds. So, we made a small patch, about 3/4 inch by 2 inches long, and welded it in. In the end, we were very pleased with our first time out.
Other things we learned was the floor is not flat in this area. We used a medium sized screw driver to push down the patch in certain areas to get flush with floorboard. In other areas we had to pry it up. Once we had a few tack welds in those areas we used a ball peen hammer to shape the rest of the patch as we went. A wire brush was used to wisk away slag and splatter. We used that a lot. By the end of the welding, it was dark out which required us to use a flash light to see what we were doing. We also had to paint the floor that night because the fog was coming in and the humidity would rust the patch over night. We used VHT’s Roll Bar and Chassis paint as it’s an epoxy paint that seals the metal and dries fast.


The next day the sun came out and we needed to finish the fix on our floorboard. We got seam sealer from the local auto paint supply house and a can of Dupli-Color’s Rubberized Undercoat spray. The seam sealer was pricey, we wanted to use the best and 3M’s Fast’n Firm sealer works great. We started under the car so we had to jack up one side of the car. If your jacking up one side of a car like we did, we’d suggest opening the door first. It may not want to open once on jack stands.


First, we wanted to close up the seam between the patch and the old floorboard. We used a socket extension as a drift and a hammer to bash the two pieces of metal together as best we could. We then got out the cocking gun and the 3M seam sealer filled in the seam. Your purpose is to keep water out of the crevice and starting the rusting process all over again. We ended up using our finger to get the nice finish on the sealer all the way around the patch. Yes, that is a shoe mark on the bottom of our new floorboard. We were concerned that it may ‘oil can’, or pop up and down, which can be annoying. If that is a concern for you use a bead roller on your patch which will make much more rigid. You can see the condensation buildup we had overnight in these pictures.


The directions from 3M say not to use their Fast’n Firm seam sealer inside the car. It’s
because of volatile gases emitted from the sealer as it cures can be dangerous in an enclosed car. We decided to risk it and use it anyways. We just left the windows open all day with the car in the driveway as it cured.

Lastly, we sprayed the Rubberized Undercoating on the underside of the floorboard to finish off sealing it off from the elements. It also helped to blend in the new piece and make it less noticeable. The car got full undercoating sometime in it’s past. Most likely when purchased new in Missouri as a dealer upgrade. We suggest you not directly under what your painting as this stuff will drip rubber paint on your face and in your hair. We sprayed two coats at this time and plan to add two more after it completely dries.
Finally, we placed on of our rear floor mats over the new patch for now to help with heat and sound deadening. Then, replaced the rotted carpet and the front floor mat. Good as new it’s not, but it’s good for keeping burnt oil smoke from entering the car and the our passenger’s feet from dragging on the pavement.


A final note on our technique here. This isn’t the most ideal way of fixing a floorboard. It’s better to use a patch from another car or a reproduction piece to fix the rusty floor. Also, trimming the patch to fit the hole cutout instead of cutting it bigger like we did will allow you to butt weld the patch for a better looking result than what we did here. We are stepping up to that on our next floorpan repair. But, we got to weld for the first time that also fixed one of our cars and learned it’s not as scary or hard as we thought would be to do. We climbed one more rung on that ladder. A big thanks needs to go out Yannick Sire for showing us we could weld after all and letting use the tools of his trade in our repair.


Cool write up. I did the same job on a friend’s 68 Nova. We replaced the entire floor pan, I had been welding for a while but not on thin sheetmetal. I have asked my friend to never lift the carpet, the welds are very strong but ugly.
Big step up from pop rivets, huh? I haven’t had to repair a floorboard in many decades, and pop rivets were all that the car rated at the time.
No one even suggested that it be welded. Sadly, I’ve still never learned, but I’m encouraged by your writeup. Thanks.
You had the perfect template for hammering beads into this panel…
Replicating beads is quite easy.
Tools needed are a ball peen hammer, a vise, a straightedge and a marker pen.
Now just transfer the measurements of the factory beads to the new panel
Now open the vise to the beads width, put the new panel atop with the marks and the vise jaws lining up and start hammering.