


- Introducing Project Buford T Justice – Our 1987 9C1 Chevy Caprice – The Adventure Begins!
- Project Buford T Justice: Our Cop Car Cruises Home and Then We Beat on It!
- Driveway Tech: Bodywork on Buford T Justice – We Close Our Roof Hole For Fun and (NO) Profit!
- Project Buford T Justice Hits the Strip with Some Pretty Shocking Results!
- Project Buford T Justice Hits the Dyno and Goes KABLOOEY! CARNAGE VIDEO INSIDE!
- Project Buford T Justice Will Be Saved For About A 100 Bucks With a 15 Year Old Transmission
- Project Buford T Justice Update: The Trans Thrash is ON!
- Buford T Justice Update: It Lives Again Thanks to a Down and Dirty Driveway Thrash and Junkyard Parts
- Buford T Justice, Our 1987 9C1 Chevy Caprice Goes Through Final Testing Before the Upgrades Begin!
- Buford T Justice 9C1 Update: The Parts From Hotchkis, Cragar, AFCO, and Mickey Thompson
- Update: Hotchkis Suspension & AFCO Bushings Transform Our 9C1 Caprice
- Buford Update: Our 9C1 Caprice Gets Real With Mickey Thompson Tires and Cragar Wheels
- Driveway Tech: How To Swap A Jeep Steering Shaft Into Your GM B-Body or G-Body Car With A Trashed Rag Joint
- Buford Update: We Flog The Suspension, Unveil a Mountain of Speed Parts, Spill Our Wild Drag Strip Plan
- Project Buford T Justice Update: Drag Strip Thrash Squashed By Ma Nature – We Learn Stuff – Plan B!
- Project Buford T Justice Quick Update: Where The Hell Has Our 9C1 Caprice Been?!
- Project Buford T Justice: We Go On Hot Pursuit Of Horsepower-Our 9C1 Caprice’s 350 Gets A Slap!
- Buford T Justice 9C1 Caprice Update: Metal Fab,Head Work, A Good Surprise, An Awful One
- Buford T Justice Update: Headers, Cheap LS Technology, New Valvetrain Parts, More Compression, Fun!
- Buford T Justice Update: A TCI 700R4 And Breakaway Torque Converter Get Our 9C1 Caprice Shifty!
- Buford T Justice Update: A Very Frustrating Day On The Dyno And How We’re Planning To Fix It
- Project Buford T Justice Update: Where Has Our 9C1 Caprice Been Hiding?
- Buford T Justice Update: We Install A First Gen Chevelle Flowmaster Kit On Our 9C1 Caprice!
- Project Buford T Justice: Our Caprice 9C1 Gets The Shaft! A Dynotech Drive Shaft That Is!
- Project Buford T Justice Our 1987 9C1 Caprice Hits The SCCA Autocross – Photos And Video!
- Project Buford T Justice Update: We Finally Give Our 1987 9C1 Caprice A Cheapo Nose Job!
- Project Buford T Justice Update: We Hit The Strip Again With More Power! (W/Video)
- Buford T Justice Update: We Bolt On Power From Trick Flow And Snappy Looks From Trans Dapt!
- Project Buford T Justice Update: Where The Heck It’s Been And Where The Hell It is Going –
- Place Your Bets For A BangShift Shirt! Buford T Justice Is Hitting The Dyno With This Engine One Last Time – Guess The Power And Win
- Project Buford T Justice: The Long Arm Of The Law Gets Longer With A Stroker Build – 388ci Of Budget Fun
As promised, we’re back with another update of Project Buford T Justice, our 1987 9C1 Caprice. In the last installment we took the car to the dyno and thrashed all day bolting on more than 20hp at the tires with ignition upgrades, a new intake, and a new carb. Returning home from the dyno, we planned to swap headers onto the car in place of the choking factory log manifolds and hit the rollers again to see what gains we would get out of simply upgrading to the headers before going onto the camshaft, valve springs, roller tipped rockers, etc. Well, that was a fantastic idea, but as you will see below, a few things jumped in our way and thwarted that simple sequence of events. There’s good news, some really bad news, and some really cool work done in the middle by guys who are experts in their field. As we’ve been doing, we’ll tell the story through photos and captions.
SCROLL DOWN TO READ ABOUT OUR RETURN FROM THE DYNO AND HOW OUR PLAN WENT OFF THE RAILS FROM THERE!

Here's the engine as it sat when we got back from Performance Auto and Dyno in the last update. Initially, I had planned to simply pull the exhaust manifolds, bolt on the headers, and go back to the dyno to see how much happier the engine would be without the crappy iron manifolds. Things started to go sideways with that idea on the way home from the dyno when we realized that the rear of the intake was leaking oil badly. That meant I was needing to come off to be resealed.

You knew this was coming, right? Despite soaking the bolts in a witches brew of solvents, penetrating oils, and stuff from the local witch doctor, and bragging to Chad about how easy all of them were coming out, I busted this one off. Fooey!

....and this little bastard pulled the same stunt on the other side but broke off flush. Double fooey!

Here's the stock factory manifolds removed and this is what the full extent of the exhaust system was during our last dyno session. Note the pipe on the left side of the photo has a pretty interesting curvature to it. That's because Caprice's of this era, cop car or not, only had single hump crossmembers.Both pipes passed under the passenger side where the hump was. Obviously with headers, this was not going to be an option. Keep reading to see the solution. Note all the oil on the pipe that was coming from the back of the manifold and down the engine.

With the manifolds off and a busted bolt in each side coupled to the leaking intake that was coming off anyway, I decided it was time to just pull the heads off. I'd have the busted bolts removed, install the new valve springs, and leave it at that. Yeah, right!

Believe it or not, that was the first moment I had ever taken the valve covers off of this engine. It looks pleasantly OK in there.

It was not a whole bunch of work to pull the intake off. Obviously there is a TON of room to work in here. The car's lowered stance makes lower back pain part of the program.

Off came the heads and again, things were looking OK in the bores and with the pistons. Not too much junk or gunk in there and the bores still hat cross hatching on them. Huh? 185,000 and looking like that? Really?!

Not really. Note the faint "40" stamped into the left side of this piston between the valve reliefs. Yep, at some point this engine was rebuilt and punched 40 over. It has to have been more than 10 years ago as Doug, the previous owner didn't do it. We now have a 357ci SBC instead of a 350, and it is WAY more fresh than we ever thought. The downside is that the rebuilder pistons have a shorter compression height due to their larger bore so they sit an astoundingly bad (almost) .050 in the hole. Quench? Yeah, we don't have that here, but we did have a plan to fix that as best we could for cheap. My elation on the rebuilt short block quickly turned to nausea though when I saw this...

DAMN IT! Yes, you are looking at another transmission in this car with a busted bell housing. How? Remember that the driveshaft came out on the dyno during our last trip and the massive vibration must have killed this transmission like the last one. I felt sick to my stomach after seeing this because replacing yet another transmission was not something I had planned or wanted to do. How did we remedy this? I'll tell you in the next installment! For now, I forged ahead. Chad Note: How in the hell does he do this stuff? Two broken transmission cases? This bad boy must be making serious steam.

Despite the trans being screwed, I knew that when the car went back together with the headers on it, the stock crossmember was not going to allow room for a pipe to pass over or under it on the drivers side. I called Jon Sandahl at Tube Chassis Designz whimpering and he consented to notch the stocker for me. I took some measurements under the car and marked the area that needed to be notched with chalk.

When I got down to Tube Chassis Designz, Jon's right hand man John Engstrom took the crossmember and went to town with the band saw, cutting out the area I had marked with the chalk.

His handiwork with the saw left us with this. I went wide with the notch because this car will probably see a few different engine combos in its life and I didn't want to cut it too close with width. (stock engine versus LS versus big block, etc)

Next, John cut steel plate and got the basic length and width of the piece necessary to close that gaping hole we made.

Using the slip roller in the shop, Engstrom began forming the flat piece of steel into the right shape to perfectly contour to the opening.

Several trips back and forth through the roller, making minor adjustments to get the curves right got John a piece of steel that he was ready to permanently affix.

Here's how things were looking before the Tig torch came out and made this a permanent part of the program.

Tig welding is a skill I really want to learn. These guys are masters at it and in no time John produced this...

Voila! As you can see the tig welded piece looks great and John was not done yet.

Here's another look at the welding work that John did to secure the steel into the opening. He was concerned about one thing though...

Being that the cut was very deep, he was thinking that adding some reinforcement to the top of the crossmember would be a good idea. Using a piece of chrome moly pipe, he sliced said pipe in two the long way and then welded one half to the top of the 'member to prevent and twisting or bowing as we start to hit it with more and more power.

We now feel bad that the coolest piece of the car is hidden under the car.

The next day after the crossmember was done and bolted back into the car, I went ahead and dragged the heads into my basement and got going on tearing them down and giving them a closer look.

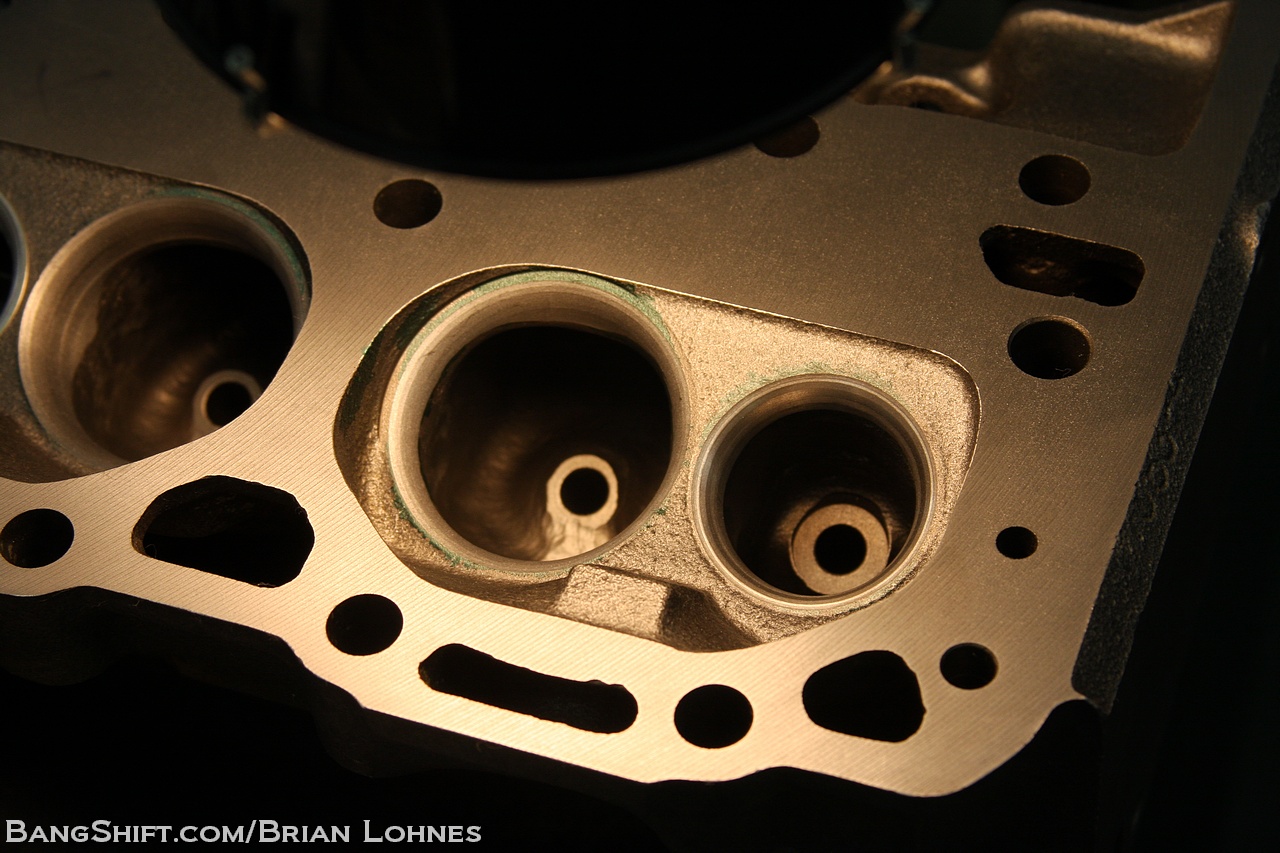
The first thing I was interested in was to check the casting number and get some info on exactly what these lumps of iron were. The heads are casting number 14101083. Some Google magic told us that they are 64cc units that have 1.94" intake valves and 1.50" exhausts. These are the same heads used on L98 350s installed in Camaro and Firebird F-bodies with 350 engines and they were used on GM crate motors rated at 285 and 300hp. They are not the bad news swirl port pieces and while not "high performance" heads per se, they are not the worst junk around either. Good news for sure.

There was no evidence of any real trauma on the business side of things in the combustion chambers and the valves looked OK as well.

A few minutes with my valve spring compressor and the grungy heads were all disassembled. Here's where the story takes another turn off course. I called Dana Hard at Custom Auto Machine in Weymouth, Massachusetts and asked if he could put the heads in his hot tank cleaner just to get all the junk out of them, so when I reassembled 'em with the new valve springs that they would be nicer to work on. He had other plans!

Dana had me bring the heads, the valve springs, all of the valves, and money to buy lunch. Here are the heads in the hot tank ready for a bath!

With the heads now fully cleaned, Dana went over them carefully and discovered a couple of issues, mainly two cracked exhaust valve seats. He also decided on his own, to get after them with the grinder and perform from bowl work, pocket porting, add a multi-angle valve job, and also cut all of the valves. Dana is a mad man. (This shot is obviously before the heads were fully cleaned!)

As these heads are 64cc combustion chambers and like we told you earlier, the replacement pistons sat so deep in the hole, Dana decided to mill 12-thou off the bottom of each head as a way to get a clean mating surface and also to get some more compression out of the engine. Here's the freshly "shaved" look.

Jon Wall, Dana's right hand man then took all the valves into the glass beading cabinet and cleaned them up before they went over to the valve grinding machine.

Here's what they looked like after coming out of the cabinet.

The plan in the valve grinding machine was to back cut the intake valves 30 degrees. This helps low lift air flow and should create more power for us where we want it while saving us the cost of new performance valves. It is the budget way out, but this whole car is largely the budget way out. Here's one more shot of the stock valve before grinding.

Here's the valve grinding machine. Most local machine shops should be able to perform this work for you at reasonable prices. It is a process that depends on accuracy, but it is not terribly time consuming.

Here's a shot of an intake valve in the grinder being back cut. Dana set the machine on the proper angle and did the cutting.

Here's the mad scientist himself, Dana Hard, making the magic happen. Although he's a Ford man at heart he builds everything from Studebaker mills to Buicks, and everything in between at his shop.

This is what the intake valves look like after grinding. Note the shiny surface created from the grinding process.

Here's a comparison shot between a stock valve and one that Dana had ground. It doesn't take a rocket scientist to see that the removal of that ridge will help get air moving quicker once the cam actuates the valve.

Dana also dressed the tips of the valve stems to make sure that the rockers had a good surface to push on.

The exhaust valves were also back cut.

Here are a few of the exhaust valves after grinding.

Another look at a freshly cleaned up exhaust valve.

After the valves were ground, Dana then fired up the grinder and got the iron dust flying. He did some pocket porting, bowl blending, and he also worked on the short turn radius in the intake ports.

Here's a shot of one cleaned up intake runner in the bowl area.

One more look here. If these were the swirl port style heads they'd have a big "ski jump" visible in the bowl area and frankly, they're better off as scrap iron than on any type of performance engine.

Dana also cleaned up some stuff in the runners on the intake side of the heads. He ground these little lips off that were in each intake port. Now you see them...

Now you don't.

Next up was a date with the Serdi 60 machine to have two exhaust seats cut out and replaces as well as having the the multi-angle valve job done.

While barely visible in this photo, there is a crack just at the end of the pointer. Time to cut this mother out!

Jon set the head up in the machine, installed the cutting head and then went to town munching cast iron.

Here's the Serdi machine at work.

Here's what the machine left behind when Jon was done. This is the perfect sized hole for the replacement seat that he was about to drive in.

Here's the replacement seat that Jon then drove into the hole he cut and got ready to machine it with another cutting head.

Here's a shot of the freshly installed seat waiting to be cut.

With the multi-angle cutter installed, Jon worked his way down each cylinder head cutting the intake and exhaust seats. The cut being made here will help air flow by creating a better radius for the air to come around when entering the combustion chamber.

Here's one of the freshly machined seats. They looked great and far better than the worn stockers.

Here's our new exhaust seat after machining.

Now it was time to put all this stuff back together with fresh new COMP Cams components.

We went with COMP beehive style springs because the larger lift of the cam we are installing down the road requires them. Stock springs would bind up at the lift levels we are going to use, so this is the perfect solution and does not require the spring pockets to be machined down.

Jon put some assembly lube on the stems of the valves and slid them all into the head.

Here they're all at home in the head.

Here, Jon's checking the installed height of the springs.

Using this rig we were able to properly determine the spring pressure in the open and closed positions for the valve off of Jon's measurements. Dana wanted to make sure that there was not too much pressure as the rocker studs in this engine are press in type stock pieces and not more robust screw in studs.

After making sure all was good, Jon used a pneumatic valve spring compressor to install the springs and we were looking good.

Here are the assembled heads ready to bolt onto the engine. We're looking forward to seeing how Dana and Jon's handiwork paid off in new HP!

Here's a closer look at the COMP cams beehive valve springs installed.

We snarfed some paint on them to keep the rust at bay and dress up the mill a little.

A huge thanks to Jon Sandahl and Dana Hard to opening their shops up to us and our camera to follow these updates on the car. While there are certainly a load of good budget minded aluminum heads on the market today, we wanted to use what we had and upgrade it some the old fashioned way to see what gains could be had. We are 100% sure the work that Dana performed on the heads would come out a lot cheaper than a brand new set of aluminum pieces. Will these work as good as a Vortec head? Maybe we should test them out head to head? Hmmm.....

So that ends this installment of the Project Buford T Justice build. Come back next week and find out how the hell we're going to deal with this busted transmission!
COME BACK NEXT WEEK TO SEE ANOTHER PROJECT UPDATE DEALING WITH OUR BUSTED TRANSMISSION, THE REASSEMBLY OF OUR ENGINE AND WHAT OTHER WACKY HI-JINX WE’RE GETTING OURSELVES INTO!


…..could your motor-mounts be bad & causing excessive movement & thus cracking the trannie case….just a thought?
NOT 64 cc….76
my good eye agrees. At 64cc, the complaint of non swirl port is ridiculous. the 64 is a very large engine on a .040. big cam or not he would have been shaking mobile home parks..
Guys, 083 heads are 64cc chambers. Find me somewhere that it says otherwise and I’ll
Believe you.
Yep 083’s are 64 CC I just installed some on my .040 357 with some dished pistons and steel shim headgaskets and a zz4 cam, runs like a scaled dog.
What would have been the actual cost for the work done for a walk-in customer? Love this stupid project……making me want a crown victoria again damn you!
Good news. Brian is now super fast at trans swaps. Call him if you need yours done in a jiffy.
Bad news . . . Brian’s dad is running out of TH-350-shaped water heater stands in the basement . . . .
So the broken bolts are still in the heads, right?
Story written in true train de-railment fashion!
And what did happen to those pesky broken bolts???
I really wanted to see how you go the snapped bolts out, especially the one that was nearly flush with the head. but snap, I would say it is coming along nicely.
Also, http://gifrific.com/wp-content/uploads/2012/06/Boy-That-Escalated-Quickly-Anchorman.gif
To quoth GM Parts Direct
http://www.gmpartsdirect.com/performance_parts/store/catalog/Category.jhtmlCATID=671.html
This is a cast iron cylinder head assembly used on 285 hp 350 engine (P/N 12353641). This complete cylinder head assembly includes 1.94″ intake valves, 1.50″ exhaust valves, valve springs (P/N 3901068) and valve spring caps (P/N 14003978). Small Image
Technical Notes: This cylinder head has 64cc chambers. The cast number for this head is P/N [b]14101083[/b] or 14096217. This cylinder head has 1987 and later inlet manifold bolt pattern. The center two bolts are at a 72º angle.
Nice fab work on that crossmember. Before the stiffener I was thinking, “Well…it’ll probably work” but the dude was hip! With all that welding the thing might be stronger now than it was originally.
Yep, those dished .040 pistons are the suck, I had a 90 LO5 and I swapped the heads for some 305 h.o. heads and the engine was stock with factory flat tops.
telling ya, there’s no quench and no hope without significant surgery of getting quench. You’re gonna be at or over .100 , might as well turbo it. That will cure all of your problems, excepting the jesus, I’ve never broken a trans bellhousing, what the *!*# are you guys doing to the trans? lol.
Good progress – keep after it Bruab.
Oh ya, and Kerri is likely to start answering anything Buford related with “A likely story”
you guys should cut off that cracked bell housing and throw on a J.W. performance Super Bell. Cheaper than a whole new trans.
Is your gear selector lever properly setup? Can you crack the bellhousing by dumping it into Drive while revving?
Next time, try this product on rust frozen bolts, http://www.seafoamsales.com/deep-creep.html
You might also find the following article useful:
Penetrating Oils
Machinist’s Workshop magazine recently published some information on
various penetrating oils that I found very interesting.
Some of you might appreciate this. The magazine reports they tested
penetrates for break out torque on rusted nuts.
They are below, as forwarded by an ex-student and professional machinist.
They arranged a subjective test of all the popular penetrates with the
control being the torque required to remove the nut from a
“scientifically rusted” environment.
*Penetrating oils ……….. Average torque load to loosen*
No Oil used ………………. 516 pounds
WD-40 ………………… … 238 pounds
PB Blaster ……………….. 214 pounds
Liquid Wrench ……………127 pounds
Kano Kroil ……………….. 106 pounds
ATF*-Acetone mix…………53 pounds
The ATF-Acetone mix is a “home brew” mix of 50 – 50 automatic
transmission fluid and acetone.
Note this “home brew” released bolts better than any commercial product
in this one particular test.
Our local machinist group mixed up a batch and we all now use it with
equally good results.
Note also that “Liquid Wrench” is almost as good as “Kroil”
for about 20% of the price.
Steve from Godwin-Singer says that ATF-Acetone mix is best, but you can
also use ATF and lacquer thinner in a 50-50 mix.
*ATF=Automatic Transmission Fluid
Brian, I feel your pain as far as the broken studs go. My old Buick heads usually pop every other stud. My local machinist/welder does not like to see me arrive at his shop anymore! Like the article!
It sounds like carbon arts alchemy! Two thumbs up! I have to say whatever result that they are getting it will be surely a result of trial and error process… 😀
That engine is completely transformed from what it was like when you started. It’s a real labour love, the effort and attention of details is immense. Thanks for sharing your pictures of the refurbishment process.
Quite impressive! This is the first time that I saw this kind of post. And it is really informative. Thank you very much for sharing your knowledge and skills in this blog.