Well I celebrated Buford’s one year anniversary in fine style last week by finally getting back to wrenching on the car. The weather has broken, Spring is here, and I found both of my kids when the snow banks melted. Life is very good! If you have been following the saga of Buford T Justice, our 1987 9C1 Caprice you know that in late October, just days before the 2012 SEMA show, I hacked the exhaust off the car at the drags to see what I’d gain in elapsed time. The strip rained out so it was all for naught. I then drove the car to the dyno with the open pipes (hacked off at the crossmember), picked up a couple of HP and went home.
Following that, I added a set of Flowtech long tube headers and the now infamous “Purple Hornies” header mufflers. That was the extent of the exhaust system. While the short glass packs bolted to the header flanges took the sharp edge off the exhaust note, they were (as is no surprise) still not much good in the quiet department. Had I plumbed a full exhaust system for them out the back of the car, the situation may have been a little better than them terminating directly under the driver and passenger seat, but I was in a hurry. I drove the car with the header mufflers for a few months and finally the people living around me were so out of joint and relations with my elderly ‘hood got so ugly that it was time for action. The good news is that I had conditioned them perfectly for what “loud” was so even putting an aggressive sounding full system on would be a major win.
I started scouring catalogs and exhaust company websites looking for a header back system that was designed for the 1977-1996 B-Body. Try as I may, I couldn’t find one. Flipping into research mode, I discovered that the these B-bodies only vary in wheelbase from a first generation A-Body by one measly inch. The frame width is damned close as well, so that’s when I decided to get creative and call the people at Flowmaster with my plan to try fitting one of their PN 17119 kits that are designed for header applications on first generation A-Body GM cars. This is their American Thunder kit that comes with Super 40 mufflers, mandrel bent 2.5″ pipe and two types of tail pipes to suit your personal preference. Currently, retail on these kits is right around $480.00 depending on who you are shopping through. Not to spoil the story below, but the kit fits the B-Body application great, with a couple of minor tweaks. This isn’t a job you want to rush through. I work slow as it is, but in the interest of getting a good fit, I used a whole day and a little change in the morning to finish this. I did the work in my driveway, so you can too!
SCROLL DOWN TO SEE THE PHOTOS AN INFO ON THE INSTALL – ALSO, EVERY PREVIOUS INSTALLMENT OF THE BUFORD Y JUSTICE 9C1 CAPRICE IS LINKED AT THE BOTTOM OF THIS STORY!

Here are the full contents of the Flowmaster PN 17119 kit. It all arrives in a box large enough for a small family to live in (and sub let a section of!), packed with directions and everything you need to install on a car other than the wrenches. If you don't have those, stop reading and go to a bird watching site.

The kit includes a pair of Flowmaster Super 40 mufflers. We dig the sound of Super 40s and they are certainly of the quality everyone has come to expect from Flowmaster over the years. The nice heavy gauge steel gives these mufflers some weight and longevity.
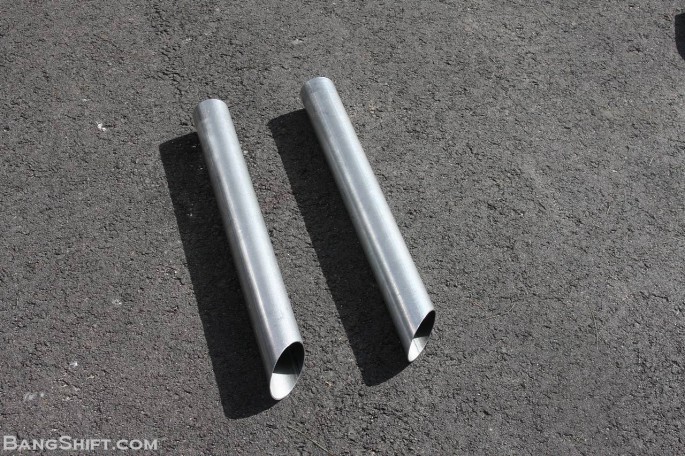
Flowmaster sends along two types of tail pipes with this kit. The first is the straight pipe with the slash-cut end. We didn't opt to use these.

The second set are these with the turn downs at the end. This is the look I like the best and the ones I decided to use. My goal was to have these barely peeking out behind the rear bumper.

To give a full illustration of the exhaust, I slid the kit together in the driveway before getting started installing it. One of the things you have to budget time for in this installation process is tweaking and moving stuff around to get the fit you want and look you want.
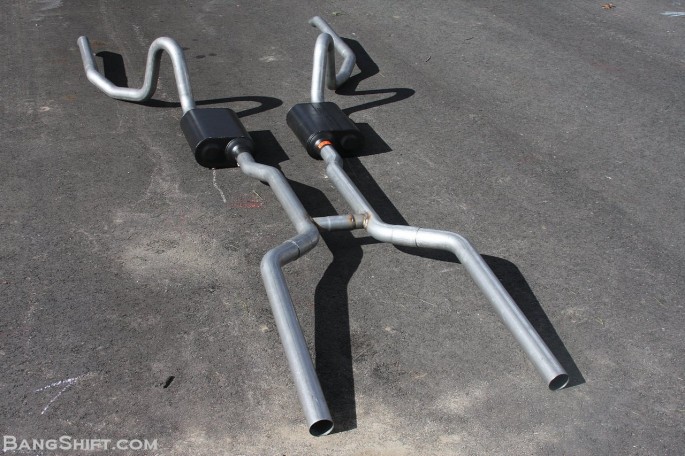
Here's the view from the front looking back. With this kit there is some cutting and fitting of pipes to do. As header applications and spacing can vary from company to company, Flowmaster sends the lead pipes wider and longer than typically needed. It is your job to cut and fit them to your application.

One last look at the system before I blew it apart and got on with installing it. My only real concern regarding the install was the width of the pipes behind the axle. I was not sure if the kit would "kick out" enough to get the pipes outside of the gas tank. Did it work? Read on to find out!

The first thing I did was to jack the car up by the frame and slide the "over axle" tubes into their rough position. The rest of the install needs to be done at ride height, so you'll see the axle supported from here on out. I removed the jack stands I was using before taking this photo. NEVER GET UNDER A CAR WITHOUT JACKSTANDS!

The next thing I did was one of the few alterations to the Chevelle kit and directions I had to make. Provided with the kit are a pair of exhaust hangers (not shown here) designed to fit two factory holes in the Chevelle. The Caprice has one of those holes but the other would have to be drilled through the area where brake and fuel lines run. I decided to grab some exhaust hangers from the parts store and use my existing factory hole to hang the exhaust from. If you wanted to pull the lines off and our of the way, I believe you could use the Flowmaster hangers but I wasn't interested in going that direction.

Next, I attached the mufflers to the H-pipe. Note that the mufflers are clearly labeled on the inlet side and you need to have the outlets justified to the outside of the car. I put the clamps on and just snugged them enough that the mufflers were under a little tension. As I was going to be handling this alone, I couldn't have stuff flopping around.

Next, I slid the whole H-pipe assembly under the car and started doing some math as it seemed I would be doing four arms worth of work with my standard issue two arms. I ended up doing some stuff that would have made Peter Parker proud, but eventually I loosely bolted the muffler end of the setup up to my hangers and supported the header end with a floor jack.

Here's the muffler end of things loosely mounted to the hangers. I obviously ended up tucking them a lot closer to the floor before cinching things down.

The good news was that once I got the mufflers into their rough position, it was clear that the over axle tubes would fit no problem and kick out far enough to the sides to get the tail pipes fit properly.

With the other end of the h-pipe supported with a floor jack to get it level, I tucked the mufflers as tight as I could to the floor. I have jackstands positioned just out of the frame here. The ramps were there to have the axle sitting at ride height. I have no intention of getting squashed under this car.

The next step in the process, going by the Flowmaster directions was to get the tail pipes into position. This took some time and thinking because we weren't able to do it the way it would normally be done on a Chevelle. The above picture if the supplied hanger for the tail pipes (one for each side). One a Chevelle, there is an existing frame hole for these to bolt in on the side of the frame rail. This hole does not exist on a Caprice. The other thing that does not exist is room enough to get a drill up there to make one. The solution we came up with was to use this hanger but in a slightly different manner.
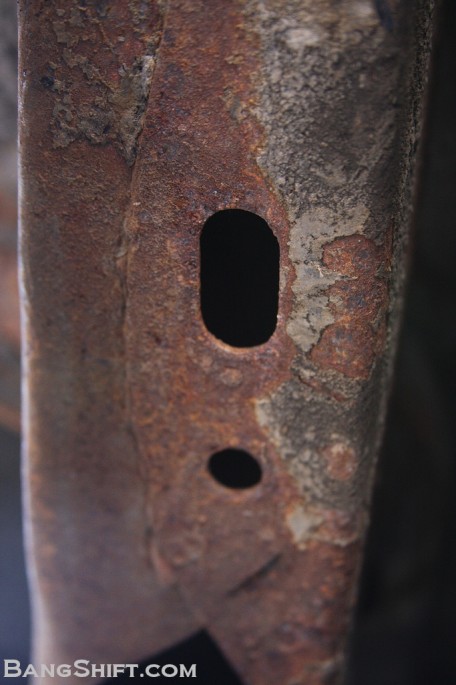
On the bottom of both rear frame rails exists this long slotted hole. Using that as a guide point, I positioned the hanger at the rear of the hold and punched a mark though the opening on the hanger of where to drill and tap a new mounting hole. This is on the bottom of the frame as opposed to the side.
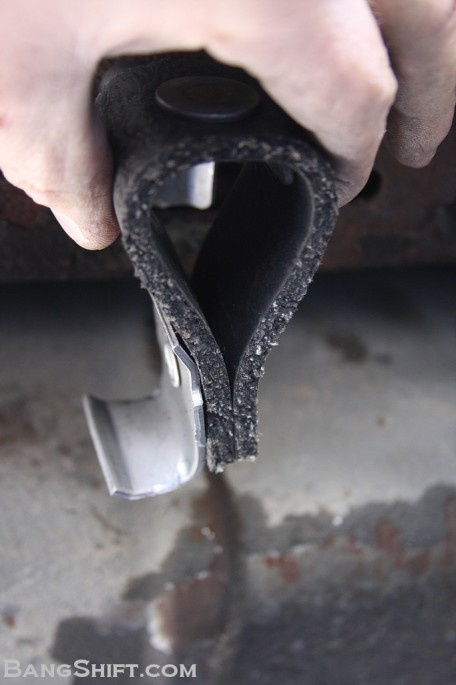
By facing the hanger out, I could still capture the pipe and provide the support needed for the exhaust system.

I drilled the holes and ran a 5/16" 18-count tap through them to get them prepared for the bolts. Using a lock washer, I ran the bolts in and the hangers were rock solid.
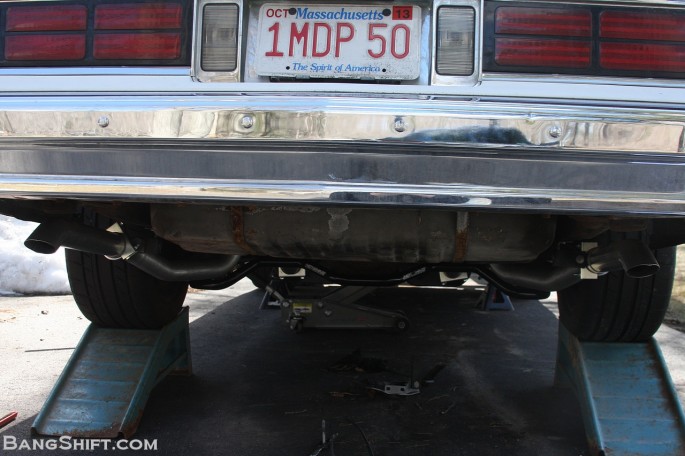
The result is that the pipes are well supported and sturdy, but not as tucked up as I permanently want. The good news is that I am going to be taking the car over to finish weld the system on a lift soon and will be able to use the metal glue gun to make the pipes tuck further up and lose the clamps. It was an interesting exercise tweaking and rotating the over axle tubes to see where they could go without hitting a spring or rear control arm. I can't express enough that this is not a job to rush. Take your time, mock things in, tweak, twist, and adjust to your liking. (and for the millionth time, I removed the jackstands I had on the frame rails ahead of the rear axle before shooting this photo)
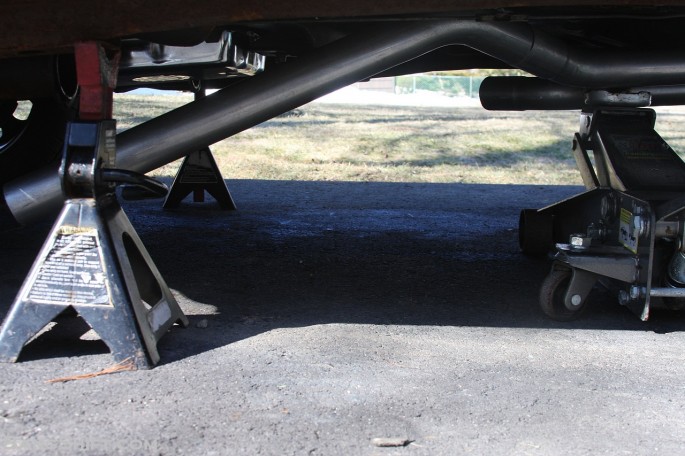
Next up came the precision part of the program. As I told you before, the lead pipes on the exhaust are longer and wider than you'll probably need. That means you need to trim them on both ends to get the fit right. TAKE YOUR TIME DURING THIS PROCESS. Screwing up here means that you'll be pretty much up the creek.

I used my handy hack saw to make my cuts. I started taking small bites of the pipe off on both ends. I am phobic about screwing up measurements and normally make a lot of small cuts to get where I need to be rather than a couple of big ones. It takes way longer, but the result is usually better for me. I was up and down to me basement 20 times between the two pipes but ultimately I got a good result.
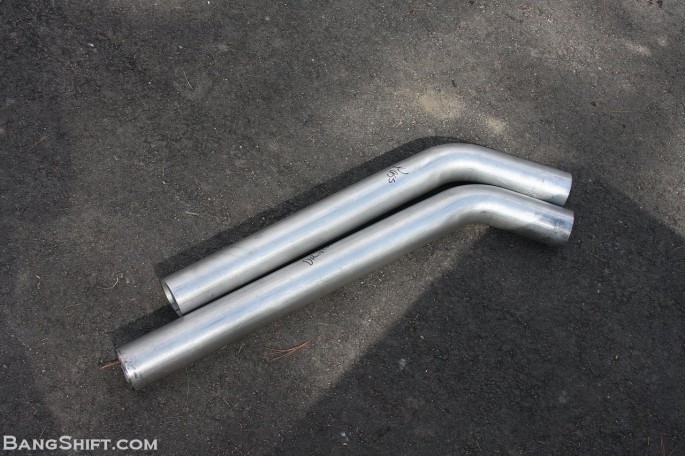
I recommend labeling your pipes as soon as you start cutting because on my particular application the header on the passenger side terminated in a different spot than the driver's side. That means the pipes need to be different and crossing them up could mean disaster. A sharpie is your friend.
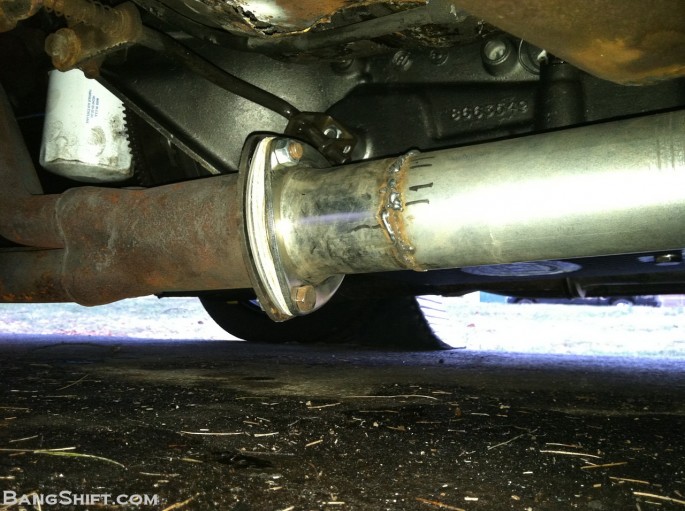
Next up, I brought the pipes over to my father in law's house just down the road. We made my final trip with his horizontal band saw for a perfectly true cut and then I welded the flange/cone deal on the end of mate up with the headers. It is a good thing I am not in the business of welding bridges...there would be a lot of failed bridges! These flanges/cones happen to be Spectre performance pieces I grabbed at Autozone that go from 2.5" at the pipe end and 3" at the flange end to mate with the headers. The car was on the ground when I shot this photo and yeah...it is low. As low as it has been since last summer!

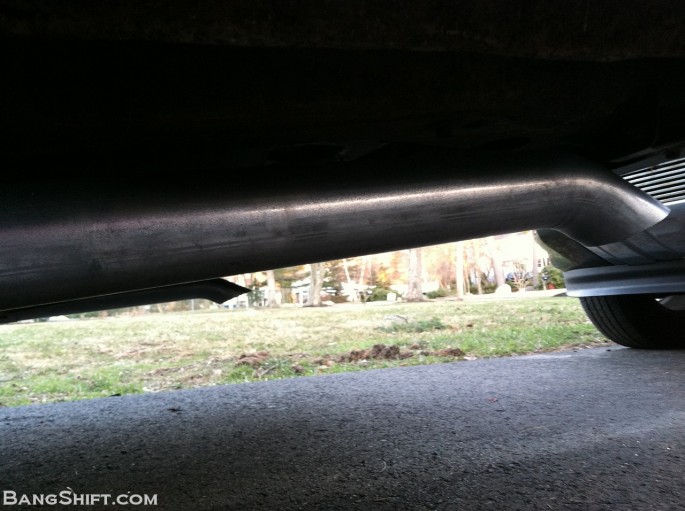
Here's a shot from the back to the front showing the system installed. I was a little nervous about doing this job in my driveway because of all the different stuff that needs to be hanging or supported at once. My fears were way overblown as the job was more about taking time, making good measurements, and thinking about what you were doing than wrestling with parts. . It seems pretty straight forward, but there is a lot of stuff to pay attention to when installing a kit like this Flowmaster piece. I am super satisfied with the fit and finish of the system and will be welding it up soon to ditch the clamps and lock everything in exactly where I want it. I would not hesitate to recommend this kit to anyone with a B-Body that is looking for a header back exhaust system on their car. Like I said, it was a day and change of work to have it where I wanted it and the improvement in sound and the driving experience is immeasurable. Anyone who isn't a ham fisted journalist could surely shave hours off of my time! Want to hear it? Here's some quickie cell phone video. NEXT WEEK WE'LL BE BACK WITH A DRIVESHAFT UPGRADE AND MORE!
- Introducing Project Buford T Justice – Our 1987 9C1 Chevy Caprice – The Adventure Begins!
- Project Buford T Justice: Our Cop Car Cruises Home and Then We Beat on It!
- Driveway Tech: Bodywork on Buford T Justice – We Close Our Roof Hole For Fun and (NO) Profit!
- Project Buford T Justice Hits the Strip with Some Pretty Shocking Results!
- Project Buford T Justice Hits the Dyno and Goes KABLOOEY! CARNAGE VIDEO INSIDE!
- Project Buford T Justice Will Be Saved For About A 100 Bucks With a 15 Year Old Transmission
- Project Buford T Justice Update: The Trans Thrash is ON!
- Buford T Justice Update: It Lives Again Thanks to a Down and Dirty Driveway Thrash and Junkyard Parts
- Buford T Justice, Our 1987 9C1 Chevy Caprice Goes Through Final Testing Before the Upgrades Begin!
- Buford T Justice 9C1 Update: The Parts From Hotchkis, Cragar, AFCO, and Mickey Thompson
- Update: Hotchkis Suspension & AFCO Bushings Transform Our 9C1 Caprice
- Buford Update: Our 9C1 Caprice Gets Real With Mickey Thompson Tires and Cragar Wheels
- Driveway Tech: How To Swap A Jeep Steering Shaft Into Your GM B-Body or G-Body Car With A Trashed Rag Joint
- Buford Update: We Flog The Suspension, Unveil a Mountain of Speed Parts, Spill Our Wild Drag Strip Plan
- Project Buford T Justice Update: Drag Strip Thrash Squashed By Ma Nature – We Learn Stuff – Plan B!
- Project Buford T Justice Quick Update: Where The Hell Has Our 9C1 Caprice Been?!
- Project Buford T Justice: We Go On Hot Pursuit Of Horsepower-Our 9C1 Caprice’s 350 Gets A Slap!
- Buford T Justice 9C1 Caprice Update: Metal Fab,Head Work, A Good Surprise, An Awful One
- Buford T Justice Update: Headers, Cheap LS Technology, New Valvetrain Parts, More Compression, Fun!
- Buford T Justice Update: A TCI 700R4 And Breakaway Torque Converter Get Our 9C1 Caprice Shifty!
- Buford T Justice Update: A Very Frustrating Day On The Dyno And How We’re Planning To Fix It
- Project Buford T Justice Update: Where Has Our 9C1 Caprice Been Hiding?
- Buford T Justice Update: We Install A First Gen Chevelle Flowmaster Kit On Our 9C1 Caprice!
- Project Buford T Justice: Our Caprice 9C1 Gets The Shaft! A Dynotech Drive Shaft That Is!
- Project Buford T Justice Our 1987 9C1 Caprice Hits The SCCA Autocross – Photos And Video!
- Project Buford T Justice Update: We Finally Give Our 1987 9C1 Caprice A Cheapo Nose Job!
- Project Buford T Justice Update: We Hit The Strip Again With More Power! (W/Video)
- Buford T Justice Update: We Bolt On Power From Trick Flow And Snappy Looks From Trans Dapt!
- Project Buford T Justice Update: Where The Heck It’s Been And Where The Hell It is Going –
- Place Your Bets For A BangShift Shirt! Buford T Justice Is Hitting The Dyno With This Engine One Last Time – Guess The Power And Win
- Project Buford T Justice: The Long Arm Of The Law Gets Longer With A Stroker Build – 388ci Of Budget Fun




Sounds good.
Should have put electric cutouts on and gone totally rogue!
“and started doing some math as it seemed I would be doing four arms worth of work with my standard issue two arms.” lol,
that aint no cop car sound….lol
Sounds awesome!
I’m imagining the sound of Buford idling down St. Charles Road during Lombard cruise night.
I will definitely look for the kit. Looks like it’s a lot of work but it’s worth it because it looks awesome when complete.
Now dyno it…..
Holy crap I can’t believe you guys went with flowmasters,, I swear I’m gonna have to show up and help you guys pick better parts and save money..