


- Introducing Project Buford T Justice – Our 1987 9C1 Chevy Caprice – The Adventure Begins!
- Project Buford T Justice: Our Cop Car Cruises Home and Then We Beat on It!
- Driveway Tech: Bodywork on Buford T Justice – We Close Our Roof Hole For Fun and (NO) Profit!
- Project Buford T Justice Hits the Strip with Some Pretty Shocking Results!
- Project Buford T Justice Hits the Dyno and Goes KABLOOEY! CARNAGE VIDEO INSIDE!
- Project Buford T Justice Will Be Saved For About A 100 Bucks With a 15 Year Old Transmission
- Project Buford T Justice Update: The Trans Thrash is ON!
- Buford T Justice Update: It Lives Again Thanks to a Down and Dirty Driveway Thrash and Junkyard Parts
- Buford T Justice, Our 1987 9C1 Chevy Caprice Goes Through Final Testing Before the Upgrades Begin!
- Buford T Justice 9C1 Update: The Parts From Hotchkis, Cragar, AFCO, and Mickey Thompson
- Update: Hotchkis Suspension & AFCO Bushings Transform Our 9C1 Caprice
- Buford Update: Our 9C1 Caprice Gets Real With Mickey Thompson Tires and Cragar Wheels
- Driveway Tech: How To Swap A Jeep Steering Shaft Into Your GM B-Body or G-Body Car With A Trashed Rag Joint
- Buford Update: We Flog The Suspension, Unveil a Mountain of Speed Parts, Spill Our Wild Drag Strip Plan
- Project Buford T Justice Update: Drag Strip Thrash Squashed By Ma Nature – We Learn Stuff – Plan B!
- Project Buford T Justice Quick Update: Where The Hell Has Our 9C1 Caprice Been?!
- Project Buford T Justice: We Go On Hot Pursuit Of Horsepower-Our 9C1 Caprice’s 350 Gets A Slap!
- Buford T Justice 9C1 Caprice Update: Metal Fab,Head Work, A Good Surprise, An Awful One
- Buford T Justice Update: Headers, Cheap LS Technology, New Valvetrain Parts, More Compression, Fun!
- Buford T Justice Update: A TCI 700R4 And Breakaway Torque Converter Get Our 9C1 Caprice Shifty!
- Buford T Justice Update: A Very Frustrating Day On The Dyno And How We’re Planning To Fix It
- Project Buford T Justice Update: Where Has Our 9C1 Caprice Been Hiding?
- Buford T Justice Update: We Install A First Gen Chevelle Flowmaster Kit On Our 9C1 Caprice!
- Project Buford T Justice: Our Caprice 9C1 Gets The Shaft! A Dynotech Drive Shaft That Is!
- Project Buford T Justice Our 1987 9C1 Caprice Hits The SCCA Autocross – Photos And Video!
- Project Buford T Justice Update: We Finally Give Our 1987 9C1 Caprice A Cheapo Nose Job!
- Project Buford T Justice Update: We Hit The Strip Again With More Power! (W/Video)
- Buford T Justice Update: We Bolt On Power From Trick Flow And Snappy Looks From Trans Dapt!
- Project Buford T Justice Update: Where The Heck It’s Been And Where The Hell It is Going –
- Place Your Bets For A BangShift Shirt! Buford T Justice Is Hitting The Dyno With This Engine One Last Time – Guess The Power And Win
- Project Buford T Justice: The Long Arm Of The Law Gets Longer With A Stroker Build – 388ci Of Budget Fun
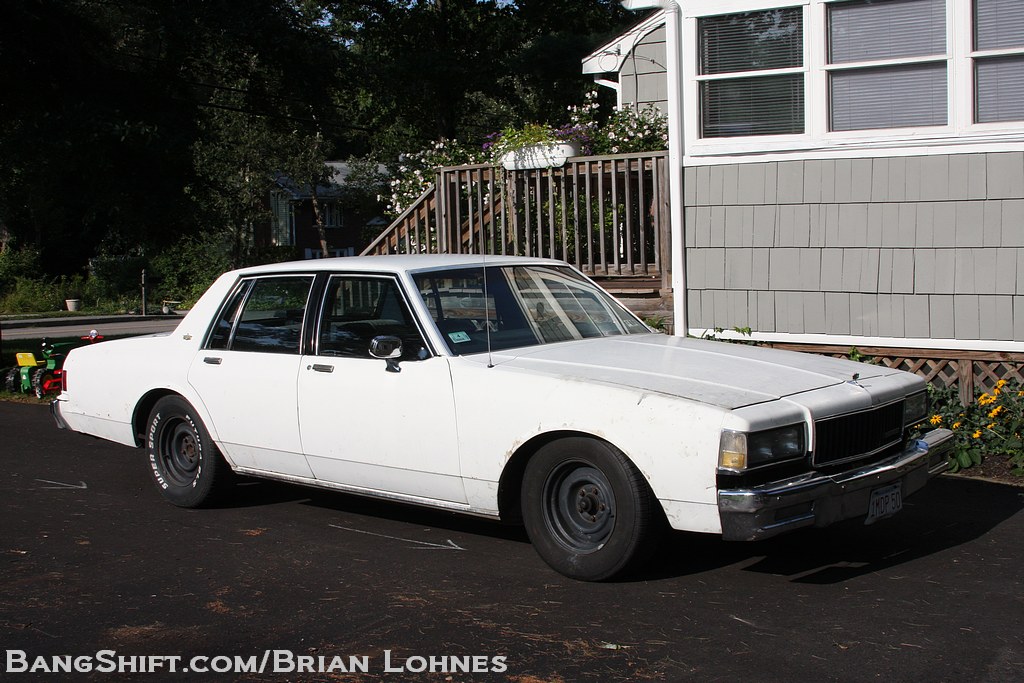
Well we can officially say that Project Buford T Justice is underway and the transformation from a sad sack, 196,000 mile ex-police vehicle into a fun to drive tire shredder is under way. Using basic tools, a whole lot of elbow grease, some help from our friends, and a pile of great parts from Hotchkis Sport Suspension and AFCO, we completely changed the driving dynamic of this 1987 Caprice. It went from a sloppy, vague, wallowing tank to a flat cornering, hard launching, non-nose diving sedan…and that’s before the installation of our Cragar Soft 8 wheels and Mickey Thompson Sport Comp tires!
We’re going to take you through the install of the suspension pieces in photos and captions below, but we wanted to give you a few notes before we get to that. If you have ever considered doing something like this to your car and you’re unsure if you could tackle the job yourself, put those doubts out of your mind. It took us a while to do the work, but that’s mostly a function of wrenching on a 25-year old car that has lived on the salt belt for the entirety of its life, the fact we spec’d out the wrong parts and had to wait for replacements, and a busy schedule in other areas of life. You know, the same type of stuff that happens to every other normal gearhead in the world.
Since installing the Hotchkis Suspension and AFCO solid bushings on the front a-arms, we’ve put about a hundred miles on the car. That would be 100 squeak free miles and 100 miles where we tried to wear the remaining traces of life right out of the junk tires that you’ll see on the car through the photos below. The next update will include the install of our new wheels and tires, aligning the car, and doing another round of slalom testing and sideways action for for your viewing pleasure.
Please read on through the photos and captions to see how we fundamentally transformed our 1987 9C1 Caprice thanks to Hotchkis and AFCO. The new stance and performance is beyond cool!

This became a pretty familiar sight to the neighbors, the Caprice up on jack stands. We started with the rear of the car because it seemed as thought that would be the easier of the two ends to do. The plan was to swap the shocks, springs, upper and lower control arms, sway bar, and bushings. It was time to attack bolts that hadn’t moved in 25 years.

One of the tools we’d highly recommend for a job like this is a pneumatic or electric impact gun. Ours happens to be an electric Kobalt unit from the local home supply center. It works good to bust crusty bolts loose as well as to simply shear the heads off of the four bolts holding the old rear sway bar in. That was easy. Good thing we had no plans to reuse any of this stuff.

With the sway bar gone, we went for the shocks next. They were old and leaky and generally shot to hell. It is a pain in the ass to get the upper shock bolts out of these cars and this one was no exception. It took a while, but we were able to bust the bolts loose, and pull the shocks.

With the shocks out of the way, the rear was able to go into full droop mode, allowing the easy removal of the old coil springs. These are going to be donated to a local B-Body club member who wants them (along with some other stuff). We used a floor jack to support the rear end to keep the flexible brake hose from being stretched to death.

We next attacked the upper rear control arms. Just note the difference in construction and strength of the Hotchkis pieces over the stock stamped pieces. An important note is to do this job one side at a time. Removing both uppers at once will allow the housing to move and do all kinds of creepy stuff. Removing one component at the time prevents this from happening.

This is by definition a physical, dirty job and this particular part of the project which is the removal and replacement of the upper control arm bushings certainly exemplifies that. In retrospect, if we had taken the time to fully remove the rear end, it would have been a quick job, but we didn’t, so it took a while. We used a drill to punch a ton of holes in the rubber bushing, allowing us to drive that center piece out and then work on crushing the bushing shell. We used a chisel and hammer to kink the bushing shell and a 3lb hammer to drive it out of the rear end housing. This job takes a while and it has to be done twice. A ball joint press can be used for this part of the operation as well. You’ll see that in a minute.

Before pressing in the new bushings, we wanted to make sure the mounting ears weren’t gouged, rusty, or otherwise junked up on the inside. We used a three stone hone and an electric drill to make things nice.

This is what we file under crude and effective.

Here’s the new bushing as provided by Hotchkis. This needs to be separated so that the bushing shell can be installed into the ear on the rear end housing.

We simply set this bushing into our small bench vise so that the corner of the vise caught the rubber and the shell was stationary. A crank or two later and the rubber center was popped free of the shell.

This photo shows how we used a ball joint press to install the new bushing shells into the rear end housing. We have heard of people using blocks of wood and big hammers, but that seemed way too butchery for even us. While it can be a pain in the ass to get the press mocked up with the pusher plate on one end and receiving cup on the other, it is worth the time. We put our electric impact on the bolt and a few pulls of the trigger later, the bushing shells were into the rear end housing. Doing this job with a hammer would most likely result in a mangled busing shell. Not good. Take the time and use this method.

After putting some grease on the rubber and pushing the center back into the bushing, installing the upper control arm is as easy as lining up the bolt holes and installing the provided hardware to the specified torque levels. Follow the directions and use your torque wrench!

Removal of the lower control arms was a pretty drama free affair. These cars had some beefy factory hardware so despite our best efforts, we didn’t have any broken bolts throughout the whole project. It took some serious leverage to get the bolts loose from these lower arms, but eventually they came free. Again, a stark difference between the factory pieces and the Hotchkis replacements.

Fully boxed construction means that there will be no more of the weird B-Body shimmy these cars have over bumps.

With the lower control arms bolted in place, it was now time to install the new rear springs. The stockers are on the right and the new Hotchkis pieces are on the left. Can you say attitude adjustment?

Installing the Hotchkis spec’d Bilstein shocks was the second to last step in the rear suspension upgrade. While not a bunch of fun to install due to the car’s layout and construction, the new hardware made bolting them in a lot easier than pulling the stock shocks out.

The last piece of the puzzle out back was the new Hotchkis rear sway bar. This is a monster unit that literally dwarfs the factory 9C1 piece. With the supplied hardware, it bolted right up to the new lower control arms. Measuring well over an inch in diameter, the hollow bar really ties the whole rear end package together.

All of our greasy hard work paid off with the completion of the rear suspension. We bolted the wheels back on and then relocated the jack and jack stands to the front of the car to begin pulling it apart…with some pretty wild results. Note the floor on the right side where the former drive shaft gave it a good whoopin’! We still need to fix that.

We knew that there would be some interesting stuff happened with this worn out front end, we just weren’t prepared for how bad it really was. Remember as you see these next photos, the car didn’t drive or ride all that bad. It wasn’t good, but it wasn’t nearly as awful as you’d think after seeing all the junked and broken stuff we pulled out. Our standards must be way low.

After we unbolted the front sway bar, the next order of business was pulling the shocks off the front. The driver’s side shock was easy because when we pulled the bottom bolts out, the damn thing literally fell out, leaving the shaft just hanging there. BTW, the oil in a 25 year old shock smells HORRID.

Front end disassembly is not rocket science, so we’re not going to bore you with a lot of it, but here was the scene when we popped the ball joints loose (with the floor jack supporting the a-arm) and got ready to strip all of the pieces off of the driver’s side.

Both of the front springs were broken, to boot. The springs were broken in the exact same place on both sides and they’ve been broken for some time as evidenced by the amount of rust in the broken area.

Both sides of the front end were stripped down to the frame. We needed the a-arms off so we could install the new AFCO bushings, ball joints, and cross shafts.

With the upper arms off of the car we were able to drill out and remove the stock bushings and then remove the stock cross shafts. We replaced them with Moog offset cross shafts which will allow us to dial more negative camber into the front end for a more performance oriented alignment.

We pulled the worn out, stock steering gear off of the car when we blew the front end apart and on a rainy day we went ahead and assembled the new pieces with the cool Hotchkis tie rod adjustment sleeves using the old stuff as a guide. We wanted to get it close enough to drive to the alignment shop with.

With new ball joints pressed into the upper and lower a-arms, the last thing to do before reassembly was to install our AFCO solid steel bushings. Why did we use these? Well, they are a budget alternative to the various polymer options on the market and lots of guys say that they are not good for the street so we wanted to test that theory. Will they require more attention with the grease gun? Sure. Are they far less expensive than other options that resist deflection? Hell yes.

With the bushings pressed in with help from pal Mike Casella, we wanted to make sure that they’d stay put so we hauled down to Tube Chassis Designz and had the boys zap them with the Tig welder.

This would have been booger central if we did it.

Re-Installing the a-arms was a reverse of the removal process. No real magic here. On the upper arms, we put a little pre-load on the bushing and added blue Loctite to secure the nuts on the cross shaft ends.

The front springs from Hotchkis versus the stockers. Don’t skip down to the stance photos! No cheating. We used the old fashioned method of using a floor jack and a couple of bars to get the new springs in. No spring compressor used, although that probably would have been faster and safer.

The front shocks and sway bar were the last two pieces to be installed.

New end links, bushings, and hardware were all provided. The front bar is as big and maybe bigger than the rear. This thing is tied down!

Here’s the new stance after about 50 miles of driving on the new suspension pieces. The car is looking good and driving better. We can’t wait to run it through the cones again with the new Mickey Thompson rubber and to complete the tough guy look with the Cragar Soft 8 wheels!

Buford has attitude now!
- Introducing Project Buford T Justice – Our 1987 9C1 Chevy Caprice – The Adventure Begins!
- Project Buford T Justice: Our Cop Car Cruises Home and Then We Beat on It!
- Driveway Tech: Bodywork on Buford T Justice – We Close Our Roof Hole For Fun and (NO) Profit!
- Project Buford T Justice Hits the Strip with Some Pretty Shocking Results!
- Project Buford T Justice Hits the Dyno and Goes KABLOOEY! CARNAGE VIDEO INSIDE!
- Project Buford T Justice Will Be Saved For About A 100 Bucks With a 15 Year Old Transmission
- Project Buford T Justice Update: The Trans Thrash is ON!
- Buford T Justice Update: It Lives Again Thanks to a Down and Dirty Driveway Thrash and Junkyard Parts
- Buford T Justice, Our 1987 9C1 Chevy Caprice Goes Through Final Testing Before the Upgrades Begin!
- Buford T Justice 9C1 Update: The Parts From Hotchkis, Cragar, AFCO, and Mickey Thompson
- Update: Hotchkis Suspension & AFCO Bushings Transform Our 9C1 Caprice
- Buford Update: Our 9C1 Caprice Gets Real With Mickey Thompson Tires and Cragar Wheels
- Driveway Tech: How To Swap A Jeep Steering Shaft Into Your GM B-Body or G-Body Car With A Trashed Rag Joint
- Buford Update: We Flog The Suspension, Unveil a Mountain of Speed Parts, Spill Our Wild Drag Strip Plan
- Project Buford T Justice Update: Drag Strip Thrash Squashed By Ma Nature – We Learn Stuff – Plan B!
- Project Buford T Justice Quick Update: Where The Hell Has Our 9C1 Caprice Been?!
- Project Buford T Justice: We Go On Hot Pursuit Of Horsepower-Our 9C1 Caprice’s 350 Gets A Slap!
- Buford T Justice 9C1 Caprice Update: Metal Fab,Head Work, A Good Surprise, An Awful One
- Buford T Justice Update: Headers, Cheap LS Technology, New Valvetrain Parts, More Compression, Fun!
- Buford T Justice Update: A TCI 700R4 And Breakaway Torque Converter Get Our 9C1 Caprice Shifty!
- Buford T Justice Update: A Very Frustrating Day On The Dyno And How We’re Planning To Fix It
- Project Buford T Justice Update: Where Has Our 9C1 Caprice Been Hiding?
- Buford T Justice Update: We Install A First Gen Chevelle Flowmaster Kit On Our 9C1 Caprice!
- Project Buford T Justice: Our Caprice 9C1 Gets The Shaft! A Dynotech Drive Shaft That Is!
- Project Buford T Justice Our 1987 9C1 Caprice Hits The SCCA Autocross – Photos And Video!
- Project Buford T Justice Update: We Finally Give Our 1987 9C1 Caprice A Cheapo Nose Job!
- Project Buford T Justice Update: We Hit The Strip Again With More Power! (W/Video)
- Buford T Justice Update: We Bolt On Power From Trick Flow And Snappy Looks From Trans Dapt!
- Project Buford T Justice Update: Where The Heck It’s Been And Where The Hell It is Going –
- Place Your Bets For A BangShift Shirt! Buford T Justice Is Hitting The Dyno With This Engine One Last Time – Guess The Power And Win
- Project Buford T Justice: The Long Arm Of The Law Gets Longer With A Stroker Build – 388ci Of Budget Fun


I use OEM tools spring compressor on the fronts many times. They are part of Autozones rental tool line. They work great and have stripped the threads.
Too bad we are on opposite coasts. It would be fun to have B body showdown, old vs older.
Looking forward to seeing the next step hopefully before it starts snowing up there!!! Wheels and tires always hide a lot of sins!!!!
I like how you didn’t even bother to knock the dirt off the old pieces you reused. Got an image to uphold here!